
WireGuard VPN

About WireGuard:
- WireGuard is a modern VPN protocol that creates a highly secure and encrypted tunnel between devices over the internet, allowing safe communication as if both devices are on the same private network.
- It uses advanced cryptographic techniques like ChaCha20 for encryption and Curve25519 for key exchange, ensuring strong protection against hacking, data interception, and unauthorized access.
- Compared to traditional VPN technologies such as OpenVPN and IPsec, WireGuard is much faster, more lightweight, and consumes fewer system resources while still maintaining high-level security.
- It works on a simple key-based system where each device has a private key and a public key, and connections are established only after verifying these keys between peers.
- WireGuard is widely used for remote office access, secure browsing on public Wi-Fi, cloud server connectivity, and personal privacy protection across different devices and operating systems.
History of WireGuard:
- WireGuard was created in 2015 by a security researcher and developer named Jason A. Donenfeld. He designed it as a simple, fast, and modern alternative to complex VPN protocols like IPsec and OpenVPN.
- The project was initially developed for the Linux kernel, focusing on making VPN technology easier to use while improving performance and security at the same time.
- In the early stages, WireGuard was not yet included in the official Linux kernel. It was distributed as an external module and continuously improved by open-source contributors.
- Due to its strong design, simplicity, and cryptographic security, WireGuard quickly gained popularity in the networking and cybersecurity community.
- In 2019, WireGuard was officially accepted into the Linux kernel mainline (version 5.6), which was a major milestone in its development history.
- After kernel integration, WireGuard adoption increased rapidly, and it began to be used in many VPN services, cloud platforms, and enterprise networks.
- Today, WireGuard is considered one of the most modern and efficient VPN protocols, widely supported across Linux, Windows, macOS, Android, iOS, and networking devices like routers.
1. What is WireGuard
- WireGuard is a modern VPN (Virtual Private Network) protocol used to create a secure and encrypted connection between devices over the internet. It helps protect your data while you browse, work remotely, or connect to private networks.
- WireGuard is a modern VPN protocol designed to create a secure and fast encrypted tunnel between two devices over the internet. It is widely used in networking because it is simple, efficient, and much faster than traditional VPN technologies.
2. Main Purpose:
The main purpose of WireGuard is to allow two or more devices to communicate securely as if they are on the same private network. It hides your real network traffic from hackers, ISP tracking, or public Wi-Fi threats by encrypting all data.
3. Why WireGuard is Important:
In today’s internet environment, data security is very important. WireGuard helps protect your data from hackers, ISP tracking, and public Wi-Fi threats by encrypting all traffic. It makes your connection private even when you are using an open or unsafe network.
4. How it Works:
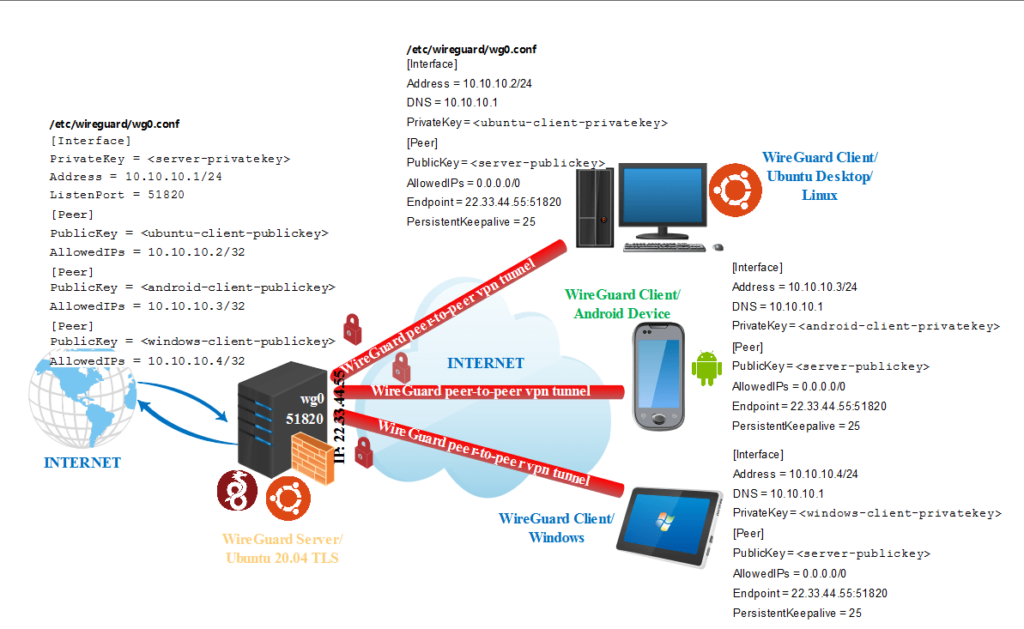
WireGuard works by using a system of cryptographic keys. Each device has a private key (kept secret) and a public key (shared with others). When two devices connect, they exchange public keys and create a secure encrypted tunnel through which all data is sent safely.
Working Concept:
WireGuard works using a peer-to-peer model. Each device acts as a peer and communicates using cryptographic keys. When a connection starts, both devices verify each other using public keys and then build a secure encrypted tunnel for data transfer.
5. Advantages of WireGuard:
WireGuard is faster and simpler compared to older VPN protocols like OpenVPN and IPsec. It has a very small codebase, which makes it easier to audit and more secure. It also provides high-speed performance, low latency, and is easy to configure.
Performance and Speed:
One of the biggest advantages of WireGuard is its high speed and low latency. It is designed inside the Linux kernel, which allows it to process data very efficiently. Because of its lightweight design, it uses less CPU compared to OpenVPN or IPsec.
6. Security Features:
WireGuard uses modern encryption methods such as ChaCha20 for encryption and Curve25519 for key exchange. These strong cryptographic standards ensure that data remains protected from interception or modification.
7. Use Cases:
WireGuard is commonly used in remote work setups, server management, cloud networking, and personal VPN services. For example, it allows you to securely access your home computer from anywhere in the world or connect office employees to a company network.
8. Configuration Simplicity:
WireGuard is very easy to configure compared to older VPN systems. It uses a small configuration file where only essential details like private key, public key, IP address, and endpoint are required. This reduces errors and setup time.
9. Overall Benefit:
Overall, WireGuard is a modern replacement for traditional VPN protocols. It offers a perfect balance of speed, security, and simplicity, making it one of the most preferred VPN technologies today.
History of WireGuard in Details
1. Origin of WireGuard:
WireGuard was created in 2015 by security researcher Jason A. Donenfeld. He designed it to be a modern VPN protocol that is simpler, faster, and more secure than older systems like OpenVPN and IPsec.
2. Early Development:
In the beginning, WireGuard was developed mainly for the Linux operating system. It started as an experimental project focused on reducing complexity while improving VPN performance and security.
3. Open Source Growth:
As an open-source project, WireGuard quickly attracted attention from developers and security experts. Many contributors helped improve its code, making it more stable, efficient, and suitable for real-world networking use.
4. Kernel Integration:
A major milestone came in 2020 (Linux kernel 5.6) when WireGuard was officially included in the Linux kernel. This made it a built-in VPN feature for Linux systems, improving performance and reliability.
5. Rapid Adoption:
After kernel integration, WireGuard became widely adopted by VPN providers, cloud services, and enterprise networks. Its speed, simplicity, and strong encryption made it a preferred choice over older VPN protocols.
6. Modern Use Today:
Today, WireGuard is used globally in personal VPNs, business networks, servers, and routers. It is supported on Windows, Linux, macOS, Android, iOS, and networking devices like MikroTik, making it one of the most popular VPN technologies.
MikroTik WireGuard Server + Windows Client Configuration
VPN (Virtual Private Network) is one of the most popular services in MikroTik RouterOS. A lot of VPN services (IPsec, EoIP, OpenVPN, PPTP, L2TP, IPIP etc.) are available in MikroTik RouterOS but in RouterOS7, a new VPN service named WireGuard has been introduced which is extremely simple yet first, secure and modern VPN. WireGuard uses cryptography to make it secure
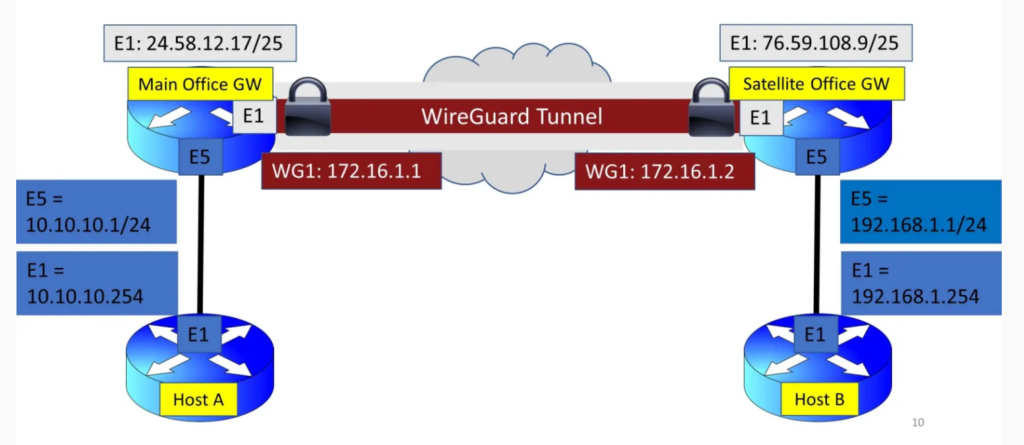
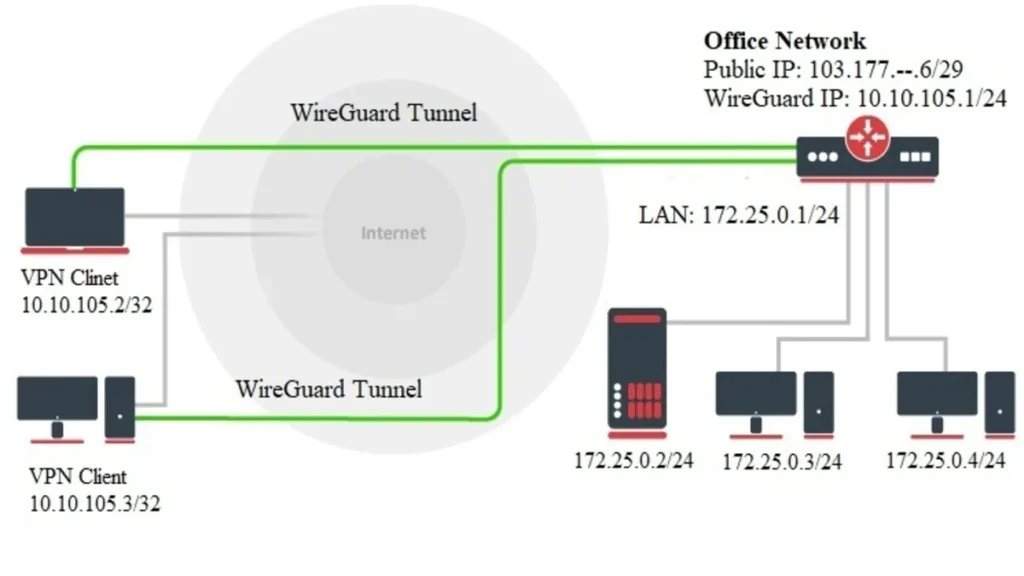
- In RouterOS7, WireGuard can be used either Client-Server (Road Warrior) VPN tunnel or site to site VPN tunnel. Using Client-Server WireGuard VPN tunnel, a Windows, Mac, Linux, iOS or Android user can be connected to his remote network and can access servers and other network devices as if he/she has be seated in that network. On the other hand, using site to site WireGuard VPN tunnel, two remote offices can always be connected across public network and can comminate with each other over this VPN tunnel.
- I will discuss how to configure Road Warrior WireGuard VPN tunnel in MikroTik RouterOS7 and then I will also discuss how to configure WireGuard Client in Window 10/11.
WireGuard Configuration in MikroTik RouterOS 7 (Road Warrior)
To configure Client-Server WireGuard VPN tunnel with Windows client, we will follow the following network diagram.
- Login to MikroTik RouterOS using Winbox with full access user permission.
- From menu item, click on WireGuard. WireGuard window will appear.
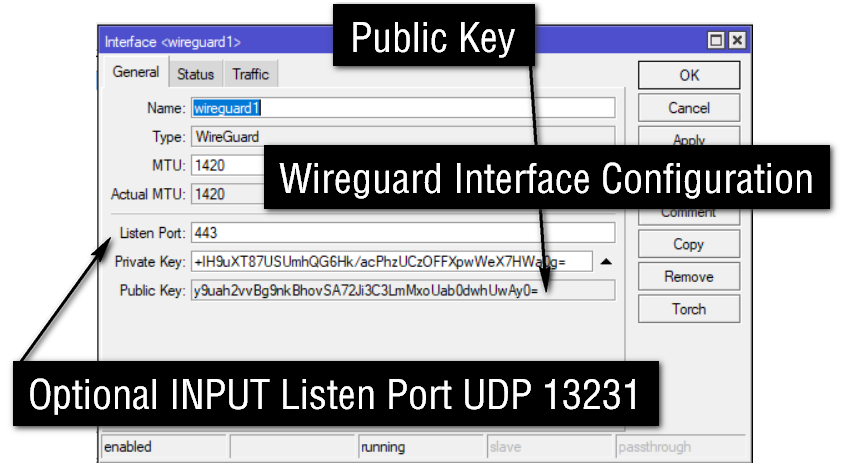
- Click on PLUS SIGN(+) to create a new WireGuard interface. New Interface window will appear.
- Put an interface name in Name input field or you can keep the default name wireguard1.
- In Listen Port input field, put 443 because we want to use 443 port which is usually not blocked. In MikroTik RouterOS7, the default WireGuard Listen Port is 13231. WireGuard works on UDP protocol because UDP is faster. On the other hand, TCP packets follow over TCP VPN tunnel makes performance issue. So, TCP is not used in WireGuard VPN tunnel.
- Click Apply button. Public Key and Private Key will be generated as soon as you click the Apply button. The Public Key will be required when WireGuard client will be configured.
- Click OK button.
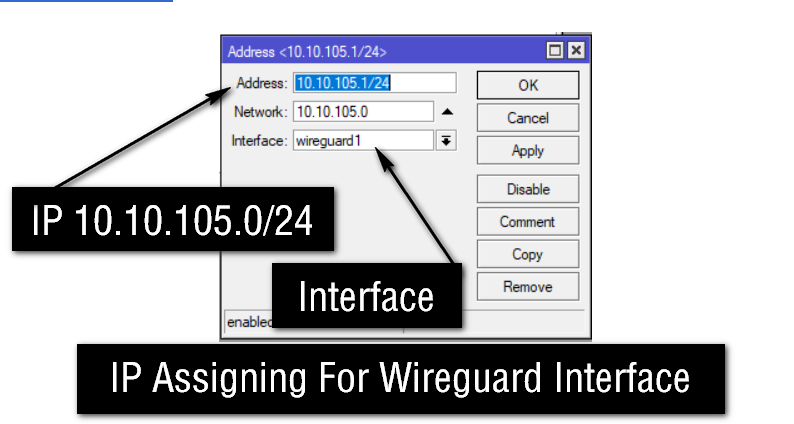
WireGuard VPN service is now enabled in MikroTik RouterOS7. Now we will assign IP address on newly created WireGuard interface. To assign IP address on WireGuard Interface, issue the following steps.
- From Winbox, go to IP > Addresses menu item. Address List window will appear.
- Click PLUS SIGN (+). New Address window will appear.
- In Address input field, put an IP address which you want. According to the network diagram, I am assigning 10.10.105.1/24. WireGuard clients will get IP address from this IP block.
- From Interface dropdown menu, choose the created WireGuard interface (wireguard1).
- Click Apply and OK button.
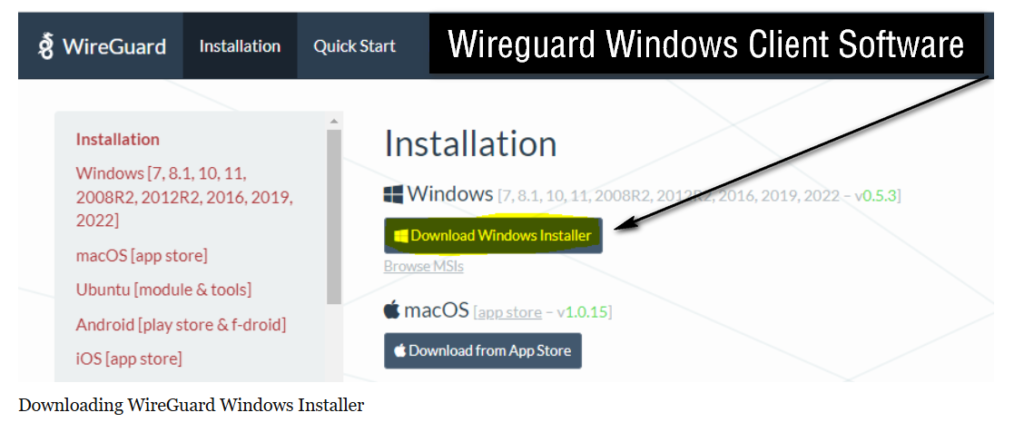
Downloading and Installing WireGuard in Windows:
As we are going to connect Windows OS to WireGuard VPN Server, we need to download and install WireGuard’s Windows application from WireGuard’s website. So, go to WireGuard installation page and download the installer for Windows Operating System. At the time of writing this article, the installation page of WireGuard looks like the following image.
Installing WireGuard Windows installer is as simple as installing other Windows applications. So, download the Windows installer and make a double click on it. The WireGuard installer will do the rest of the work for you. After installing WireGuard in your Windows Operating System, it will start WireGuard service and open a new WireGuard window like the following image where it will ask to provide configuration either manually or importing any configuration file.
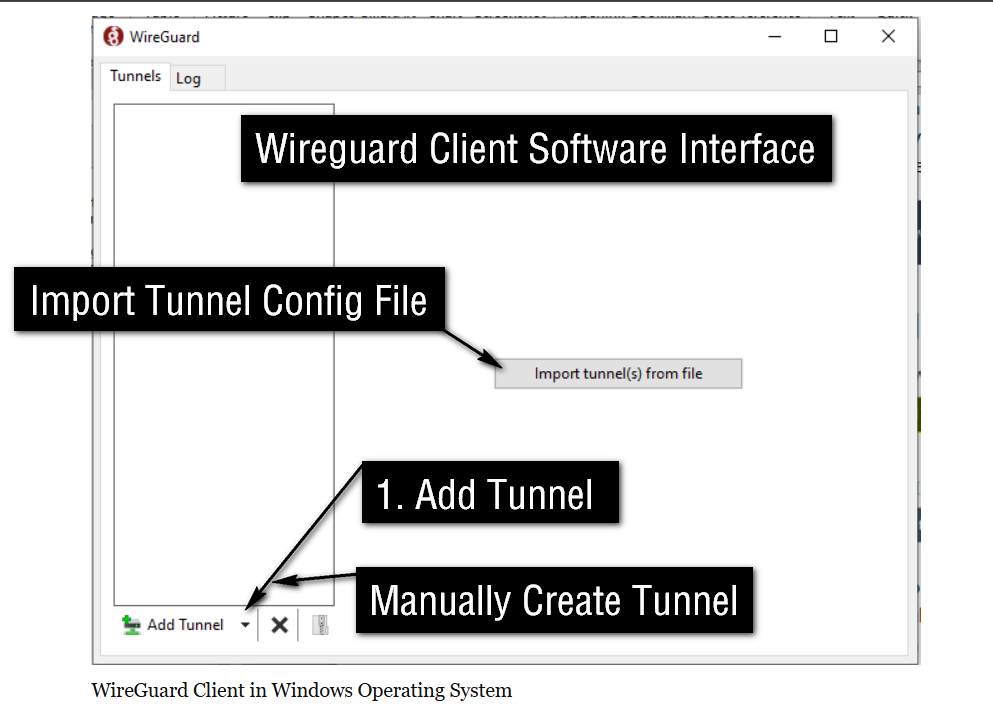
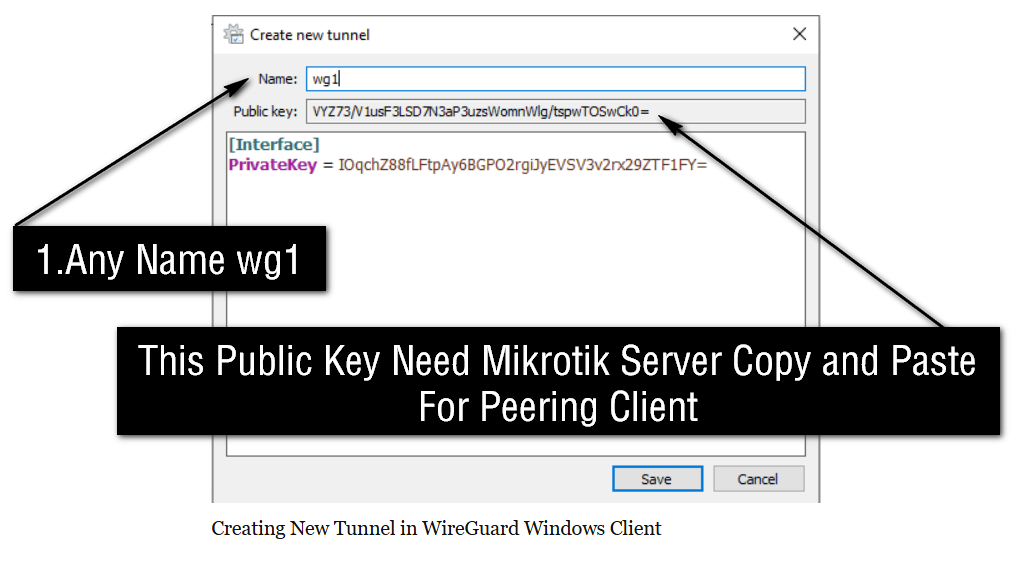
We will configure WireGuard tunnel here manually because MikroTik RouterOS does not provide any configuration file. So, from this window, click on Add Tunnel dropdown menu and then choose Add empty tunnel… option. Create new tunnel window will appear where we will provide all the options required to create WireGuard Tunnel
In Create new tunnel window, put a name (example: wg1) for the tunnel in Name input field and then click Save button. You will also find generated Public Key and Private Key in this window. Among these two keys, the Public Key will be required to configure peer between WireGuard Server and Client.
Creating Peer Between WireGurad Server and Client:
To create a VPN tunnel between Windows client and the RouterOS WireGuard Server, we need to configure WireGuard Peer. So, at first, we will configure peer in MikroTik RouterOS and then we will configure peer in WireGuard Windows client.
To configure WireGuard peer in MikroTik RouterOS, follow the following steps.
- From WireGuard window, click on Peers tab and then click on PLUS SIGN (+). New WireGuard Peer window will appear.
- In New WireGuard Peer window, choose WireGuard interface (wiregurad1) from Interface dropdown menu.
- In Public Key input field, put the public key generated by the Windows client (with whom it will make peer).
- In Allowed Address field, put the IP address (10.10.105.3/32) that will be assigned to the WireGuard Client.
- Click Apply and OK button.
Peer configuration in MikroTik RouterOS has been completed. Now we will configure WireGuard Peer in Windows Client.
- Open WireGuard client in Windows OS and select the WireGuard interface that was created before and then click on Edit button.
- In Interface configuration, add two more properties (Address = 10.10.105.3/32 and DNS = 8.8.8.8). These two values will be assigned the WireGuard virtual interface. Change the IP values according to your network configuration.
- Now add a new option named [Peer] and add these properties (PublicKey = y9uah2vvBg9nkBhovSA72Ji3C3LmMxoUab0dwhUwAy0= AllowedIPs = 0.0.0.0/0 Endpoint = 103.177.246.6:443 PersistentKeepalive = 10). Here, the Public Key is the Public Key of the RouterOS WireGuard, AllowedIPs will be the IPs those can access this client and by default it is 0.0.0.0/0 that means it can access any IP, the Endpoint property is very important and it will be the IP of the MikroTik RouterOS where WireGuard Server is enabled and the Port number, the PersistentKeepalive property keeps the tunnel active by checking the status of the tunnel every assigned time (seconds).
- Click the Save button to save the configuration.
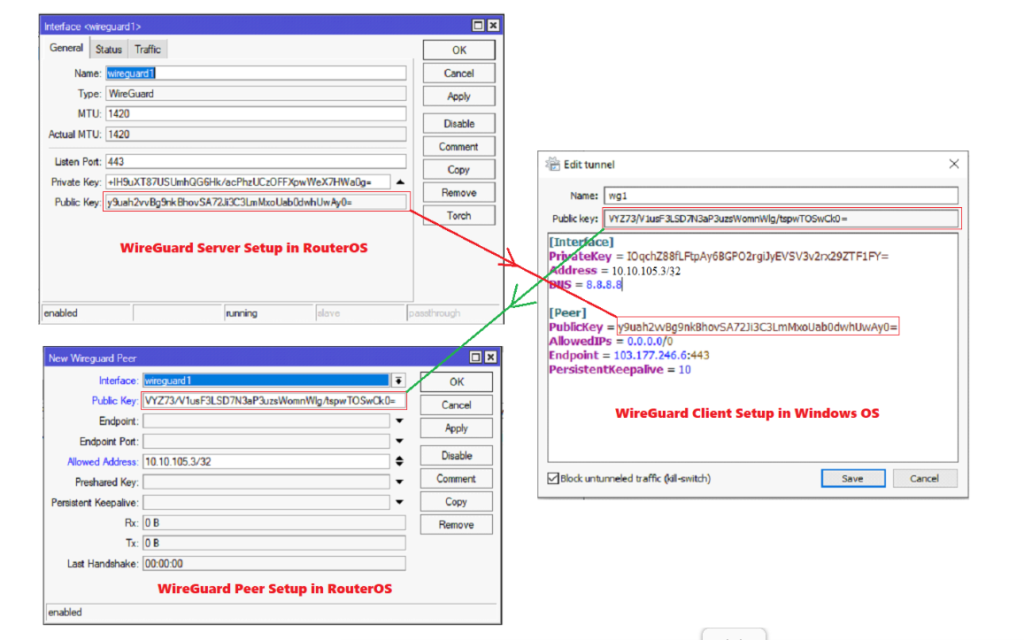
WireGuard Peer Configuration between RouterOS and Windows Client App
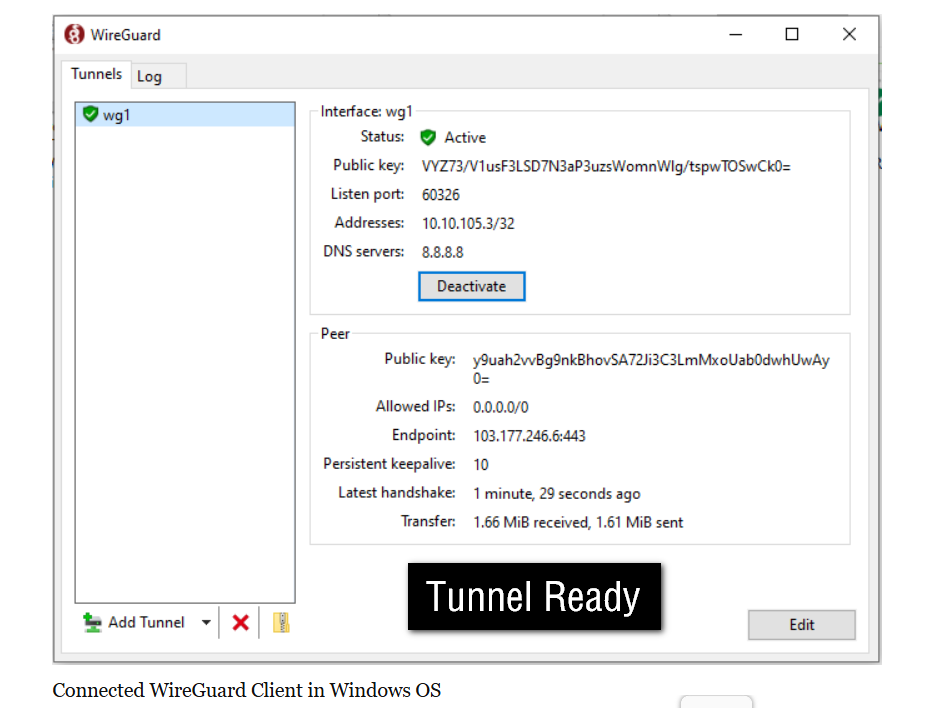
Peer configuration between the WireGuard Server and Client has been completed. Now click the Activate button from the WireGuard client. If everything is OK, the tunnel will be created and you can access your remote servers and other network devices without any issue and the client window looks like the following image.
					Network Example
...............
MikroTik LAN: 192.168.1.0/24
WireGuard Network: 10.10.10.0/24
MikroTik WG IP: 10.10.10.1
Windows WG IP: 10.10.10.2


MikroTik WireGuard Interface
............................
Interfaces → WireGuard → +
/interface wireguard
add name=wg1 listen-port=51820


WireGuard Interface-এ IP Assign
...............................
/ip address
add address=10.10.10.1/24 interface=wg1


Assign IP
.........
/ip firewall filter
add chain=input protocol=udp dst-port=51820 action=accept comment="WireGuard"


Windows WireGuard Client
........................
Install:

WireGuard Official Website

Open WireGuard → Add Empty Tunnel

A Public Key and Private Key will be generated automatically.

Copy the Windows Public Key.


Add Windows Peer on MikroTik
............................
/interface wireguard peers
add interface=wg1 \
public-key="WINDOWS_PUBLIC_KEY" \
allowed-address=10.10.10.2/32


Windows Client Configuration
............................
[Interface]
PrivateKey = Windows_Private_Key
Address = 10.10.10.2/24
DNS = 8.8.8.8

[Peer]
PublicKey = MikroTik_Public_Key
Endpoint = YOUR_PUBLIC_IP:51820
AllowedIPs = 192.168.1.0/24,10.10.10.0/24
PersistentKeepalive = 25

For full-tunnel internet through MikroTik:
AllowedIPs = 0.0.0.0/0


Allow Access to LAN
...................
/ip firewall filter
add chain=forward src-address=10.10.10.0/24 action=accept


Add NAT for Client internet Access
..................................
/ip firewall nat
add chain=srcnat src-address=10.10.10.0/24 out-interface-list=WAN action=masquerade


Allow WireGuard Remote Clients to Access LAN and VLANs
......................................................
WireGuard Network: 10.10.10.0/24
LAN: 192.168.1.0/24
VLAN10: 192.168.10.0/24
VLAN20: 192.168.20.0/24

Allow Access to All LAN/VLAN Networks
.....................................

/ip firewall filter
add chain=forward src-address=10.10.10.0/24 action=accept comment="WireGuard to LAN/VLAN"


VLAN10
......
/ip firewall filter
add chain=forward src-address=10.10.10.0/24 dst-address=192.168.10.0/24 action=accept comment="WG to VLAN10"


VLAN20
......
/ip firewall filter
add chain=forward src-address=10.10.10.0/24 dst-address=192.168.20.0/24 action=accept comment="WG to VLAN20"


WireGuard Peer Configuration
............................
/interface wireguard peers
add interface=wg1 public-key="CLIENT_PUBLIC_KEY" allowed-address=10.10.10.2/32

Windows Client Configuration
............................
AllowedIPs = 192.168.1.0/24,192.168.10.0/24,192.168.20.0/24
Or for full tunnel:
AllowedIPs = 0.0.0.0/0
Site to Site WireGuard VPN Network With Mikrotik Router
Site to Site WireGuard VPN Network Diagram:
We are going to implement a site-to-site VPN like the following image where two offices are connected over WireGuard site to site VPN service.
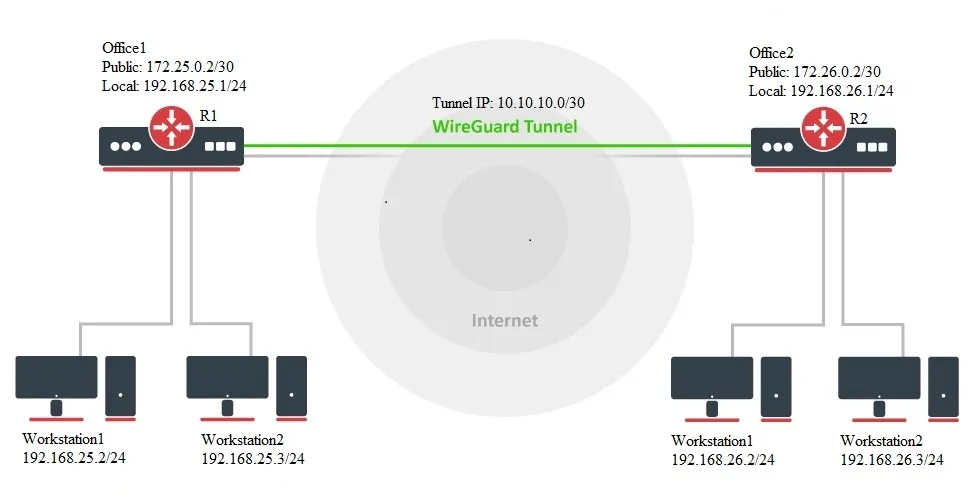
Note: in the above diagram, we are using private IP addresses in public interface for demo purpose. In live network, you should replace these IP Addresses with your public IP Addresses
Site to Site WireGuard VPN Configuration in RouterOS 7:
According to the above network diagram, we will now configure site to site WireGuard VPN in MikroTik RouterOS. But before going to start WireGuard VPN, you should have RouterOS 7 basic configuration which includes WAN, LAN, DNS, Gateway and Masquerade setup.
If you have existing network and RouterOS 7 is running there, don’t forget to replace my demo IP information according to your existing one. You just follow my steps keeping your existing IP information.
Networking Equipment:
We will now do configurations those are required for WireGuard configuration. For WireGuard configuration we need to do enabling WireGuard, Creating Peers, assigning IP address in WireGuard virtual interface and doing routing over virtual interface to communicate among LAN devices.
Enabling WireGuard in MikroTik RouterOS:
WireGuard package is installed by default in MikroTik RouterOS 7. So, you will get a WireGuard menu item in Winbox by default. To enable WireGuard in R1 Router, do the following steps.
- Login to R1 Router of Office 1 with Winbox using full access user credentials.
- Click on WireGuard menu item from Winbox menu bar. WireGuard window will appear.
- Click on PLUS SIGN (+) to create a new WireGuard interface. New Interface window will appear.
- Put an interface name in Name input field or you can keep the default name wireguard1.
- Click Apply button. Public Key and Private Key will be generated as soon as you click the Apply button. The Public Key will be required when WireGuard Peer will be created in R2 Router (Office 2 Router).
- Click OK button.
Similarly, enable WireGuard in R2 Router of Office 2 Router and create a new WireGuard interface. Your configurations will look like the following image.
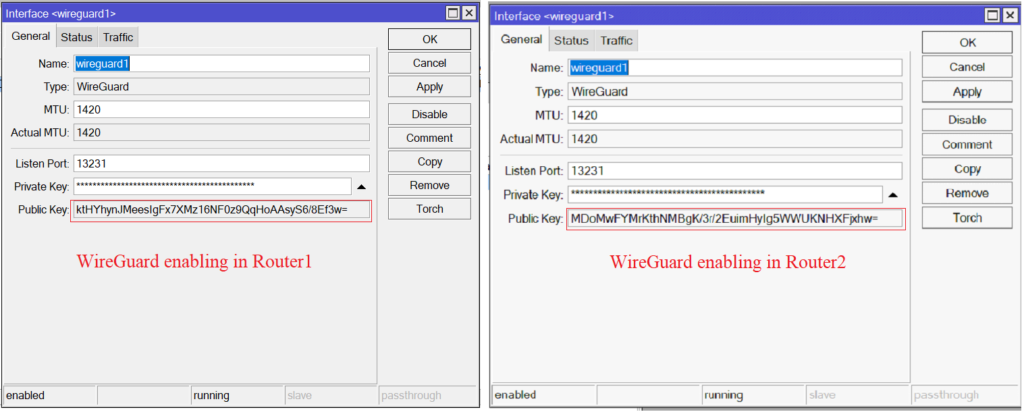
Assigning IP Address on WireGuard Virtual Interface:
After enabling WireGuard in RouterOS 7, a new virtual interface will be created in each Router. We will now assign IP address in each WireGuard interface so that both interfaces can communicate with each other after establishing WireGuard tunnel.
To assign IP address on WireGuard virtual interface in R1 Router, issue the following steps.
- From Winbox, go to IP > Addresses menu item. Address List window will appear.
- Click on PLUS SIGN (+) to add new address. New Address window will appear.
- Put an IP address (in this article: 10.10.10.1/30) that you to assign for WireGuard VPN tunnel in Address input field.
- Choose WireGuard interface (in this article: wireguard1) from Interface dropdown menu.
- Click Apply and OK button.
Similarly, add the second IP address on the WireGuard virtual interface of R2 Router at office 2. According to the above diagram, the second router’s IP will be 10.10.10.2/30.
Creating WireGuard Peers Between Two RouterOS:
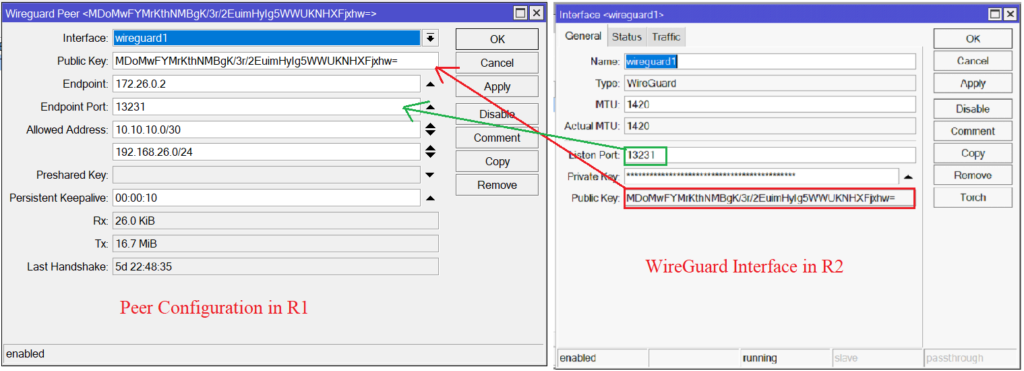
After assigning IP addresses on WireGuard virtual interface, we will now configure peers in both Routers. To create peers in R1 Router of office1, issue the following steps.
- From Winbox, click on WireGuard menu item and then click on Peers tab.
- Click on PLUS SIGN (+). New WireGuard Peer window will appear.
- Choose WireGuard interface (wireguard1) from Interface dropdown menu.
- Put the Public Key that was generated at R2 Router when WireGuard was enabled, in Public Key input field.
- Put the Public IP address (For demo purpose, in this article: 172.26.0.2) of R2 Router in Endpoint input field.
- If you don’t change the port number (default is 13231), no need to change the Endpoint Port but if you change, put the listen port of R1 Router in Endpoint Port input field.
- Put the IP blocks (in this article: 10.10.10.0/30 for tunnel interface and 192.168.26.0/24 LAN IP Block of R2 Router) those will be passed over WireGuard VPN Tunnel in Allowed Address input field. If you want to allow all IP addresses, put 0.0.0.0/0 in this field.
- In Persistent Keepalive input, put a time value in seconds (for 10 second: 00:00:10) when the tunnel will be checked and keep lived.
- Click Apply and OK button.
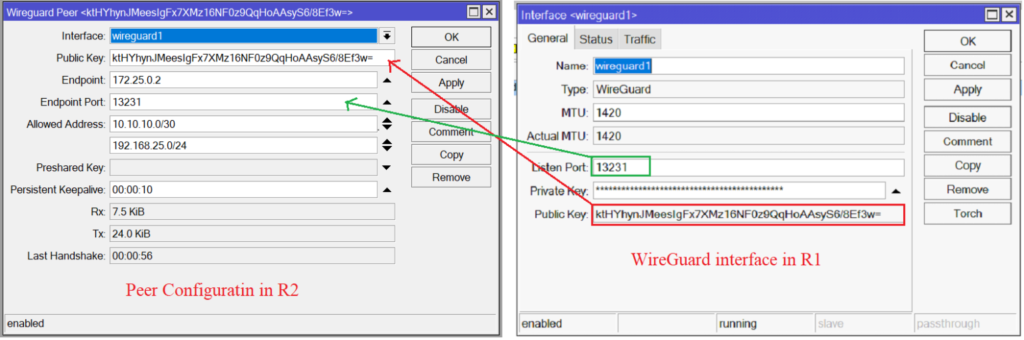
Similarly, create peer in R2 Router and information accordingly. Be careful to put Public Key, Endpoint and Endpoint Port of R1 Router. Also be careful to put IP block of R2 Router’s LAN block. The configuration should be like the following image.
Static Routing Configuration Between RouterOS:
At the last step of site-to-site WireGuard VPN configuration, we will configure static routing between R1 and R2 Router so that R1 Router’s LAN can access R2 Router’s LAN and vice versa
To configure static routing in R1 Router, do the following steps.
- From Winbox, go to IP > Routes menu item. Route List window will appear.
- Click PLUS SIGN (+) to add new route. New Route window will appear.
- In Dst. Address input field, put the LAN IP block (in this article: 192.168.26.0/24) of R2 Router.
- Put the IP address (10.10.10.2) assigned on WireGuard interface of R2 Router in Gateway input field.
- Click Apply and OK button.
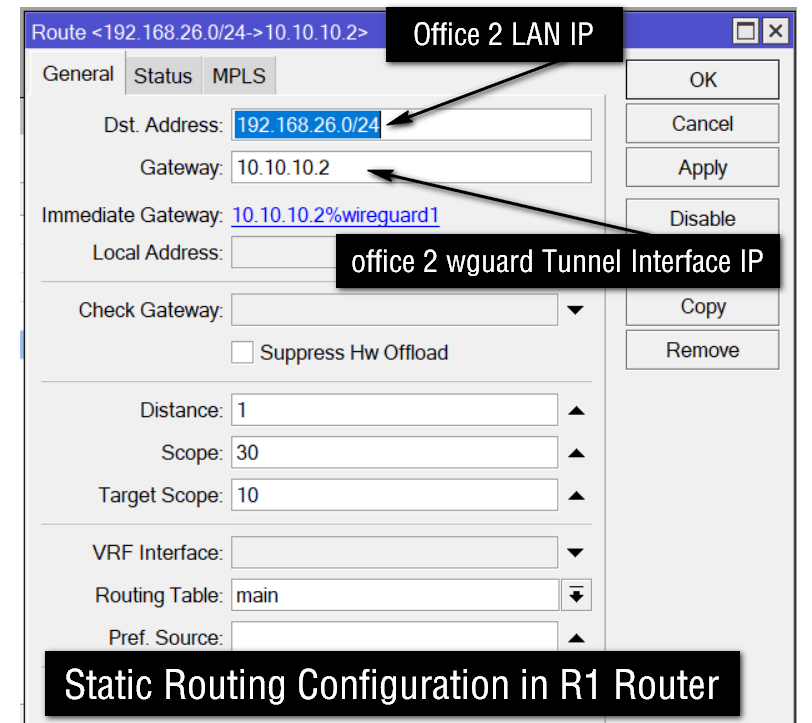
Similarly, configure static routing in R2 Router and put the LAN IP block (in this article: 192.168.25.0/24) of R1 Router and WireGuard interface IP address (10.10.10.1) of R1 Router.