
OSPF Commnds
Check OSPF configuration, status, and neighbors on Cisco routers
show ip ospf neighbor
Displays OSPF neighbors and their current state, including IP addresses, interface, state, and area.
Show OSPF Interface
show ip ospf interface
Shows detailed information about OSPF-enabled interfaces, including IP addresses, area, state, and OSPF configuration
show ip ospf database
Show OSPF Database
Displays the OSPF link-state database, which includes information about OSPF routes and network topology
Show OSPF Route Summary
show ip ospf summary
Provides a summary of OSPF routing information, including area, network type, number of areas, and OSPF process ID.
show ip ospf virtual-links
Displays information about OSPF virtual links, including endpoints, state, area, and authentication status
Show OSPF Border Routers
show ip ospf border-routers
Displays OSPF border routers in the network, including router ID, interface, and state
show ip ospf events
What is SPF in OSPF
SPF (Shortest Path First) is the algorithm used by OSPF to calculate the best path to all networks. It is based on the Dijkstra algorithm. Whenever there is a topology change (link up/down), OSPF runs SPF to recalculate routes.
Check SPF Statistics
The command show ip ospf statistics gives detailed information about SPF calculations, including:
- SPF run count
- LSA processing
- Timing details
show ip ospf statistics
1. Basic OSPF Information
The command show ip ospf is used to display general information about the OSPF process running on the router. It shows details like process ID, router ID, number of areas, SPF calculations, and timers. This command helps you verify whether OSPF is running correctly on the device.
2. OSPF Neighbor Information
The command show ip ospf neighbor displays all OSPF neighbors and their states (Full, 2-Way, Init, etc.). It also shows the DR (Designated Router) and BDR (Backup Designated Router). This is one of the most important commands to check OSPF adjacency.
3. OSPF Interface Details
The command show ip ospf interface shows OSPF configuration on each interface. It includes area ID, cost, hello/dead timers, network type, and DR/BDR election details. This is useful for troubleshooting interface-level issues.
4. OSPF Interface Brief
The command show ip ospf interface brief gives a short summary of all OSPF-enabled interfaces. It shows interface name, area, IP address, and state in a compact format.
5. OSPF Database (LSDB)
The command show ip ospf database displays the Link-State Database (LSDB). It contains all LSAs (Link-State Advertisements) learned by the router. This is useful for deep troubleshooting and understanding OSPF topology.
6. OSPF Routes in Routing Table
The command show ip route ospf shows only OSPF-learned routes from the routing table. These routes are marked with “O”. It helps verify if routes are being learned correctly.
7. OSPF Border Router Information
The command show ip ospf border-routers displays information about ABR (Area Border Routers) and ASBR (Autonomous System Boundary Routers) in the network.
8. OSPF Virtual Links
The command show ip ospf virtual-links shows the status of configured OSPF virtual links. It is useful in multi-area OSPF designs.
9. OSPF Traffic Statistics
The command show ip ospf traffic provides statistics about OSPF packets such as Hello, LS Update, LS Request, and LS Acknowledgment packets sent and received.
10. OSPF Summary Information
The command show ip ospf summary displays summarized route information, mainly useful when route summarization is configured.
11. OSPF Neighbor Detail
The command show ip ospf neighbor detail gives detailed information about each neighbor including timers, state transitions, and retransmissions.
12. Check OSPF Configuration
The command show running-config | section ospf displays only the OSPF-related configuration from the running config.
13. OSPF Database by LSA Type
Commands like:
					show ip ospf database router
show ip ospf database network
show ip ospf database summary
show ip ospf database external
1. Enable OSPF on Interface
The command ip ospf <process-id> area <area-id> is used to enable OSPF directly on an interface. Instead of using the network command in router configuration mode, this method activates OSPF only on that interface.
					interface g0/0
 ip ospf 1 area 0
2. Set OSPF Cost
The command ip ospf cost <value> is used to manually set the OSPF cost (metric) of an interface. Lower cost is preferred for route selection.
					interface g0/0
 ip ospf cost 10
3. Configure Hello Timer
The command ip ospf hello-interval <seconds> sets how often OSPF Hello packets are sent on the interface. Default is 10 seconds (broadcast networks).
					interface g0/0
 ip ospf hello-interval 5
4. Configure Dead Timer
The command ip ospf dead-interval <seconds> defines how long a router waits before declaring a neighbor down. Default is 40 seconds.
					interface g0/0
 ip ospf dead-interval 20
5. Set OSPF Network Type
The command ip ospf network <type> defines the OSPF network type for the interface.
- broadcast
- non-broadcast
- point-to-point
- point-to-multipoint
					interface g0/0
 ip ospf network point-to-point
6. Configure OSPF Priority (DR/BDR Election)
The command ip ospf priority <value> is used to control DR/BDR election. Higher value = higher chance to become DR.
- Range: 0–255
- 0 = never becomes DR/BDR
					interface g0/0
 ip ospf priority 100
7. Enable OSPF Authentication
The command ip ospf authentication enables authentication on the interface.
					interface g0/0
 ip ospf authentication-key cisco
9. Configure MD5 Authentication
The command ip ospf message-digest-key <key-id> md5 <password> is used for secure MD5 authentication.
					interface g0/0
ip ospf message-digest-key 1 md5 cisco123
10. Passive Interface Control
The command ip ospf passive-interface prevents OSPF from sending Hello packets on that interface but still advertises the network.
					interface g0/0
 ip ospf passive-interface
Configure MD5 Area Authentication
Enable MD5 for Area
					router ospf 1
area 0 authentication message-digest
To configure OSPF 1 on All interfaces
					Enter Configuration Mode: configure terminal
Start OSPF Process: router ospf 1
Activate on All Interfaces: network 0.0.0.0 255.255.255.255 area 0 (Assuming Area 0)
					Check OSPF neighbors & DR/BDR roles
...................................
show ip ospf neighbor


Check OSPF interface details (who is DR/BDR)
............................................
show ip ospf interface fastEthernet 1/0


Force OSPF to re-elect DR/BDR
.............................
clear ip ospf process


Set OSPF Priority (influences DR/BDR election)
..............................................
interface g0/0
ip ospf priority 100


Check OSPF process summary
...........................
show ip ospf


Check OSPF Database (LSAs learned via DR/BDR)
.............................................
show ip ospf database


Check current OSPF network type
...............................
show ip ospf interface g0/0


OSPF Basic Configuration Commands
.................................

router ospf <process-id>          # Start OSPF process (process-id is local only)
router-id <rid>                   # Set manual router ID (default = highest IP)
network <ip> <wildcard> area <id> # Advertise networks into OSPF
passive-interface <int>           # Stop sending OSPF Hello on interface
no passive-interface <int>        # Enable OSPF hello on interface
default-information originate     # Advertise default route
area <id> authentication          # Enable area authentication
area <id> stub                    # Make area stub


OSPF Interface-Level Commands
.............................

interface g0/0
 ip ospf <process-id> area 0      # Enable OSPF directly on interface
 ip ospf priority <0-255>         # Influence DR/BDR election (0 = never DR/BDR)
 ip ospf hello-interval <sec>     # Change hello timer
 ip ospf dead-interval <sec>      # Change dead timer
 ip ospf cost <value>             # Set interface cost (metric)


OSPF Neighbor & Adjacency Verification
......................................

show ip ospf neighbor             # Shows neighbor states (DR/BDR/DROTHER)
show ip ospf interface            # Shows OSPF settings, DR/BDR on interface
show ip ospf                      # General OSPF process info
show ip ospf database             # LSDB (Link-State Database)
show ip ospf border-routers       # Shows ABRs & ASBRs
show ip protocols                 # Displays routing protocols running


OSPF Routing Table & LSAs
.........................

show ip route ospf                # Only OSPF routes
show ip ospf database router      # Router LSAs (Type-1)
show ip ospf database network     # Network LSAs (Type-2, created by DR)
show ip ospf database summary     # Summary LSAs (Type-3, ABR)
show ip ospf database asbr-summary# ASBR summary (Type-4)
show ip ospf database external    # External LSAs (Type-5)


OSPF Troubleshooting Commands
.............................

debug ip ospf adj                 # Debug adjacency formation
debug ip ospf hello               # Debug hello packets
debug ip ospf events              # Debug OSPF events
debug ip ospf packet              # Debug OSPF packets
clear ip ospf process             # Restart OSPF process (re-election)
clear ip ospf neighbor            # Reset adjacency with neighbor
ping <neighbor-ip>                # Check connectivity
traceroute <ip>                   # Verify path


Check any routing Protocol use Or Not
.................................
show ip protocols


show ip route ospf

interface fastEthernet 1/0
ip ospf cost 50

interface fastEthernet 1/0
no ip ospf cost 50


show ip interface loopback 0

router ospf 1
network 2.2.2.0 0.0.0.255 area 0


debug ip ospf packet
no debug all

interface fastEthernet 1/0
ip ospf authentication message-digest
ip ospf message-digest-key 1 md5 mykey
OSPF Passive-Interface Commands
					This feature is used to advertise a network into OSPF without forming
neighbor adjacencies (i.e., OSPF Hellos are stopped on that interface).
Simple Way Stop Router Lan Interface OSPF Hello Packets Block For Router Reduce
CPU And Network Bandwith
.......................................................................


Make a Specific Interface Passive
.................................
router ospf <process-id>
passive-interface <interface>


Example...

router ospf 1
passive-interface g0/1


OSPF stops sending Hello packets on g0/1.
The network is still advertised into OSPF


Make All Interfaces Passive (by default)
........................................
router ospf <process-id>
passive-interface default  <-This makes all interfaces passive (no Hellos sent anywhere).


Allow OSPF on Specific Interfaces (after default)
.................................................
router ospf <process-id>
passive-interface default
no passive-interface <interface>


Example...

router ospf 1
passive-interface default
no passive-interface g0/0
no passive-interface g0/2


Here, only g0/0 and g0/2 form neighbors.

All other interfaces remain passive


Remove Passive-Interface (re-enable adjacency)
..............................................
router ospf <process-id>
no passive-interface <interface>


Verification
............
show ip ospf neighbor              # Should not see neighbors on passive interfaces
show ip ospf interface <interface> # Confirms Hello packets are suppressed


Summary of OSPF Passive-Interface Commands
..........................................

passive-interface <int> → Suppresses OSPF Hellos on one interface.

passive-interface default → Suppresses OSPF Hellos on all interfaces.

no passive-interface <int> → Re-enable OSPF Hellos on chosen interfaces.

Networks are still advertised even if the interface is passive.
OSPF Timer-Related Commands
OSPF Default Timer Values
| Network Type | Hello Interval | Dead Interval | Retransmit Interval | Transmit Delay |
|---|---|---|---|---|
| Broadcast (Ethernet, FDDI) | 10s | 40s | 5s | 1s |
| Point-to-Point (Serial, PPP) | 10s | 40s | 5s | 1s |
| Non-Broadcast (NBMA – Frame Relay, ATM) | 30s | 120s | 5s | 1s |
| Point-to-Multipoint | 30s | 120s | 5s | 1s |
| Virtual Links | 10s | 40s | 5s | 1s |
					There are 4 main OSPF timers (configurable on interfaces):
..........................................................

Hello Interval → how often hello packets are sent (default: 10s on
broadcast/point-to-point,
30s on NBMA).

Dead Interval → how long to wait before declaring neighbor down (default: 40s / 120s).

Retransmit Interval → how long between LSA retransmissions (default: 5s).

Transmit Delay → how long to add to LSA age before sending (default: 1s).


Configure OSPF Timers (Interface Mode)
......................................
interface g0/0
ip ospf hello-interval <seconds>
ip ospf dead-interval <seconds>
ip ospf retransmit-interval <seconds>
ip ospf transmit-delay <seconds>


Common Examples
...............
Set Hello & Dead Timers

interface g0/0
ip ospf hello-interval 5
ip ospf dead-interval 20

Note - Neighbors must match Hello & Dead timers, otherwise adjacency will fail.


Set Retransmit Interval
.......................
interface g0/0
ip ospf retransmit-interval 10


Set Transmit Delay
..................
interface g0/0
ip ospf transmit-delay 3


Verification Commands
.....................
show ip ospf interface g0/0


Output shows:

Hello interval

Dead interval

Retransmit interval

Transmit delay

DR/BDR info
OSPF Basic Commnds

OSPF Advance Commnd
					OSPF Database Commands (LSA & Topology)
.......................................
show ip ospf database


Show LSDB by Type
.................
show ip ospf database router        # Type-1 LSAs (Routers)
show ip ospf database network       # Type-2 LSAs (DR-generated)
show ip ospf database summary       # Type-3 LSAs (ABR summary)
show ip ospf database asbr-summary  # Type-4 LSAs (ABR-generated external summary)
show ip ospf database external      # Type-5 LSAs (External routes)


Show ABRs in OSPF
.................
show ip ospf border-routers

Displays all ABRs known in OSPF area.


Troubleshooting ABR & LSDB
..........................
show ip ospf neighbor          # Check adjacency state with neighbors
show ip ospf interface         # Check area assignment & DR/BDR
show ip route ospf             # Check OSPF routes learned from other areas
debug ip ospf events           # Shows LSDB updates, area changes


Show SPF Log / Events
.....................
show ip ospf spf statics


show ip route ospf | include O IA        # Show only inter-area routes
show ip route ospf | include O E2        # Show only external type-2 routes
show ip ospf neighbor | include FULL     # Show only fully adjacent neighbors
show ip ospf database | include External # Show only type-5 LSAs
show ip ospf interface | include DR      # Show interfaces where router is DR
OSPF Route Symbols in Routing Table
OSPF Route Symbols in Routing Table
| Symbol | Meaning | Details |
|---|---|---|
| O | OSPF Intra-area | Learned within the same OSPF area. Example: Router sees a network in Area 0, where it is directly connected via OSPF. |
| O IA | OSPF Inter-area | Learned from another OSPF area via an ABR (Type-3 LSA). Example: Area 1 network advertised to Area 0 by an ABR. |
| O E1 | OSPF External Type-1 | External routes imported into OSPF with cost = internal OSPF cost + external cost. Used when external route’s metric is added to the internal path cost. |
| O E2 | OSPF External Type-2 | External routes imported with cost = external cost only. Default for OSPF external routes. Internal OSPF cost does not affect metric. |
Explanation
1. O (Intra-Area)
- The simplest type.
- Network exists inside the same area as the router.
- Best path is always the shortest path to that network inside the area.
2. O IA (Inter-Area)
- Learned via ABR from another area.
- Cost = OSPF cost from router to ABR + cost advertised by ABR.
- Helps connect multiple OSPF areas.
3. O E1 (External Type-1)
- External route (redistributed into OSPF from another protocol like RIP or BGP).
- Metric = internal OSPF cost to ASBR + external metric.
- Example: Router adds its path cost to the external route metric.
4. O E2 (External Type-2)
- Default external route type.
- Metric = external cost only (ignores OSPF internal cost).
- If multiple E2 routes exist → the lowest external cost wins; internal cost used only as tiebreaker.
OSPF LSAs (Link-State Advertisements)
					Show All LSAs in OSPF Database
..............................
show ip ospf database


Check LSAs for a Specific Prefix
................................
show ip ospf database | include 192.168.1.0


Check LSAs from a Specific Router
................................
show ip ospf database router | include 1.1.1.1


Check Detailed LSA Information
...............................
show ip ospf database router <lsa-id> detail
show ip ospf database network <lsa-id> detail
show ip ospf database summary <lsa-id> detail
show ip ospf database external <lsa-id> detail


Useful Pipes
............
show ip ospf database | include OSPF
show ip ospf database | include External
show ip ospf database | begin Network
show ip ospf database | section Summary
OSPF Virtual Link Commands


					Purpose of OSPF Virtual Link
............................

Connect a non-backbone area (e.g., Area 1) to backbone Area 0 through another area.

Virtual link runs between two ABRs.

Acts like a logical point-to-point link over a transit area.


Requirements
............

Both ABRs must have interfaces in the transit area
(the area between the remote area and backbone).

Remote ABR must be configured with router ID.

Only non-stub areas can be used as transit areas.


OSPF Virtual Link Configuration (Cisco IOS)
............................................
Step 1: Enter OSPF Process
router ospf 1


Step 2: Create Virtual Link
area <transit-area-id> virtual-link <neighbor-router-id>


Example...

router ospf 1
area 1 virtual-link 2.2.2.2


Verification Commands
.....................


Show virtual links
..................
show ip ospf virtual-links


Check OSPF neighbors (includes virtual link neighbor)
.....................................................
show ip ospf neighbor


Show OSPF interface info (virtual link appears as interface)
............................................................
show ip ospf interface


Show OSPF database
..................
show ip ospf database


R1(config)
..........
router ospf 1
network 1.1.1.0 0.0.0.255 area 0
network 192.168.12.0 0.0.0.255 area 1


R2(config)
..........
router ospf 1
network 192.168.12.0 0.0.0.255 area 1
network 192.168.23.0 0.0.0.255 area 2


R3(config)
.........
router ospf 1
network 192.168.23.0 0.0.0.255 area 2


Start with a default OSPF configuration
.......................................
R1(config)
..........
router ospf 1
area 1 virtual-link 192.168.23.2

					Router A
........
interface Loopback0
ip address 1.1.1.1 255.255.255.0
interface Fa0/0
ip address 10.0.0.1 255.255.255.0
exit


Router B
.........
interface Loopback0
ip address 2.2.2.2 255.255.255.0
interface Fa0/1
ip address 10.0.0.2 255.255.255.0
interface Fa0/0
ip address 20.0.0.1 255.255.255.0
exit


Router C
........
interface Loopback0
ip address 3.3.3.3 255.255.255.0
interface Fa0/1
ip address 20.0.0.2 255.255.255.0
interface Fa0/0
ip address 30.0.0.1 255.255.255.0
exit


Router D
.........
interface Loopback0
ip address 4.4.4.4 255.255.255.0
interface Fa0/1
ip address 30.0.0.2 255.255.255.0
exit


After interface ip configuration, we will configure OSPF process and add OSPF Networks
under this interface. Here, we will use OSPF process number 1. Router A is in Area 0,
Router B is Area Border Router (ABR) and it is on both ara 0 and area 1.
Again, Router C is an Area Border Router (ABR) and in two different areas,
in Area 1 and area 2. And lastly, Router D will be in area 2 only.
The interfaces will be added to these ospf process with these
areas with network addresses and required wildcard mask.


Router A
........
router ospf 1
network 10.0.0.0 0.0.0.255 area 0


Router B
........
router ospf 1
network 10.0.0.0 0.0.0.255 area 0
network 20.0.0.0 0.0.0.255 area 1


Router C
........
router ospf 1
network 20.0.0.0 0.0.0.255 area 1
network 30.0.0.0 0.0.0.255 area 2


Router D
........
router ospf 1
network 30.0.0.0 0.0.0.255 area 2


Configuring Virtual-Links
.........................

After configuring ip addresses and OSPF processes with networks, now it is time to do the exact
OSPF Virtual Link Configuration on Packet Tracer. Here,
we will connect Area 2 to Area 0 over Area 1. So, we will create a virtual link between Router B and Router C. On router B,
we will set the destination virtual link address as the loopback ip address of router C (3.3.3.3).
And on router C, we will set the destination virtual link address as the loopback ip address of Router B (2.2.2.2).


Router B
........
router ospf 1
area 1 virtual-link 3.3.3.3


Router C
.........
router ospf 1
area 1 virtual-link 2.2.2.2


Cisco Virtual-Link Confgiuration Verification
.............................................
Router B# show ip ospf virtual-links

Virtual Link OSPF_VL0 to router 3.3.3.3 is up

Run as demand circuit

Transit area 1, via interface FastEthernet0/0, Cost of using 1

Transmit Delay is 1 sec, State POINT_TO_POINT,

Timer intervals configured, Hello 10, Dead 40, Wait 40, Retransmit 5

Hello due in 00:00:06

Adjacency State FULL

Index 1/2, retransmission queue length 0, number of retransmission 0

First 0x0(0)/0x0(0) Next 0x0(0)/0x0(0)

Last retransmission scan length is 0, maximum is 0

Last retransmission scan time is 0 msec, maximum is 0 msec


Router C# show ip ospf virtual-links
....................................

Virtual Link OSPF_VL0 to router 2.2.2.2 is up

Run as demand circuit

Transit area 1, via interface FastEthernet1/0, Cost of using 1

Transmit Delay is 1 sec, State POINT_TO_POINT,

Timer intervals configured, Hello 10, Dead 40, Wait 40, Retransmit 5

Hello due in 00:00:07

Adjacency State FULL

Index 1/2, retransmission queue length 0, number of retransmission 0

First 0x0(0)/0x0(0) Next 0x0(0)/0x0(0)

Last retransmission scan length is 0, maximum is 0

Last retransmission scan time is 0 msec, maximum is 0 msec


Router B# show ip ospf neighbor
...............................

Neighbor ID     Pri   State           Dead Time   Address         Interface

3.3.3.3           0   FULL/  -        00:00:36    20.0.0.2        OSPF_VL0

10.0.0.1          1   FULL/DR         00:00:38    10.0.0.1        FastEthernet1/0

3.3.3.3           1   FULL/DR         00:00:31    20.0.0.2        FastEthernet0/0


Router C# show ip ospf neighbor
...............................

Neighbor ID     Pri   State           Dead Time   Address         Interface

2.2.2.2           1   FULL/BDR        00:00:34    20.0.0.1        FastEthernet1/0

30.0.0.2          1   FULL/DR         00:00:39    30.0.0.2        FastEthernet0/0

2.2.2.2           0   FULL/  -        00:00:31    20.0.0.1        OSPF_VL0


Virtual Link Authentication Types
.................................
Plaintext Authentication (simple password)
MD5 Authentication (secure, recommended)


Configure Plaintext Authentication on Virtual Link
..................................................
router ospf <process-id>
area <transit-area-id> virtual-link <neighbor-router-id>
area <transit-area-id> authentication
area <transit-area-id> authentication-key <password>

Example...

router ospf 1
area 1 virtual-link 2.2.2.2
area 1 authentication
area 1 authentication-key CISCO123


Configure MD5 Authentication on Virtual Link
............................................
router ospf 1
area 1 virtual-link 2.2.2.2
area 1 authentication message-digest
area 1 message-digest-key 1 md5 CISCO123


show ip ospf interface
show ip ospf interface brief
show ip ospf neighbor
Originate Default Route into OSPF
What is “Originate Default Route into OSPF”?
In OSPF, the default route is 0.0.0.0/0, which is used to forward packets for unknown destinations.
- Originate default route means telling an OSPF router to advertise a default route into the OSPF network, so other OSPF routers can use it as a gateway for networks they don’t know.
- Typically, this is done by an ABR (Area Border Router) or an ASBR (Autonomous System Boundary Router).
Why It’s Used
- To provide a gateway of last resort for OSPF routers in other areas.
- To allow internal OSPF routers to reach external networks or the internet.
- Useful when not all routers need full routing information — they can use the default route instead of learning all external networks.
					Originate Default Route into OSPF
................................
router ospf <process-id>
default-information originate


This tells the OSPF router to advertise a default route (0.0.0.0/0)
to all other OSPF routers.

Example...

router ospf 1
default-information originate


Force Originate Default Route
..............................
router ospf 1
default-information originate always


Verify Default Route in OSPF
............................
show ip route

O*E2 0.0.0.0/0 [110/1] via <next-hop>


Symbol explanation:

O → OSPF

E2 → External Type-2 route (default route is always external)
OSPF Stub and Totally Stubby Area Commands
1. OSPF Stub Area Overview
- Stub Area → An area that does not accept external (Type-5) LSAs.
- Instead, it uses a default route (0.0.0.0) to reach external networks.
- Useful to reduce LSDB size in areas with many external routes.
2. Totally Stubby Area Overview
- Totally Stubby Area (TSA) → Cisco-specific enhancement.
- Blocks both Type-5 (external) LSAs and Type-3 summary LSAs from other areas.
Router only knows:
Intra-area routes (Type-1, Type-2)
A single default route to reach other areas
					Configure Stub Area (Router on ABR)
..................................
router ospf <process-id>
area <area-id> stub


Example...

router ospf 1
area 1 stub


Configure Totally Stubby Area
.............................
On ABR connecting to the totally stubby area:

router ospf <process-id>
area <area-id> stub no-summary


Example...

router ospf 1
area 1 stub no-summary


no-summary → Blocks Type-3 summary LSAs.

Routers inside area see only intra-area routes + default route.


Tips
....
Only ABR can configure stub/totally stubby area.

All routers in the area must agree on stub type, otherwise adjacency fails.

Stub area reduces routing table size and SPF calculations.
OSPF NSSA (Not-So-Stubby Area) and Totally NSSA
1. OSPF NSSA Overview
NSSA (Not-So-Stubby Area) is a special type of stub area.
Characteristics:
Blocks external Type-5 LSAs from other areas (like stub).
Allows redistribution of external routes into OSPF as Type-7 LSAs.
Type-7 LSAs are converted to Type-5 by ABR when leaving the NSSA.
Useful when you have external routes in a stub-like area (e.g., connecting RIP/BGP to OSPF stub).
2. Totally NSSA Overview
- Totally NSSA → Cisco enhancement.
- Blocks Type-5 external LSAs and Type-3 summary LSAs, except for a default route.
Routers inside see:
Intra-area routes (Type-1/Type-2)
Type-7 LSAs (for redistributed external routes inside NSSA)
Default route for everything else
					NSSA Configuration Commands
..................................
router ospf <process-id>
area <area-id> nssa


Example...

router ospf 1
area 2 nssa


By default, NSSA injects Type-3 summary LSAs from backbone.

External routes from NSSA are advertised as Type-7 LSAs


Configure Totally NSSA
.........................
On ABR connecting to the totally stubby area:

router ospf 1
area <area-id> nssa no-summary


Example...

router ospf 1
area 2 nssa no-summary


no-summary → Blocks Type-3 summary LSAs, only default + Type-7 external routes.


Optional – Default Route in NSSA
................................

ABR can inject default route into NSSA:

area 2 nssa default-information-originate


Verification Commands
.....................
show ip ospf
show ip ospf database


Shows Type-7 LSAs for external routes

Type-7 LSAs are converted to Type-5 outside the NSSA


show ip route
Inside NSSA, redistributed external routes appear as O E2 (external)


Tip:
....
Use NSSA when you want a stub-like area but still need external route redistribution.

Totally NSSA is useful when you
want the area to have minimal routes, only defaults and necessary redistributed networks.
OSPF Cost Commands
OSPF Metric Calculation
As we know, OSPF is a link state protocol, so the router learns all the paths and their costs to the destination and selects the routes with the lowest costs to the destination. This is known as OSPF Metric calculation.
Metric – It is a parameter that OSPF uses to choose its best path. OSPF metrics are calculated using a cost-based algorithm.
For any given interface, the cost is always inversely proportional to the bandwidth.
- A higher bandwidth leads to a lower cost.
- A lower bandwidth leads to a higher cost.
So, the path with the lowest cost will be the best path for OSPF.
Now, as we know, OSPF utilizes link-state advertisements for network destinations, and it is known as a link-state routing protocol. For this reason, the (shortest path first) SPF algorithm is used for routing calculations based on link-state information. With OSPF, all routers share metrics and link-state information about their connected interfaces with each other.
Let’s move on to know more about the shortest-path-first algorithm.
SPF Algorithm
Specifically, OSPF employs a (shortest-path-first) SPF algorithm to determine and construct the shortest route to all known destinations.
- In OSPF, routers generate a link state advertisement (LSA). This advertisement depicts the all-link states of the router.
- All routers in OSPF exchange link states by flooding LSAs. Every router that receives an LSA will store a copy of its link-state database and then forward the OSPF LSA to other routers.
- Once the database of every router is synced, it will calculate the shortest path to all possible destinations, which we call the shortest path tree (SPT).
- The algorithm puts every router in a tree and determines the shortest path to each destination by taking into account the total cost of getting there.
- Lastly, when the router builds the SPT, it starts creating the routing table.
We hope you have a good overview of the SPF Algorithm. Let’s understand the OSPF cost formula now.
OSPF Cost Formula
The formula used by OSPF to determine cost is as follows:
Cost = Reference bandwidth/Interface bandwidth
In OSPF’s documentation (RFC 2338), reference bandwidth was given a completely random number. Each manufacturer must determine its reference bandwidth. When referring to bandwidth, Cisco uses 100 Mbps (108) as reference bandwidth. With this, the equation would be:
Cost = 108/interface bandwidth in bps
Some of the key points to follow while calculating cost is discussed below.
Key points
- Cost is a positive integer value.
- All decimal values will be rounded to the nearest positive integer.
- Any value in decimal or less than 1 will be considered 1.
Now that we have the formula let’s perform the arithmetic and get the base cost of the necessary interfaces.
Default cost of essential interfaces.
| Interface type | Bandwidth | Metric Calculation | Cost |
| Serial Link | 1544Kbps | 100000000/1544000 = 64.76 | 64 |
| Ethernet Link | 10Mbps | 100000000/10000000 = 10 | 10 |
| FastEthernet Link | 100Mbps | 100000000/100000000 = 1 | 1 |

Enable OSPF and Set Router ID
					Enable OSPF and Set Router ID
.............................
router ospf <process-id>
router-id <rid>

Example...

router ospf 1
router-id 1.1.1.1


Advertise Networks
..................
network <ip> <wildcard-mask> area <area-id>

Example...

network 192.168.1.0 0.0.0.255 area 0
network 10.0.0.0 0.0.0.3 area 0


Interface-Based OSPF (Alternative to network command)
.....................................................
interface g0/0
ip ospf <process-id> area <area-id>


Example...


interface g0/0
ip ospf 1 area 0
OSPF Authentication
					There are 3 authentication types in OSPF
........................................
Null (No Authentication) – default.

Plaintext Authentication – simple password (not secure).

MD5 Authentication – secure hash-based authentication (preferred).


Enable OSPF Authentication (per-area)
.....................................
router ospf <process-id>
area <area-id> authentication                 # Enable simple (plaintext) auth
area <area-id> authentication message-digest  # Enable MD5 auth


Configure Authentication on Interfaces
......................................
Plaintext Authentication

interface g0/0
ip ospf authentication
ip ospf authentication-key <password>

Example..

ip ospf authentication
ip ospf authentication-key CISCO123


MD5 Authentication
..................
interface g0/0
ip ospf authentication message-digest
ip ospf message-digest-key <key-id> md5 <password>

Example..
ip ospf authentication message-digest
ip ospf message-digest-key 1 md5 MYSECRET


Disable Authentication (on interface)
.....................................
interface g0/0
no ip ospf authentication


Verification Commands
.....................

show ip ospf interface g0/0         # Shows auth type (None, Simple, or MD5)
show ip ospf neighbor               # Check if neighbors are FULL (adj formed)
debug ip ospf adj
DR/BDR Election
					DR/BDR Election Control (Interface Level)
.........................................
interface g0/0
ip ospf priority <0-255>


Default priority = 1

0 → Router will never become DR/BDR

Higher number = higher chance of becoming DR


Special Scenarios
.................
interface g0/0
ip ospf priority 0


interface g0/0
ip ospf priority 100 <This Commnds DR For Highest Priority

Influence election by priority
Router with highest OSPF priority becomes DR, second highest → BDR.
If priorities are equal → highest Router ID wins.


Forcing DR/BDR Re-election
..........................
clear ip ospf process            # Restart OSPF process → triggers new election
clear ip ospf neighbor           # Resets adjacency with neighbors


Verification Commands
.....................
show ip ospf neighbor


FULL/DR → This router is DR

FULL/BDR → This router is BDR

FULL/DROTHER → Normal router


Check DR/BDR on Interface
.........................
show ip ospf interface g0/0


Displays:

Current DR & BDR IPs

This router’s priority

Hello/Dead timers


General OSPF Status
...................
show ip ospf

Shows router ID, process ID, area info


Debug Commands (Election Process)
.................................

debug ip ospf events             # Shows OSPF election events
debug ip ospf adj                # Shows adjacency state changes
debug ip ospf hello              # Shows hello packets (used in elections)


To stop debug
.............
undebug all
OSPF Network Type
					Change OSPF network type on an interface
........................................
interface g0/0
 ip ospf network broadcast
 ip ospf network non-broadcast
 ip ospf network point-to-point
 ip ospf network point-to-multipoint
 ip ospf network point-to-multipoint non-broadcast


1. Broadcast

Default on Ethernet/FastEthernet/GigabitEthernet.

DR/BDR election occurs.

Neighbors discovered automatically via multicast (224.0.0.5/6).


2. Non-Broadcast (NBMA)

Used in Frame Relay/ATM.

DR/BDR election occurs.

No multicast → must use manual neighbors.


3. Point-to-Point

Default on serial links.

No DR/BDR election.

Only 2 neighbors.


4. Point-to-Multipoint

Treats all neighbors as separate point-to-point links.

No DR/BDR election.

Neighbors discovered automatically (multicast).


5. Point-to-Multipoint Non-Broadcast

Similar to above, but no multicast → must manually configure neighbors.

No DR/BDR election.
					Cisco Routers OSPF show Commands
................................
NDNA@cisco#sh ip ospf
NDNA@cisco#sh ip ospf data
NDNA@cisco#sh ip ospf database database-summary
NDNA@cisco#sh ip ospf neighbor
NDNA@cisco#sh ip ospf neighbor details
NDNA@cisco#sh ip ospf interface
NDNA@cisco#sh ip ospf virtual-links
NDNA@cisco#sh ip ospf database self-originate
NDNA@cisco#sh ip ospf adv-router X.X.X.X
NDNA@cisco#sh ip ospf stat

Juniper OSPF show Commands
NDNA@juniper> show ospf route
NDNA@juniper> show ospf route detail
NDNA@juniper> show ospf route extensive
NDNA@juniper> show ospf3 route detail
NDNA@juniper> show ospf route topology voice
NDNA@juniper> show ospf database
NDNA@juniper> show ospf database detail
NDNA@juniper> show ospf database extensive
NDNA@juniper> show ospf database summary
NDNA@juniper> show ospf database opaque-area detail

Huawei Routers OSPF show Commands
.............................
NDNA@Huawei> display ospf peer
NDNA@Huawei>display ospf routing
NDNA@Huawei>display ospf error
NDNA@Huawei> display ospf 1 interface
NDNA@Huawei> display current-configuration configuration ospf
NDNA@Huawei> display ospf 1 brief
NDNA@Huawei>display current-configuration interface GigabitEthernet X
NDNA@Huawei> display ospf interface verbose

HP Aruba Routers OSPF show Commands
.............................
NDNA@HP# show ip ospf area
NDNA@HP# show ip ospf border-routers
NDNA@HP# show ip ospf config
NDNA@HP# show ip ospf database external-link-state
NDNA@HP# show ip ospf gen
NDNA@HP# show ip ospf interface
NDNA@HP# show ip ospf database link-state status
NDNA@HP# show ip ospf neighbor
NDNA@HP# show ip ospf routes
NDNA@HP# show ip ospf trap
NDNA@HP# show ip ospf virtual-link X

Arista Routers OSPF show Commands
.............................
NDNA@arista>show ip ospf
NDNA@arista>show ip ospf border-routers
NDNA@arista>show ip ospf 1 0 database database-summary
NDNA@arista>show ip ospf database adv-router X.X.X.X
NDNA@arista>show ip ospf 1 2 database router
NDNA@arista>show ip ospf interface vlan 1
NDNA@arista>show ip ospf interface brief
NDNA@arista>show ip ospf lsa-log
NDNA@arista>show ip ospf neighbor
NDNA@arista>show ip ospf neighbor vlan 2 detail
NDNA@arista>show ip ospf neighbor vlan 2 adjacency-changes
NDNA@arista>show ip ospf neighbor state full
NDNA@arista>show ip ospf neighbor summary
NDNA@arista>show ip ospf request-list
NDNA@arista>show ip ospf retransmission-list
NDNA@arista>show ip ospf spf-log
OSPF Lab

					hostname R1

interface GigabitEthernet0/0

ip address 10.0.0.1 255.255.255.0

no shutdown

interface GigabitEthernet0/4

ip address 10.0.14.1 255.255.255.0

no shutdown

router ospf 1

router-id 1.1.1.1

network 10.0.14.1 0.0.0.0 area 0

network 10.0.0.1 0.0.0.0 area 0
					hostname R2

interface GigabitEthernet0/0

ip address 10.0.0.2 255.255.255.0

no shutdown

interface GigabitEthernet0/3

ip address 10.0.23.2 255.255.255.0

no shutdown

router ospf 1

router-id 2.2.2.2

network 10.0.23.2 0.0.0.0 area 0

network 10.0.0.2 0.0.0.0 area 0
					hostname R3

interface GigabitEthernet0/0

ip address 10.0.0.3 255.255.255.0

no shutdown

interface GigabitEthernet0/2

ip address 10.0.23.3 255.255.255.0

no shutdown

router ospf 1

router-id 3.3.3.3

network 10.0.23.3 0.0.0.0 area 0

network 10.0.0.3 0.0.0.0 area 0
					hostname R4

interface GigabitEthernet0/0

ip address 10.0.0.4 255.255.255.0

no shutdown

interface GigabitEthernet0/1

ip address 10.0.14.4 255.255.255.0

no shutdown

router ospf 1

router-id 4.4.4.4

network 10.0.14.4 0.0.0.0 area 0

network 10.0.0.4 0.0.0.0 area 0

					..........Router RA..........

en

conf t

interface GigabitEthernet0/0

ip ospf hello-interval 5

ip ospf dead-interval 20

ip ospf priority 150

ip ospf authentication message-digest

ip ospf message-digest-key 1 md5 Area0pa55


router ospf 1

network 192.168.1.0 0.0.0.255 area 0

area 0 authentication message-digest

End
					..........Router RB..........

en

conf t

interface GigabitEthernet0/0

ip ospf hello-interval 5

ip ospf dead-interval 20

ip ospf priority 100

ip ospf authentication message-digest

ip ospf message-digest-key 1 md5 Area0pa55


router ospf 1

network 192.168.1.0 0.0.0.255 area 0

area 0 authentication message-digest

end
					.....Router RC ASBR.....

en

conf t

interface GigabitEthernet0/0

ip ospf hello-interval 5

ip ospf dead-interval 20

ip ospf priority 50

ip ospf authentication message-digest

ip ospf message-digest-key 1 md5 Area0pa55


router ospf 1

passive-interface default

no passive-interface GigabitEthernet0/0

network 192.168.1.0 0.0.0.255 area 0

default-information originate

area 0 authentication message-digest

ip route 0.0.0.0 0.0.0.0 Serial0/0/0 end

					.....Router R1.....

hostname R1

no ip domain lookup

banner motd # This is R1, Implement Multi-Area OSPFv2 Lab#


interface gi0/0

ip add 172.16.0.2 255.255.255.252

no shut

Ip ospf 1 area 0

exit


interface GigabitEthernet0/1

ip address 192.10.0.1 255.255.255.252

no shut

Ip ospf 1 area 1

exit
					.....Router R3.....

hostname R3

no ip domain lookup

banner motd # This is R3, Implement Multi-Area OSPFv2 Lab #


interface gi0/0

ip add 172.16.1.2 255.255.255.252

no shut

Ip ospf 1 area 0

exit


interface Gi0/1

ip address 192.10.4.1 255.255.255.252

no shut

Ip ospf 1 area 2

exit
					.....Router R2.....

hostname R2

no ip domain lookup

banner motd # This is R2, Implement Multi-Area OSPFv2 Lab #

interface gi0/0

ip add 172.16.0.1 255.255.255.252

no shut

exit

interface Gi0/1

ip address 172.16.1.1 255.255.255.252

no shut

exit

interface lo0

ip add 209.165.200.225 255.255.255.224

int gi0/2

ip address dhcp

no shutdown
					.....NAT_Configuration.....

access-list 1 permit 192.10.1.0 0.0.0.255

access-list 1 permit 192.10.5.0 0.0.0.255

ip nat inside source list 1 interface gi0/2 overload

int gi0/2

ip nat outside

int gi0/0

ip nat inside

int gi0/1

ip nat inside
					.....L3 Switch .....

hostname D1

conf t

no ip domain lookup

banner motd # This is D1, Implement Multi-Area OSPFv2 Lab #

interface gi0/1

no switchport

ip address 192.10.0.2 255.255.255.252

no shut

Ip ospf 1 area 1

Exit

interface gi0/0

no switchport

ip address 192.10.1.1 255.255.255.0

no shut

exit
					.....L3 Switch.....

hostname D2

no ip domain looku

banner motd # This is D2, Implement Multi-Area OSPFv2 Lab #

interface gi0/0

no switchport

ip address 192.10.4.2 255.255.255.252

no shut

Ip ospf 1 area 2

exit

interface gi0/1

no switchport

ip address 192.10.5.1 255.255.255.0

no shut

exit
Route Redistribution between OSPF and EIGRP
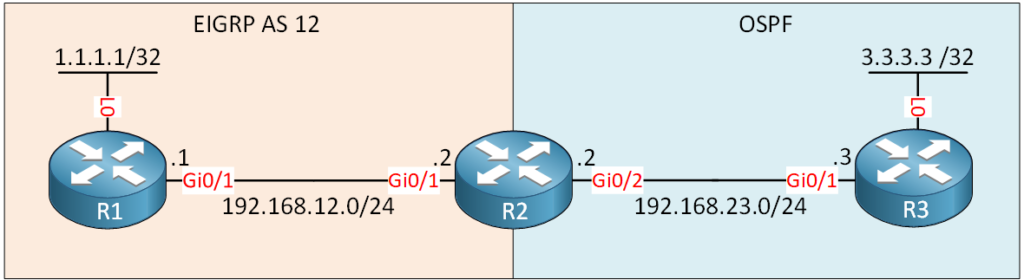
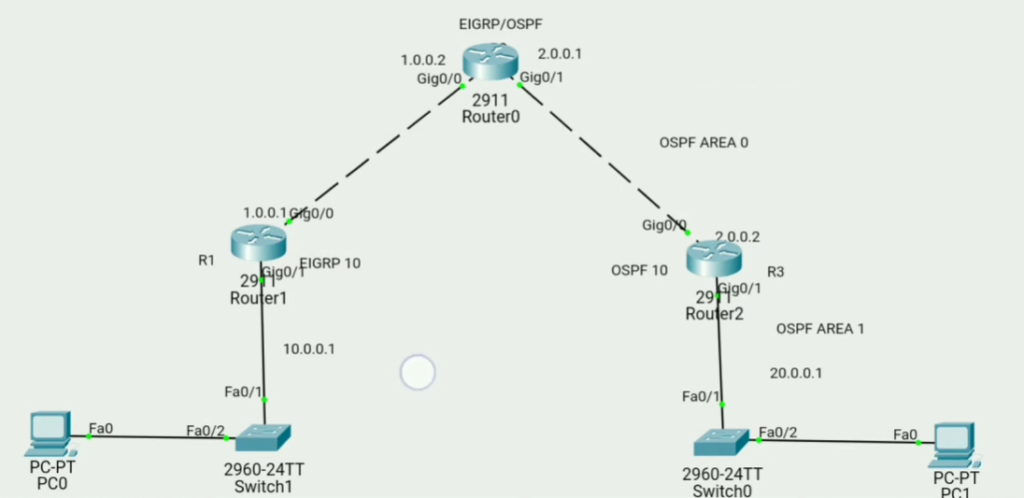
					R1 Configuration
.................
conf t
no ip domain lookup
interface gig0/0
ip address 1.0.0.1 255.255.255.0
no shut

interface gig0/1
ip address 10.0.0.1 255.255.255.0
no shut


router eigrp 10
network 10.0.0.0
network 1.0.0.0
exit
					R3 Configuration
.....................
conf t
no ip domain lookup
interface gig0/0
ip address 2.0.0.2 255.255.255.0
no shut

interface gig0/1
ip address 20.0.0.1 255.255.255.0
no shut


router ospf 10
network 20.0.0.0 0.255.255.255 area 0
network 2.0.0.0 0.255.255.255 area 0
exit
					R2 Configuration
................
conf t
no ip domain lookup
interface gig0/0
ip address 1.0.0.2 255.255.255.0
no shut
exit

interface gig0/1
ip address 2.0.0.1 255.255.255.0
no shut
exit


router ospf 10
network 2.0.0.0 0.255.255.255 area 0
exit


router eigrp 10
network 1.0.0.0
exit


Redistribute EIGRP into OSPF
............................

router eigrp 10
redistribute ospf 10 metric 1 10 255 255 1500


Redistribute OSPF into EIGRP
............................

router ospf 100
redistribute eigrp 100 metric 1 subnets