
How To Install Nextcloud on Ubuntu 22.04
What is Nextcloud?
Nextcloud advertises itself as a safe home for user data and documents. Developed with an open source philosophy in mind, Nextcloud provides users with much more control and flexibility than the alternatives. Some of the main advantages of Nextcloud include:
Use the following steps to install and configure Nextcloud on Linux ubuntu 22.04:
Nextcloud is an open-source software platform that allows you to store, sync, and share files, documents, and other data. It provides a self-hosted alternative to cloud storage and collaboration services like Dropbox, Google Drive, and Microsoft OneDrive. Here are some key aspects of Nextcloud:
- Step 1 – Install PHP and Apache Web Server
- Step 2 – Install MySQL / MariaDB Database Server
- Step 3 – Download and Install Nextcloud
- Step 4 – Configure Apache to Serve Nextcloud
- Step 5 – Enable ReWrite Mode and Restart Server
- Step 6 – Complete Nextcloud Installation via GUI
Step 1 – Install PHP and Apache Web Server
1 Update and upgrade the Ubuntu packages:1
sudo apt update && sudo apt upgrade
2 Install the Apache web server using
apt
sudo apt install apache2
3 Configure the ufw firewall to allow the Apache Full profile. This permits HTTP and HTTPS connections, enabling web access. OpenSSH connections must also be allowed. Enable ufw when all changes are complete.
					sudo ufw allow OpenSSH
sudo ufw allow in "Apache Full"
sudo ufw enable
Note
The Apache Full profile permits HTTP and HTTPS traffic. To temporarily restrict web traffic to HTTP requests, use the Apache profile instead. The Apache Secure profile blocks HTTP requests and only permits HTTPS traffic through. Do not use this profile before enabling HTTPS on the server.
Verify the firewall settings using the ufw status command:
sudo ufw status
| Status: active
To Action From |
4 Enable the mpm_prefork Apache module and disable mpm_event:
4 Enable the mpm_prefork Apache module and disable mpm_event:
					sudo a2dismod mpm_event
sudo a2enmod mpm_prefork
5 Restart Apache using the systemctl utility:
sudo systemctl restart apache2
6 Ensure the web server is still active using systemctl:
sudo systemctl status apache2
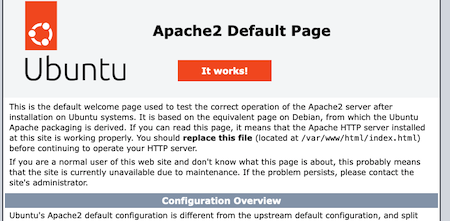
Visit the IP address of the web server and confirm the server is working properly:
| http://your_IP_address/ |
The default Ubuntu/Apache2 welcome page appears in the browser. The page features the message “It works” and details some basic information about the server:
For more information about configuring the Apache HTTP Server, see the Apache Documentation.
Installing the MariaDB RDBMS
Nextcloud stores its information inside an RDBMS, such as MySQL or MariaDB. This guide uses MariaDB. MariaDB is very similar to MySQL, but it more closely follows the open source philosophy. MariaDB provides more features than MySQL does. It also has better performance and usability.
To install MariaDB on Ubuntu 22.04, follow the steps in this example
1 Install MariaDB using apt:
sudo apt install mariadb-server
2 Verify the status of MariaDB to ensure it is installed correctly:
sudo systemctl status mariadb
3 Enable MariaDB in systemctl so it automatically activates upon server boot up:
sudo systemctl enable mariadb
4 Configure and secure MariaDB using the mysql_secure_installation utility:
sudo mysql_secure_installation
5 Enter your password. It is not necessary to switch to Unix socket authentication or change the root password. Answer Y to the following questions:
Remove anonymous users?
Disallow root login remotely?
Remove test database and access to it?
Reload privilege tables
For further information about MariaDB, consult the MariaDB Server Documentation.
Enter current password for root (enter for none): enter
Switch to unix_socket authentication [Y/n] n
Change the root password? [Y/n] n
Remove anonymous users? [Y/n] y
Disallow root login remotely? [Y/n] y
Remove test database and access to it? [Y/n] y
Reload privilege tables now? [Y/n] y
Creating the Nextcloud database in MariaDB
1 Log into MariaDB as the root user. If you added a root password, provide it when requested. The MariaDB prompt appears.
sudo mysql -u root
2 Create the nextcloud database. For this and all remaining commands, MariaDB should reply with Query OK.
CREATE DATABASE nextcloud;
3 Use the SHOW DATABASES command to ensure the database has been properly created:
SHOW DATABASES;
| +——————–+ | Database | +——————–+ | information_schema | | mysql | | nextcloud | | performance_schema | | sys | +——————–+ 5 rows in set (0.001 sec) |
4 Create a user and grant them all rights to access the database. In place of password, provide a more secure password.
GRANT ALL PRIVILEGES ON nextcloud.* TO 'nextcloud'@'localhost' IDENTIFIED BY 'password';
5 Flush the privileges to apply the recent changes:
FLUSH PRIVILEGES;
6 Exit the database:
quit
Installing PHP and Other Components
1 Nextcloud uses the PHP programming language. Nextcloud version 24 supports PHP release 8.1. This is also the default release of PHP in the Ubuntu packages, so the regular php package can be installed. However, PHP 7.4 is required to use earlier versions of Nextcloud.
Note
To install PHP 7.4, substitute php7.4 in place of php for all packages. For example, php-cli becomes php7.4-cli.
To install PHP and the other required packages, use these commands.
1 Install the core PHP package using apt:
sudo apt install php
2 Confirm the PHP release number:
php -v
3 Install the remaining PHP components:
					sudo apt install php-apcu php-bcmath php-cli php-common php-curl
 php-gd php-gmp php-imagick php-intl php-mbstring php-mysql php-zip php-xml


sudo apt install php-apcu php-bcmath php-cli php-common
php-curl php-gd php-gmp php-imagick php-intl php-mbstring php-mysql php-zip php-xml


sudo apt install apache2 mariadb-server libapache2-mod-php php-gd php-mysql
php-curl php-mbstring php-intl php-gmp php-bcmath php-xml php-imagick php-zip
4 Enable the necessary PHP extensions:
sudo phpenmod bcmath gmp imagick int
Install the unzip utility. This utility might already be installed on the system.
sudo apt install unzip
5 Install the libmagic package:
sudo apt install libmagickcore-6.q16-6-extra
Downloading, Installing, and Configuring Nextcloud
Nextcloud can be downloaded using wget. After unzipping the downloaded file, a virtual host must be created for Nextcloud. Some additional configurations and optimizations must also be applied to the system.Downloading and Installing Nextcloud
2 Unzip the archive. This creates a nextcloud folder in the same directory as the zip file.
https://download.nextcloud.com/server/releases/latest.zip
3 (Optional) Delete or rename the archive after unzipping the contents. It is also possible to rename the nextcloud directory to a more meaningful name, such as nextcloud.yourdomainname.
4 Change the folder permissions for the nextcloud directory:
sudo chown -R www-data:www-data nextcloud
5 Move the new directory to the server directory. The server directory usually defaults to /var/www/html on most servers.
sudo mv nextcloud /var/www/html
6 Disable the default Apache landing page:
sudo a2dissite 000-default.conf
Note
Ignore the advisory to reload Apache at this time. Apache should be reloaded later when all configuration is complete..
Creating a Virtual Host File for Nextcloud
This section explains how to configure a virtual host file for the Nextcloud application. The virtual host tells Apache how to handle and serve requests for the Nextcloud domain.
1 Create a new file in the etc/apache2/sites-available directory and name the file nextcloud.conf:
sudo nano /etc/apache2/sites-available/nextcloud.conf
2 The file must include the following information. The DocumentRoot is the name of the server directory followed by /nextcloud. For the ServerName attribute, enter the actual name of the domain instead of example.com. Save the file when all changes have been made.
sudo nano /etc/apache2/sites-available/nextcloud.conf
					<VirtualHost *:80>
DocumentRoot "/var/www/html/nextcloud"
ServerName example.com
<Directory "/var/www/html/nextcloud/">
Options MultiViews FollowSymlinks
AllowOverride All
Order allow,deny
Allow from all
</Directory>

TransferLog /var/log/apache2/nextcloud_access.log
ErrorLog /var/log/apache2/nextcloud_error.log

</VirtualHost>
3 Enable the site. Do not reload Apache yet.
sudo a2ensite nextcloud.conf
Optimizing PHP for Nextcloud
he default PHP implementation is fine for most applications. But certain PHP settings must be adjusted to allow for peak Nextcloud performance and operations. To make the necessary adjustments, follow these steps.
- Edit the
php.inifile and make the following changes. In some cases, the parameter might be commented out and must be uncommented. To uncomment a parameter, delete the;character at the start of the line. Leave the remaining lines unchanged
sudo nano /etc/php/8.1/apache2/php.ini
					max_execution_time = 360
memory_limit = 512M
post_max_size = 200M
upload_max_filesize = 200M
date.timezone = Europe/London
opcache.enable=1
opcache.memory_consumption=128
opcache.interned_strings_buffer=8
opcache.max_accelerated_files=10000
opcache.revalidate_freq=1
opcache.save_comments=1
2 Enable some additional Apache modules:
sudo a2enmod dir env headers mime rewrite ssl
3 Restart the Apache server:
sudo systemctl restart apache2
4 Verify the Apache server status and ensure it is still active. If the server is in a failed state, examine the server error logs and make any necessary changes to the /etc/apache2/sites-enabled/nextcloud.conf file.
sudo systemctl status apache2
Setting up Nextcloud Using the Web Interface
The remaining Nextcloud configuration tasks can be accomplished using the web interface. To configure and activate Nextcloud, follow these steps.
- Visit the domain associated with the server. The Nextcloud configuration page appears in the browser window. In the following example, replace
example.comwith the name of the domain:http://example.com/.
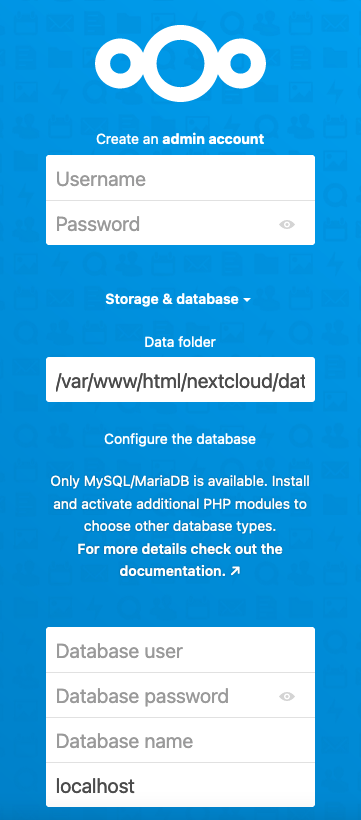
On this page, perform the following tasks:
- Create an administrative account. Provide a user name and password for the account.
- Leave the address for the Data Folder at the current value.
- In the Configure the database section, add information about the
nextclouddatabase. Enter the user name and password for the account created in MariaDB earlier. The database name isnextcloud. Leave the final field set tolocalhost. - Click Install to complete the form.

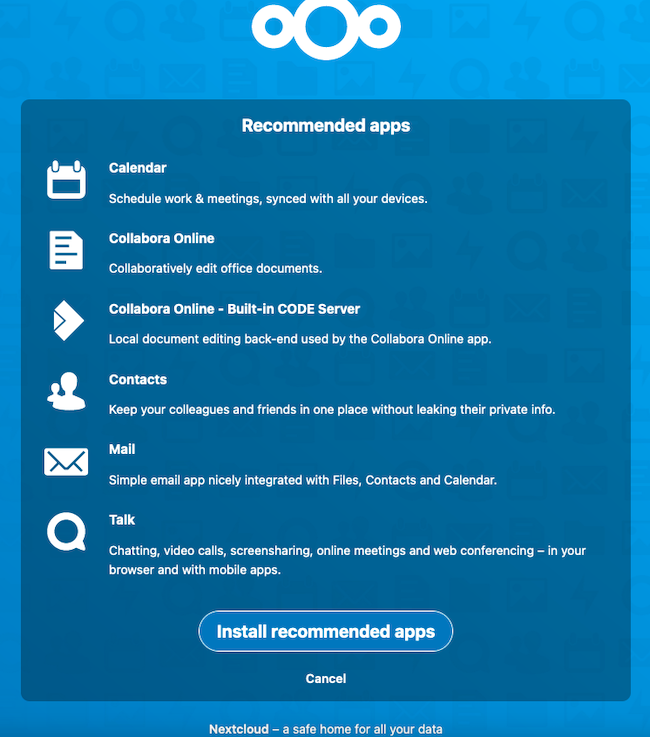
Nextcloud proceeds to set up the application. This might take a minute or two. On the next page, Nextcloud asks whether to install a set of recommended applications. Click Install recommended apps to continue.
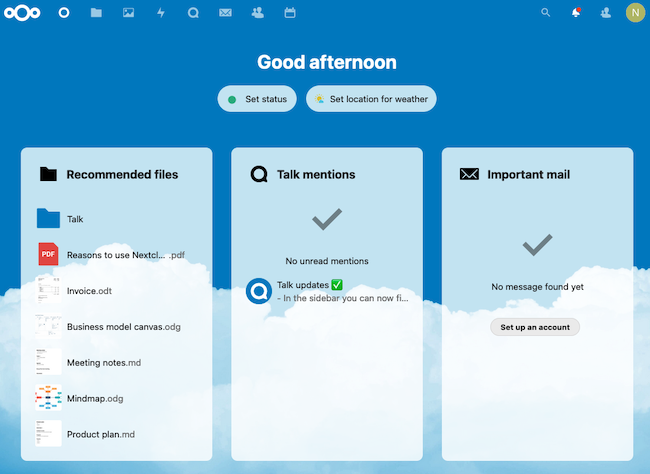
Nextcloud displays a series of welcome slides. Click the right arrow symbol on the right-hand side of the page to walk through the slides. Read through each slide, recording any important information.

On the final welcome page, select Start using Nextcloud to proceed to the Nextcloud dashboard.

The browser now displays the Nextcloud Dashboard page.
Securing and Optimizing Your Nextcloud Application
Nextcloud is now ready to use. However, it is not as secure or as efficient as it could be. For a better Nextcloud experience, enable the Hypertext Transfer Protocol Secure (HTTPS) protocol using the Certbot application. There are also a few more changes to add to the config.php file.
Setting up a SSL Certificate for Nextcloud (Optional)
Nextcloud works even without the Hypertext Transfer Protocol Secure (HTTPS) protocol. However, HTTPS is highly recommended, and Nextcloud displays some warnings on the “Settings” page if it is not configured. HTTPS encrypts information using the Secure Sockets Layer (SSL) technology to help secure the Nextcloud data.
The Linode server must possess a signed public-key certificate from a trusted certificate authority before it can accept HTTPS requests. Most Ubuntu administrators use Certbot to install SSL certificates. Certbot is a free and open source tool for automating the process of requesting Let’s Encrypt certificates for a website.
To configure HTTPS for the domain, follow these steps.
- Update Snap, which is pre-installed on Ubuntu 22.04. Snap is used to download application bundles.
2 To avoid conflicts, remove the default Ubuntu Certbot package:
					sudo snap install core && sudo snap refresh core
sudo apt remove certbot
3 Use snap to install Certbo
certbot 1.31.0 from Certbot Project (certbot-eff✓) installed
4 Use Certbot to download a certificate for the domain:
sudo certbot --apache
Certbot begins the installation process. To receive a certificate, the following information is required. The workflow varies depending on whether you have used Certbot before. Enter the following information when requested to do so:
- A contact email for the domain owner.
- An acknowledgment of the terms of service. Enter
Yto proceed. - Whether to share the email address with the Electronic Frontier Foundation.
- The domain name to be registered. Enter the domain both with and without the
wwwprefix or choose it from a list.
After granting the certificate, Certbot displays some information about the granting process and the certificate. Take note of the location of the newly-deployed certificate. Additional configuration is added to this file in the next section.
					Deploying certificate
Successfully deployed certificate for example.com to
/etc/apache2/sites-available/nextcloud-le-ssl.conf
Congratulations! You have successfully enabled HTTPS on https://example.com
5 (Optional) Certbot can automatically renew and update the certificate. To perform a trial run, use the renew command:
sudo certbot renew --dry-run
How to safely update Nextcloud through console
sudo -u www-data php updater/updater.pharsudo certbot renew --dry-run
How to enable & disable Maintenance mode in Nextcloud
					cd /var/www/nextcloud
sudo -u www-data php occ maintenance:mode --on
sudo -u www-data php occ maintenance:mode --off
sudo -u www-data php /var/www/nextcloud/occ maintenance:mode

OR

cd /var/www/nextcloud ; sudo -u www-data php occ maintenance:mode --on
cd /var/www/nextcloud ; sudo -u www-data php occ maintenance:mode --off
Self Sign SSL Certificate
					Step 1 — Enabling mod_ssl
sudo a2enmod ssl


Step 2 — Restart Apache to activate the module:
sudo systemctl restart apache2


Step 3 — Create the SSL Certificate
sudo openssl req -x509 -nodes -days 64365 -newkey rsa:2048 -keyout /etc/ssl/private/apache-selfsigned.key -out /etc/ssl/certs/apache-selfsigned.crt


Step 4 — Configure Apache to Use SSL
sudo nano /etc/apache2/sites-available/your_domain_or_ip.conf


Step 5 — Open a new file in the /etc/apache2/sites-available directory:
<VirtualHost *:443>
ServerName your_domain_or_ip
DocumentRoot /var/www/your_domain_or_ip
SSLEngine on
SSLCertificateFile /etc/ssl/certs/apache-selfsigned.crt
SSLCertificateKeyFile /etc/ssl/private/apache-selfsigned.key
</VirtualHost>


sudo a2ensite your_domain_or_ip.conf
sudo apache2ctl configtest
sudo systemctl reload apache2


sudo ufw allow "Apache Full"

Step 6 — Redirecting HTTP to HTTPS
sudo nano /etc/apache2/sites-available/your_domain_or_ip.conf


<VirtualHost *:80>
ServerName your_domain_or_ip
Redirect / https://your_domain_or_ip/
</VirtualHost>


sudo apachectl configtest
sudo systemctl reload apache2


..Onlyoffice Configuartion edit put this code config.php nextcloud..
'onlyoffice' =>
array (
"jwt_secret" => "yaMnXwYiTDJEVBLHk17p9ooKYvI6lUiJ",
"jwt_header" => "Authorization"
)
Nextcloud Commnds
					1. Update and Upgrade the Ubuntu Packages
.........................................
apt update -y && apt upgrade -y


2. install Apache and MySQL Server
..................................
apt install apache2 mariadb-server


3. Install PHP and other Dependencies and Restart Apache
........................................................
apt install libapache2-mod-php php-bz2 php-gd php-mysql php-curl php-zip \
php-mbstring php-imagick php-ctype php-curl php-dom php-json php-posix \
php-bcmath php-xml php-intl php-gmp zip unzip wget


4. Enable required Apache modules and restart Apache:
.....................................................
a2enmod rewrite dir mime env headers
systemctl restart apache2


1. Login to MySQL Prompt, Just type
....................................
mysql -u root -p


2. Create MySQL Database and User for Nextcloud and Provide Permissions.
........................................................................
CREATE USER 'nextcloud'@'localhost' IDENTIFIED BY 'passw@rd';
CREATE DATABASE IF NOT EXISTS nextcloud CHARACTER SET utf8mb4 COLLATE utf8mb4_general_ci;
GRANT ALL PRIVILEGES ON nextcloud.* TO 'nextcloud'@'localhost';
FLUSH PRIVILEGES;
quit;

Activate Remote Database user Account Create
............................................
sudo nano /etc/mysql/mariadb.conf.d/50-server.cnf
bind 0.0.0.0
sudo systemctl restart mariadb.service
sudo systemctl enable mariadb.service

CREATE USER 'saikat'@'%' IDENTIFIED BY 'sumita';
GRANT ALL PRIVILEGES ON *.* TO 'saikat'@'%' WITH GRANT OPTION;
FLUSH PRIVILEGES;
quit


1. Download and unzip in the /var/www folder
............................................
cd /var/www/
wget https://download.nextcloud.com/server/releases/latest.zip
unzip latest.zip


2. Remove the zip file, which is not necessary now.
...................................................
rm -rf latest.zip


3. Change the ownership of the nextcloud content directory to the HTTP user.
............................................................................
chown -R www-data:www-data /var/www/nextcloud/


Install NextCloud From the Command Line
........................................
cd /var/www/nextcloud
sudo -u www-data php occ  maintenance:install -database \
"mysql" -database-name "nextcloud"  -database-user "nextcloud" -database-pass \
"passw@rd" -admin-user "admin" -admin-pass "admin123"


nextcloud allows access only from localhost, it could through error
“Access through untrusted domain”. we need to allow accessing
nextcloud by using ip or domain name.
...................................................................
nano /var/www/nextcloud/config/config.php

  'trusted_domains' =>
  array (
    0 => 'localhost',
    1 => 'nc.mailserverguru.com',   // we Included the Sub Domain
  ),


3. Configure Apache to load Nextcloud from the /var/www/nextcloud folder
.........................................................................
vi /etc/apache2/sites-enabled/000-default.conf

<VirtualHost *:80>
        ServerAdmin webmaster@localhost
        DocumentRoot /var/www/nextcloud
        ErrorLog ${APACHE_LOG_DIR}/error.log
        CustomLog ${APACHE_LOG_DIR}/access.log combined
</VirtualHost>


Now, Restart Apache Server
..........................
systemctl restart apache2


Self Sign SSL Certificate
.........................
sudo openssl req -x509 -nodes -days 10000 -newkey rsa:2048 -keyout /etc/ssl/private/apache-selfsigned.key -out /etc/ssl/certs/apache-selfsigned.crt

Doc Server install
..................
curl -O https://download.onlyoffice.com/docs/docs-install.sh
bash docs-install.sh

Edit Json file
.............
nano /etc/onlyoffice/documentserver/local.json