
Configure HAProxy on Ubuntu 22.04
What is HAProxy
HAProxy also stands for High Availability Proxy is a free, open-source Load Balancer and proxying solution designed to simplify and secure modern application architectures. It allows a web server to distribute incoming requests across multiple endpoints. It is very useful where too many concurrent connections over-saturate the capability of a single server. It is gaining popularity due to its efficiency, reliability, and low memory and CPU footprint.
Prerequisites
- A server running Ubuntu 22.04 for HAProxy.
- Two servers running Ubuntu 22.04 for Apache Backend server.
- A root password is configured on all servers.
HAProxy load balancing Algorithms
The open-source load balancer for distributing incoming traffic over several servers or backend resources is HAProxy. HAProxy offers a number of load balancing techniques. This governs the allocation of how incoming requests among backend servers.
We will go through some of the most common load balancing techniques that HAProxy supports.
Round Robin:
This method distributes incoming requests to backend servers in a circular fashion. The process sends requests sequentially to each server, with each server being assigned a number.
This method ensures that each server receives an equal amount of requests, making it an excellent choice when we have a collection of servers with similar capabilities.
Least Connections:
This algorithm distributes incoming requests to the server with the least number of active connections. This algorithm is useful when a set of servers with different processing capabilities are present as it ensures that requests are sent to the least busy server.
Source IP Hash:
This HAProxy load balancing algorithm employs a hash function to map the incoming request’s originating IP address to a backend server. Requests from the same IP address always route the same server.
When we have a group of servers that need to save state information, such as session data, this technique comes in handy.
Weighted Round Robin:
This algorithm is similar to the Round Robin algorithm, but it allows you to assign weights to each server. Servers with a higher weight receive more requests than servers with a lower weight.
This algorithm is useful when you have a set of servers with different capabilities, and we want to distribute traffic accordingly.
Weighted Least Connections:
This approach is similar to the Least Connections algorithm in that weights assign to each server. Higher-weighted servers receive more requests than lower-weighted ones. This approach is handy when we have a collection of servers with varying processing power and want to distribute traffic properly.
These are some of the most frequent load balancing algorithms that HAProxy supports. The capability of the backend servers and the application’s requirements determine the chosen algorithm.
To ensure the proper dispersal of incoming traffic and successful usage of the backend servers, it is essential to select the appropriate algorithm.
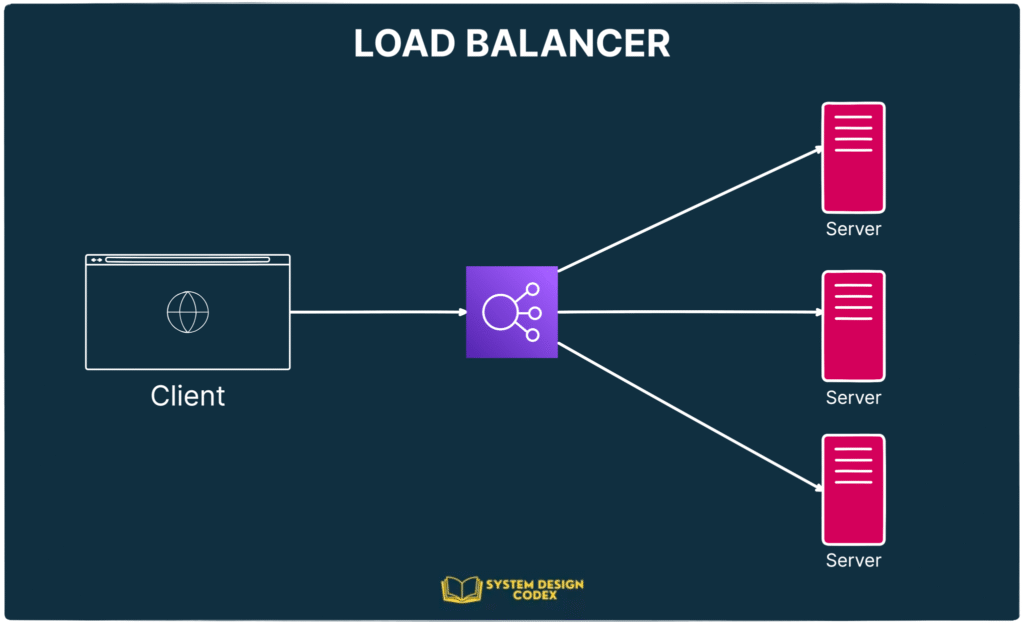
Types of Load Balancing
Now that you have an understanding of the basic components that are used in load balancing, you can move into the basic types of load balancing.
No Load Balancing
A simple web application environment with no load balancing might look like the following:
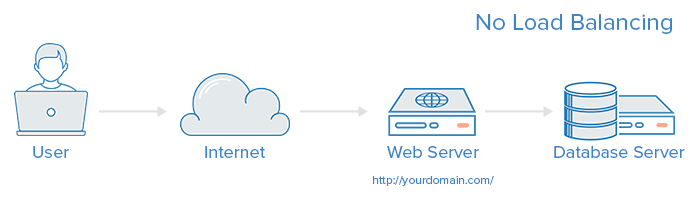
In this example, the user connects directly to your web server, at yourdomain.com and there is no load balancing. If your single web server goes down, the user will no longer be able to access your web server. Additionally, if many users are trying to access your server simultaneously and it is unable to handle the load, they may have a slow experience or they may not be able to connect at all.
Layer 4 Load Balancing
The simplest way to load balance network traffic to multiple servers is to use layer 4 (transport layer) load balancing. Load balancing this way will forward user traffic based on IP range and port (i.e. if a request comes in for http://yourdomain.com/anything, the traffic will be forwarded to the backend that handles all the requests for yourdomain.com on port 80). For more details on layer 4, check out the TCP subsection of our
Here is a diagram of a simple example of layer 4 load balancing:
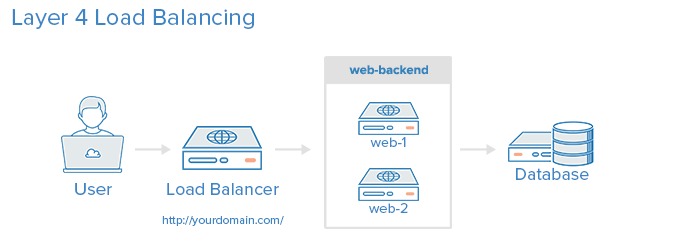
The user accesses the load balancer, which forwards the user’s request to the web-backend group of backend servers. Whichever backend server is selected will respond directly to the user’s request. Generally, all of the servers in the web-backend should be serving identical content–otherwise the user might receive inconsistent content. Note that both web servers connect to the same database server.
Layer 7 Load Balancing
Another, more complex way to load balance network traffic is to use layer 7 (application layer) load balancing. Using layer 7 allows the load balancer to forward requests to different backend servers based on the content of the user’s request. This mode of load balancing allows you to run multiple web application servers under the same domain and port. For more details on layer 7,
Here is a diagram of a simple example of layer 7 load balancing:
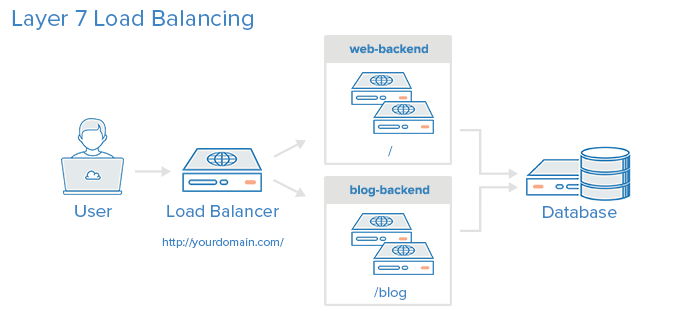
In this example, if a user requests yourdomain.com/blog, they are forwarded to the blog backend, which is a set of servers that run a blog application. Other requests are forwarded to web-backend, which might be running another application. Both backends use the same database server, in this example.
					frontend http
bind *:80
mode http
acl url_blog path_beg /blog
use_backend blog-backend if url_blog
default_backend web-backend
This configures a frontend named http, which handles all incoming traffic on port 80.
acl url_blog path_beg /blog matches a request if the path of the user’s request begins with /blog.
use_backend blog-backend if url_blog uses the ACL to proxy the traffic to blog-backend.
default_backend web-backend specifies that all other traffic will be forwarded to web-backend.
Load Balancing Algorithms
The load balancing algorithm that is used determines which server, in a backend, will be selected when load balancing. HAProxy offers several options for algorithms. In addition to the load balancing algorithm, servers can be assigned a weight parameter to manipulate how frequently the server is selected, compared to other servers.
A few of the commonly used algorithms are as follows:
roundrobin
Round Robin selects servers in turns. This is the default algorithm.
leastconn
Selects the server with the least number of connections. This is recommended for longer sessions. Servers in the same backend are also rotated in a round-robin fashion.
source
This selects which server to use based on a hash of the source IP address that users are making requests from. This method ensures that the same users will connect to the same servers.
Sticky Sessions
Some applications require that a user continues to connect to the same backend server. This can be achieved through sticky sessions, using the appsession parameter in the backend that requires it.
Health Check
HAProxy uses health checks to determine if a backend server is available to process requests. This avoids having to manually remove a server from the backend if it becomes unavailable. The default health check is to try to establish a TCP connection to the server.
If a server fails a health check, and therefore is unable to serve requests, it is automatically disabled in the backend, and traffic will not be forwarded to it until it becomes healthy again. If all servers in a backend fail, the service will become unavailable until at least one of those backend servers becomes healthy again.
For certain types of backends, like database servers, the default health check is not necessarily to determine whether a server is still healthy.
The Nginx web server can also be used as a standalone proxy server or load balancer, and is often used in conjunction with HAProxy for its caching and compression capabilities.
High Availability
The layer 4 and 7 load balancing setups described in this tutorial both use a load balancer to direct traffic to one of many backend servers. However, your load balancer is a single point of failure in these setups; if it goes down or gets overwhelmed with requests, it can cause high latency or downtime for your service.
A high availability (HA) setup is broadly defined as infrastructure without a single point of failure. It prevents a single server failure from being a downtime event by adding redundancy to every layer of your architecture. A load balancer facilitates redundancy for the backend layer (web/app servers), but for a true high availability setup, you need to have redundant load balancers as well.
Here is a diagram of a high availability setup:
In this example, you have multiple load balancers (one active and one or more passive) behind a static IP address that can be remapped from one server to another. When a user accesses your website, the request goes through the external IP address to the active load balancer. If that load balancer fails, your failover mechanism will detect it and automatically reassign the IP address to one of the passive servers. There are a number of different ways to implement an active/passive HA setup.
What is Layer 4 Load Balancing?
A layer 4 load balancer makes routing decisions based on IPs and TCP or UDP ports. It has a packet view of the traffic exchanged between the client and a server which means it takes decisions packet by packet.
The layer 4 connection is established between the client and the server.
It is really fast but can’t perform any action on the protocol above layer 4. The fastest layer4 load balancers use an ASIC to make a routing decision.
What is Layer 7 Load Balancing?
A layer 7 load balancer makes routing decisions based on IPs, TCP or UDP ports, or any information it can get from the application protocol (mainly HTTP). The layer 7 load-balancer acts as a proxy, which means it maintains two TCP connections: one with the client and one with the server.
Layer 4 Proxy Mode
Configure HAProxy to be a layer 4 proxy by setting its mode directive to tcp, as shown in this configuration snippet:
					defaults
# mode is inherited by sections that follow
mode tcp
frontend db
# receives traffic from clients
bind :3306
default_backend databases

backend databases
# relays the client messages to servers
server db1 192.168.0.10:3306
server db2 192.168.0.11:3306
Here, the mode is set in a defaults section so that it applies to any listen, frontend and backend sections that follow. You can also set it in any of those sections too to override what you set in the defaults section. Beware that a frontend and a backend, which form the two halves of the proxied connection—from the client to HAProxy and from HAProxy to the server(s)—must have the same value for mode.
Layer 4 of the OSI model is the Transport layer. It’s responsible for transferring data across a network. One of the most common protocols used here is the Transmission Control Protocol (TCP). TCP chops a message up into segments and then sends them from a source computer to a destination. The sending and receiving computers may have several conversations going on with multiple computers at the same time. For that reason, each communication stream is assigned a unique IP address and port number combination so that those conversations can happen in parallel without colliding.
When HAProxy runs in this mode, it has access to which IP address and port the client is trying to connect to on the backend server. It intercepts the messages by standing in for the server on the expected address and port. For example, if the client expects to connect to port 3306, HAProxy will listen on that port and relay the messages to the server. However, because HAProxy stands in the middle, the server is free to listen on some other IP and port.
Proxying at this layer is lightweight and fast because it is only concerned with transport. HAProxy doesn’t read the messages, it only acts as a courier passing messages back and forth. Yet, it can still add a lot of benefits including health checking servers, hiding your internal network from the public Internet, queuing connections to prevent server overload, and rate limiting connections. It works well for load balancing services that communicate over TCP such as database traffic to MySQL, Postgres and Redis servers.
					defaults
# mode is inherited by sections that follow
mode tcp
frontend db
# receives traffic from clients
bind :3306
default_backend databases

backend databases
# relays the client messages to servers
server db1 192.168.0.10:3306
server db2 192.168.0.11:3306
Layer 7 Proxy Mode
Configure HAProxy to be a layer 7 proxy by setting its mode directive to http, as shown in this configuration snippet:
					defaults
# mode is inherited by sections that follow
mode http
frontend www
# receives traffic from clients
bind :80
default_backend web_servers

backend web_servers
# relays the client messages to servers
server s1 192.168.0.10:3000
server s2 192.168.0.11:3000
Layer 7 is the Application layer, but it doesn’t mean application in the typical sense. It refers to the underlying protocol that an application uses, such as how a web server uses HTTP to bundle a web page. At this layer, HAProxy can make routing decisions based on any detail of a message that’s defined in layers 4 through 7. That includes all of the following:
- source and destination IP addresses and ports
- SSL handshake metadata
- HTTP metadata including headers, cookies, URL and method
In this mode, you get what you had with mode tcp, but more. You can choose a pool of servers based on information found in the SSL handshake, such as SNI fields. Or you can route to a specific set of servers based on the requested URL path. Or you can route based on the HTTP headers received, such as the host or cookie headers. HAProxy can make smarter decisions in this mode, but it still performs at lightning speed. This mode is ideal for load balancing web applications, as you might have guessed.
The benefits of using this mode include being able to route based on higher-level protocols, the opportunity to alter HTTP messages as they pass through, more sophisticated health checking, and the ability to rate limit requests. Other features include setting new request or response headers on messages as they pass through HAProxy, issuing HTTP redirects, enabling Basic authentication, and introducing cookie-based server persistence.
Sample HAProxy LoadBalancing Topology
This article uses the following example topology to configure HAProxy as a load balancer that distributes traffic to multiple backend servers running the Apache web server application. Depending on your application servers, HAProxy forwards connection requests to a backend server depending on its health status and your load balancing method
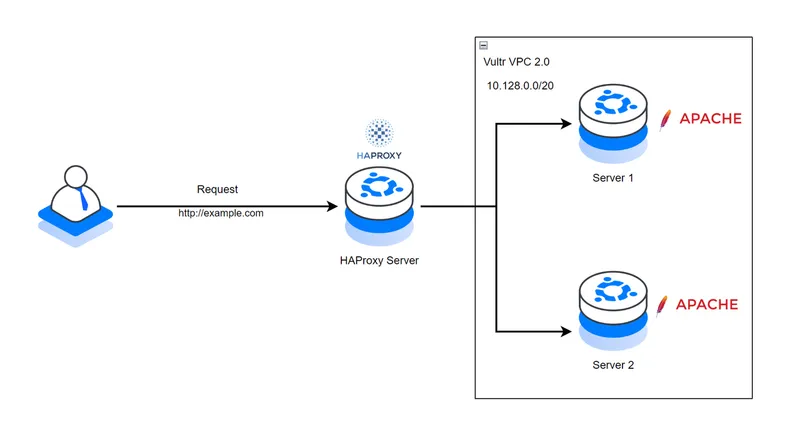
Below are the respective IP address details for each server in the Vultr VPC 2.0 network.
- HA-Proxy Server:
- Public Hostname:
haproxy.example.com - VPC 2.0 IP:
10.128.0.2
- Public Hostname:
- Server 1:
- VPC 2.0 IP:
10.128.0.3
- VPC 2.0 IP:
- Server 2:
- VPC 2.0 IP:
10.128.0.4
- VPC 2.0 IP:
Install HAProxy on Ubuntu 22.04
Access the HAProxy server using SSH.
ssh root@SERVER-IP
- This command connects to a remote server using SSH. It uses the root user account to log in to the server with the specified IP address. This allows direct access to the server’s command line interface.
Create a new non-root user with sudo privileges. For example,
haproxyadmin.
adduser haproxyadmin && adduser haproxyadmin sudo
- This code creates a new user called haproxyadmin and adds them to the sudo group so they can run administrative commands. The first part adds the user and the second part grants sudo access. The && ensures the second command only runs if the first succeeds.
Switch to the new sudo user account.
su - haproxyadmin
- This command switches the current user to the haproxyadmin account using the su (switch user) command. The hyphen ensures the environment variables and settings of the haproxyadmin user are loaded. It is typically used to gain administrative access for managing HAProxy configurations.
Update the server package index
sudo apt update
- This command updates the list of available software packages on a Debian-based Linux system by fetching the latest information from the configured repositories. The sudo part gives the command administrative privileges to perform the update.
Install HAProxy.
sudo apt install haproxy -y
- This command installs the HAProxy software on a Linux system using the apt package manager. The sudo part gives administrative privileges, apt install tells the system to install the package, haproxy is the software being installed, and -y automatically confirms the installation without asking for permission.
The latest HAProxy version may not be available in the default APT repositories. Run the following command to install a specific version using the
vybernetPPA repository on your server.
sudo add-apt-repository ppa:vbernat/haproxy-2.8 -y
- This command adds a third-party software repository to your Ubuntu system. The repository provides a specific version of HAProxy (a load balancing tool) and allows you to install or update it using the package manager. The sudo prefix gives administrative rights, and the -y flag automatically confirms any prompts.
Enable HAProxy to start at boot time.
sudo systemctl enable haproxy
- This command enables the HAProxy service to start automatically when the system boots up. It uses sudo to run the command with administrative privileges and systemctl to manage the service configuration.
View the HAProxy system service status to verify that the application is installed on your server.
sudo systemctl status haproxy
- This command checks the current status of the HAProxy service on a Linux system. It uses sudo to run the command with administrative privileges and systemctl to query the status of the haproxy service. The output shows whether the service is active, running, or stopped and provides related information.
Output:
Active: active (running)
Configure the HAProxy Server
The HAProxy main configuration file /etc/haproxy/haproxy.cfg controls how the application runs and listens for incoming connections on the server. The configuration file includes the following sections by default:
global: Contains settings that define how HAProxy runs on the server. Available options include logging, user/group, system service mode, and SSL configurations.defaults: Includes the default HAProxy parameters that define the application performance on your server. Available options include timeouts and the application mode. The default valuehttpinstructs HAProxy to treat all incoming traffic as HTTP while a value such astcptreats traffic as raw TCP connections on the server.
Follow the steps below to modify the configuration file with new sections that define how HAProxy accepts and distributes traffic as a load balancer to backend servers in the Vultr VPC 2.0 network
Back up the original HAProxy configuration file.
sudo cp /etc/haproxy/haproxy.cfg /etc/haproxy/haproxy.cfg.backup
- This command copies the HAProxy configuration file to a backup file. It uses sudo to gain administrative privileges, copies the original configuration file named haproxy.cfg to a new file named haproxy.cfg.backup in the same directory. This creates a backup of the configuration before making changes.
Open the HAProxy main configuration file using a text editor like nano.
sudo nano /etc/haproxy/haproxy.cfg
- This command opens the HAProxy configuration file in the nano text editor with administrative privileges. It allows you to view or edit settings that control how HAProxy handles network traffic, such as load balancing or proxy rules. The file is located in the /etc/haproxy directory, which stores system-wide configuration data.
Add the following configurations at the end of the file.
					frontend website-frontend
    bind *:80,*:443
    option httpchk GET /healthcheck
    default_backend servers

backend servers
    balance roundrobin
    server server-1 10.128.0.3:80 weight 1 check
    server server-2 10.128.0.4:80 weight 1 check
The above configuration creates two new sections, frontend and backend with custom labels for identification purposes. The frontend section website-frontend defines how HAProxy listens for incoming requests on the server. Within the section:
bind: Instructs HAProxy to listen for incoming connections on the HTTP port80and the HTTPS port443.option httpchk: Sets the URL path and request type to use with HAProxy when running health checks on the backend servers.default_backend: Defines the backend policy and hosts to use with HAProxy. Theserversvalue enables the backend group to load balance.
The backend section with the custom label servers sets the target hosts to forward traffic and use with HAProxy. Within the section:
balance: Sets the HAProxy load balancing algorithm to use with the backend servers. The valueroundrobinselects servers in turns where traffic is evenly distributed to all available servers. Other supported modes includeleastconnandsourcethat define how HAProxy load balances traffic between the defined servers.server: Defines the backend servers to use with HAProxy. For example, the valueserver-1 10.128.0.3:80 weight 1 checkcreates a new backend server connection with the labelserver 1on the VPC address10.128.0.3, and the target port80. The server has a weight of1which defines its share of the traffic load for uneven distribution while the same weight with other servers such asserver 2creates an even distribution of traffic. Thecheckoption enables health checking to stop forwarding traffic to a server in case it’s unable to handle requests.
Add a new listen section at the end of the file with the following configurations to enable monitoring.
					listen stats
    bind *:8404
    mode http
    stats enable
    stats uri /stats
    stats auth admin:your_password
    stats refresh 10s
Save and close the file.
The above configuration enables access to the HAProxy web dashboard that provides real-time traffic monitoring and statistics about the active server processes. The stats page offers insights into various metrics such as the number of connections, session rates, request rates, response times, and errors. Within the above listen configuration:
stats: Sets the listener label tostatsfor identification purposes.bind: Sets the target host port to listen for incoming connections to the HAProxy statistics page.mode: Specifies the HAProxy connection mode. The valuehttpenables HTTP requests and optimizations on the specified port.stats enable: Enables the HAProxy statistics page.stats uri: Specifies the URL path to access the HAProxy stats page.stats auth: Sets the username and password for accessing the HAProxy statistics page.stats refreshSets the HAProxy statistics refresh interval. The value10sspecifies a refresh rate of 10 seconds.
Restart the HAProxy service to apply your configuration changes.
sudo systemctl restart haproxy
- This command restarts the HAProxy service which is used to manage traffic between servers. The sudo part gives temporary administrative privileges to perform the action and systemctl is the tool used to control system services.
Uncomplicated Firewall (UFW) is active on Vultr Ubuntu servers and blocks connection requests by default. Allow the HAProxy port 80 through the firewall to enable HTTP connections on the server.
sudo ufw allow 80/tcp
- This command allows incoming traffic on port 80 using the TCP protocol. Port 80 is commonly used for web traffic. The sudo part gives administrative privileges to run the command, and ufw is the firewall tool being used to configure the rule.
Allow the HAProxy port 3804 to enable access to the statistics page.
sudo ufw allow 3804/tcp
- This command allows incoming traffic on port 3804 using the TCP protocol through the firewall. It requires administrative privileges to execute.
Restart the firewall to apply the connection rules.
sudo ufw reload
Test connectivity to your backend server VPC addresses using the Ping utility.
Server 1
ping 10.128.0.3
Server 2
ping 10.128.0.4
Access the HAProxy Accelerated Web Application
HAProxy distributed traffic in rounds to the backend servers within the Vultr VPC 2.0 network. Depending on the backend server health, a single server cannot process multiple requests at a time based on the round-robin algorithm that distributes the traffic evenly to all servers. Follow the steps below to access the HAProxy server and verify that your backend servers respond to all user requests.
Access your HAProxy server domain URL using a web browser such as Chrome.
http://haproxy.example.com
Verify that your web application displays in your browser window. The first request may be forwarded to Server 1 and the next request to another server in the backend pool depending on the number of backend servers.

Refresh your web browser window and verify that Server 2 responds to the request.

Refresh the web page again and verify that Server 1 responds to your HTTP request again due to the round-robin algorithm.
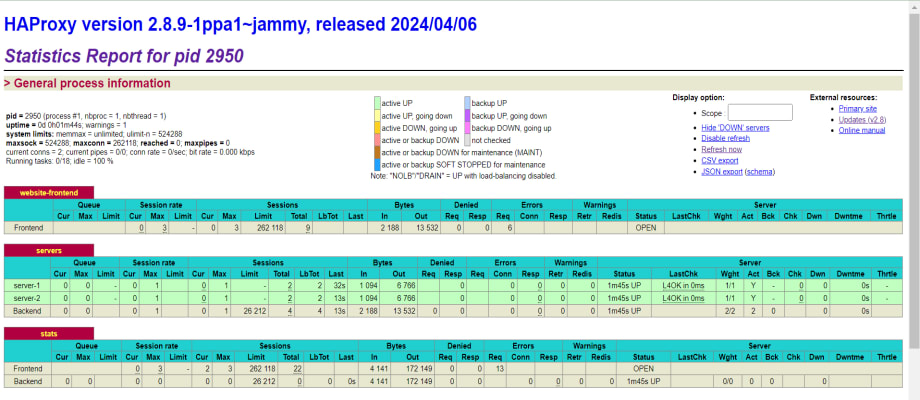
Access the HAProxy statistics interface on the monitoring port 8404 to view your HAProxy connection requests and performance.
http://haproxy.example.com:8404
Enter the administrative user login details you created with the stats auth directive in your listen stats configuration.
Verify that the HAProxy statistics interface displays in your web browser with information about your frontend and backend performance.
How to Configure an SSL Certificate in HAProxy
Add this line, to Haproxy.cfg File configure the maximum size of temporary DHE keys
that are generated:
# Default SSL material locations
ca-base /etc/ssl/certs
tune.ssl.default-dh-param 2048 <add This Line Haproxy.cfg File>
crt-base /etc/ssl/private
Haproxy.cfg Main Loade Balenceing Config File
					cache my_cache
    total-max-size 512
    max-object-size 5000000
    max-age 150


frontend http_front
    bind *:80
    bind :443 ssl crt /etc/ssl/certs/haproxy.pem

    http-request cache-use my_cache
    http-response cache-store my_cache

    acl host_app1 hdr(host) -i ottcloud.saikatinfotech.com
    acl host_app2 hdr(host) -i learncloud.saikatinfotech.com
    acl host_app3 hdr(host) -i musiccloud.saikatinfotech.com
    #http-request redirect scheme https unless { ssl_fc }

    use_backend backend_app1 if host_app1
    use_backend backend_app2 if host_app2
    use_backend backend_app3 if host_app3

backend backend_app1
     balance roundrobin
     http-request cache-use my_cache
     http-response cache-store my_cache
     server app1srv1 192.168.1.130:8081 check


backend backend_app2
    balance roundrobin
    http-request cache-use my_cache
    http-response cache-store my_cache
    server app2srv1 192.168.1.130:8081 check


backend backend_app3
    balance roundrobin
    http-request cache-use my_cache
    http-response cache-store my_cache
    server app3srv1 192.168.1.130:8081 check


listen stats
bind *:8181
mode http
stats enable
stats uri /stats
stats auth admin:tiger@7700
stats refresh 10s

........XAMMP Vhost Config........

<VirtualHost *:8081>
   ServerAdmin webmaster@dummy-ottcloud.saikatinfotech.com
   DocumentRoot "R:\Server\cloud"
   ServerName ottcloud.saikatinfotech.com
   ServerAlias www.ottcloud.saikatinfotech.com
   ErrorLog "logs/dummy-ottcloud.saikatinfotech.com-error.log"
   CustomLog "logs/dummy-ottcloud.saikatinfotech.com-access.log" common
</VirtualHost>

<VirtualHost *:8081>
   ServerAdmin webmaster@dummy-learncloud.saikatinfotech.com
   DocumentRoot "R:\Server\itking"
   ServerName learncloud.saikatinfotech.com
   ServerAlias www.learncloud.saikatinfotech.com
   ErrorLog "logs/dummy-learncloud.saikatinfotech.com-error.log"
   CustomLog "logs/dummy-learncloud.saikatinfotech.com-access.log" common
</VirtualHost>


<VirtualHost *:8081>
   ServerAdmin webmaster@dummy-musiccloud.saikatinfotech.com
   DocumentRoot "R:\Server\music"
   ServerName musiccloud.saikatinfotech.com
   ServerAlias www.musiccloud.saikatinfotech.com
   ErrorLog "logs/dummy-musiccloud.saikatinfotech.com-error.log"
   CustomLog "logs/dummy-musiccloud.saikatinfotech.com-access.log" common
</VirtualHost>
Generate a Self-Signed Certificate
					1- openssl genrsa -out /etc/ssl/private/haproxy.key 2048
2- openssl req -new -key /etc/ssl/private/haproxy.key -out /etc/ssl/certs/haproxy.csr
3- openssl x509 -req -days 365 -in /etc/ssl/certs/haproxy.csr
-signkey /etc/ssl/private/haproxy.key -out /etc/ssl/certs/haproxy.crt
4 - cat /etc/ssl/private/haproxy.key /etc/ssl/certs/haproxy.crt >>
/etc/ssl/certs/haproxy.pem

..Checking Commnd  All config Any Error Or Not ..
haproxy -c -f /etc/haproxy/haproxy.cfg
sudo systemctl restart haproxy

OR

Step 1 — Create the directory for HAProxy certificates
.......................................................
sudo mkdir -p /etc/haproxy/certs
sudo chmod 700 /etc/haproxy/certs


Step 2 — Generate a Self-Signed Certificate (OpenSSL)
.....................................................
sudo openssl req -x509 -nodes -days 365 \
  -newkey rsa:2048 \
  -keyout /etc/haproxy/certs/server.key \
  -out /etc/haproxy/certs/server.crt


Step 3 — Combine Key + Certificate into a PEM file
...................................................
sudo cat /etc/haproxy/certs/server.key /etc/haproxy/certs/server.crt \
  | sudo tee /etc/haproxy/certs/server.pem > /dev/null

Secure permissions:
...................
sudo chmod 600 /etc/haproxy/certs/server.pem


Step 4 — HAProxy HTTPS Configuration (SSL termination)
......................................................
sudo nano /etc/haproxy/haproxy.cfg

global
    log /dev/log local0
    maxconn 2000
    tune.ssl.default-dh-param 2048

defaults
    mode http
    timeout connect 5s
    timeout client 50s
    timeout server 50s

frontend https_front
    bind *:443 ssl crt /etc/haproxy/certs/server.pem
    default_backend webservers

backend webservers
    balance roundrobin
    server web1 192.168.1.10:80 check
    server web2 192.168.1.11:80 check

Step 5 — Force HTTP → HTTPS Redirect
.....................................
frontend http_front
    bind *:80
    redirect scheme https code 301 if !{ ssl_fc }

Step 6 — Test configuration
...........................
sudo haproxy -f /etc/haproxy/haproxy.cfg -c
sudo systemctl restart haproxy
Nginx Proxy Load Balencing
nano/etc/nginx/conf.d proxy.conf

upstream backend_domain1 {
    server 192.168.1.130:8081;

}


upstream backend_domain2 {
    server 192.168.1.130:8081;

}

server {
    listen 80;
    server_name ottcloud.saikatinfotech.com www.ottcloud.saikatinfotech.com;
    server_name ottcloud.saikatinfotech.com;
    return 301 https://$host$request_uri;

    location / {
        proxy_pass http://backend_domain1;
        proxy_set_header Host $host;
        proxy_set_header X-Real-IP $remote_addr;
    }
}

server {
    listen 443 ssl http2;
    server_name ottcloud.saikatinfotech.com www.ottcloud.saikatinfotech.com;

    ssl_certificate /etc/ssl/certs/selfsigned.crt;
    ssl_certificate_key /etc/ssl/private/selfsigned.key;

    location / {
        proxy_pass http://backend_domain1;
        proxy_set_header Host $host;
        proxy_set_header X-Real-IP $remote_addr;
    }
}

server {
    listen 80;
    server_name musiccloud.saikatinfotech.com www.musiccloud.saikatinfotech;
#    server_name musiccloud.saikatinfotech.com;
 #   return 301 https://$host$request_uri;

    location / {
        proxy_pass http://backend_domain2;
        proxy_set_header Host $host;
        proxy_set_header X-Real-IP $remote_addr;
    }
}

server {
    listen 443 ssl http2;
    server_name musiccloud.saikatinfotech.com www.musiccloud.saikatinfotech;
   ssl_protocols TLSv1.2 TLSv1.3;
    ssl_ciphers HIGH:!aNULL:!MD5;
    client_max_body_size 500M;
    ssl_certificate /etc/ssl/certs/selfsigned.crt;
    ssl_certificate_key /etc/ssl/private/selfsigned.key;


       location / {
        proxy_pass http://backend_domain2;

        proxy_set_header Host $host;
        proxy_set_header X-Real-IP $remote_addr;
        proxy_set_header X-Forwarded-For $proxy_add_x_forwarded_for;
        proxy_set_header X-Forwarded-Proto https;

        proxy_http_version 1.1;
        proxy_set_header Upgrade $http_upgrade;
        proxy_set_header Connection "upgrade";

   }
}