Palo Alto Basic Initial Configuration
Palo Alto Basic Configuration Overview
- Management Configuration – Configure the firewall management IP, gateway, DNS, and administrator access.
- Interface Configuration – Configure WAN, LAN, and DMZ interfaces with the required IP addresses.
- Security Zone Configuration – Create zones such as LAN, WAN, and DMZ to separate and control different network areas.
- Virtual Router Configuration – Add interfaces to the Virtual Router and configure Layer-3 routing.
- Routing Configuration – Configure the default route and required static routes to reach the ISP, internal networks, and other destinations.
- NAT Configuration – Configure Source NAT for Internet access and Destination NAT when publishing internal servers.
- Security Policy – Create rules to allow or deny traffic between security zones.
- App-ID – Identify applications such as web browsing, DNS, RDP, SSH, Teams, etc., and control them through Security Policies.
- URL Filtering – Control access to websites and block unwanted or dangerous website categories.
- Security Profiles – Add Antivirus, Anti-Spyware, Vulnerability Protection, File Blocking, and WildFire for additional security.
- Logging & Monitoring – Use Traffic, Threat, URL, and System logs to monitor activity and troubleshoot problems.
- Commit Configuration – Commit the candidate configuration so the changes become active.
- Testing & Troubleshooting – Test gateway, routing, NAT, DNS, Internet connectivity, and check Traffic Logs.
Palo Alto Next-Generation Firewall Syllabus
Firewall & Networking Fundamentals
- What is Firewall?
- Traditional Firewall vs NGFW
- Palo Alto Firewall overview
- TCP/IP basics
- OSI Model
- IP Address & Subnetting
- TCP/UDP
- Ports & Protocols
- Routing basics
- NAT basics
- DNS & DHCP
Initial / Basic Configuration
- Management IP configuration
- Login & administrator account
- Hostname
- DNS configuration
- NTP
- Time Zone
- Management services
- Commit configuration
- Save configuration
- Backup configuration
Virtual Router & Routing
- Virtual Router
- Static Route
- Default Route
- Next Hop
- Routing Table
- Administrative Distance
- ECMP
- Dynamic Routing introduction
- OSPF
- BGP
NAT
- What is NAT?
- Source NAT
- Destination NAT
- Static NAT
- Dynamic IP NAT
- PAT
- Port Forwarding
- DNAT for Server
- NAT troubleshooting
User Identification
- User-ID
- IP-to-User mapping
- Active Directory integration
- LDAP
- Group mapping
- User-based security policy
Antivirus & Threat Prevention
- Antivirus Profile
- Anti-Spyware
- Vulnerability Protection
- WildFire
- Security Profiles
- Security Profile Groups
- Threat logs
Content & Data Security
- File Blocking
- Data Filtering
- WildFire Analysis
- DLP concepts
- Malware detection
GlobalProtect
- What is GlobalProtect?
- Portal
- Gateway
- Client configuration
- Authentication
- User-based VPN
- Remote-access VPN
- Troubleshooting
Panorama
- What is Panorama?
- Panorama architecture
- Firewall onboarding
- Device Groups
- Templates
- Template Stacks
- Shared Policy
- Centralized management
- Commit & Push
Advanced Networking
- VLAN
- Inter-VLAN routing
- PBF (Policy Based Forwarding)
- QoS
- Multicast
- DHCP Relay
- DNS Proxy
- Virtual Wire deployment
- Multiple ISP
- Load balancing concepts
Licensing & Updates
- PAN-OS upgrade
- Dynamic Updates
- Antivirus updates
- Applications & Threats updates
- URL Filtering updates
- License management
- Support portal
Palo Alto Introduction
- Palo Alto Networks overview
- PAN-OS
- Firewall architecture
- Management Plane & Data Plane
- Palo Alto Firewall models
- VM-Series overview
- Physical vs VM Firewall
Palo Alto Firewall Modes
- Layer 3 Mode
- Layer 2 Mode
- Virtual Wire Mode
- TAP Mode
- When to use each mode
Interfaces & Zones
- Ethernet Interface
- Management Interface
- Loopback Interface
- VLAN Interface
- Interface types
- Security Zone
- Trust Zone
- Untrust Zone
- DMZ Zone
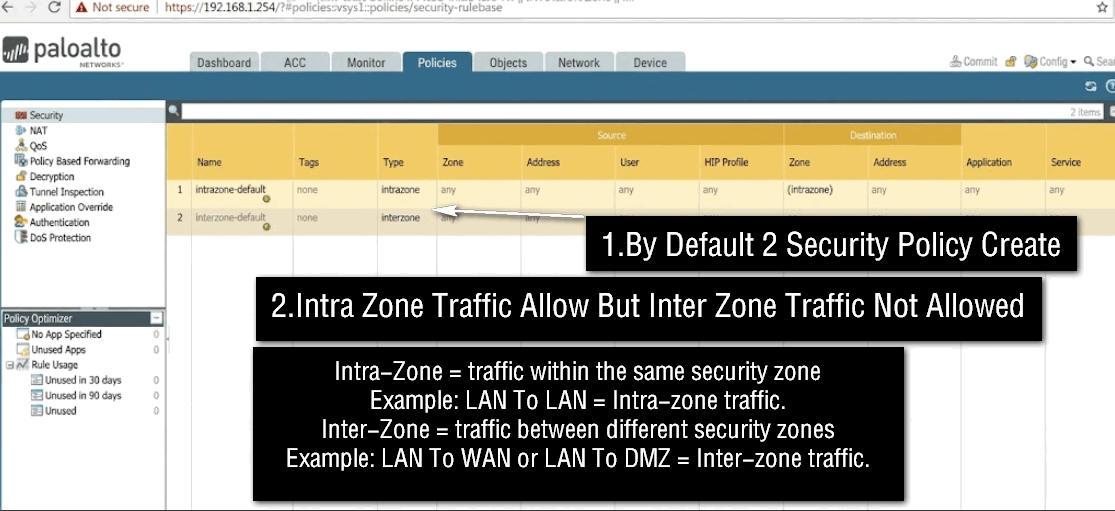
- Intra-Zone
- Inter-Zone
Security Policy
- What is Security Policy?
- Source Zone
- Destination Zone
- Source Address
- Destination Address
- Application
- Service
- Action
- Allow / Deny
- Rule order
- Logging
- Policy troubleshooting
Application Control
- App-ID
- Application identification
- Application groups
- Application filtering
- Custom applications
- Application dependency
URL Filtering
- URL Filtering
- URL categories
- Allow / Block websites
- Custom URL Category
- Safe Search
- URL filtering profiles
- Website monitoring
SSL/TLS Inspection
- SSL Forward Proxy
- SSL Inbound Inspection
- Certificate configuration
- Decryption policy
- Certificate deployment
- Troubleshooting SSL inspection
VPN
- Site-to-Site IPsec VPN
- IKE
- IPsec
- IKE Gateway
- IPsec Tunnel
- Tunnel Interface
- Route-based VPN
- GlobalProtect
High Availability
- HA overview
- Active/Passive HA
- HA1
- HA2
- HA3
- Configuration synchronization
- Failover
- HA troubleshooting
Monitoring & Troubleshooting
- Traffic Monitor
- Threat Monitor
- URL logs
- System logs
- Configuration logs
- ACC
- Session monitoring
- Packet capture
- CLI troubleshooting
- Ping / Traceroute
- Session troubleshooting
Advanced Networking
- Security Profile Groups
- Custom signatures
- External Dynamic Lists
- IP blocking
- DNS Security
- Advanced URL Filtering
- WildFire
- Zero Trust concepts
Palo Alto Firewall Basic Initial Configuration
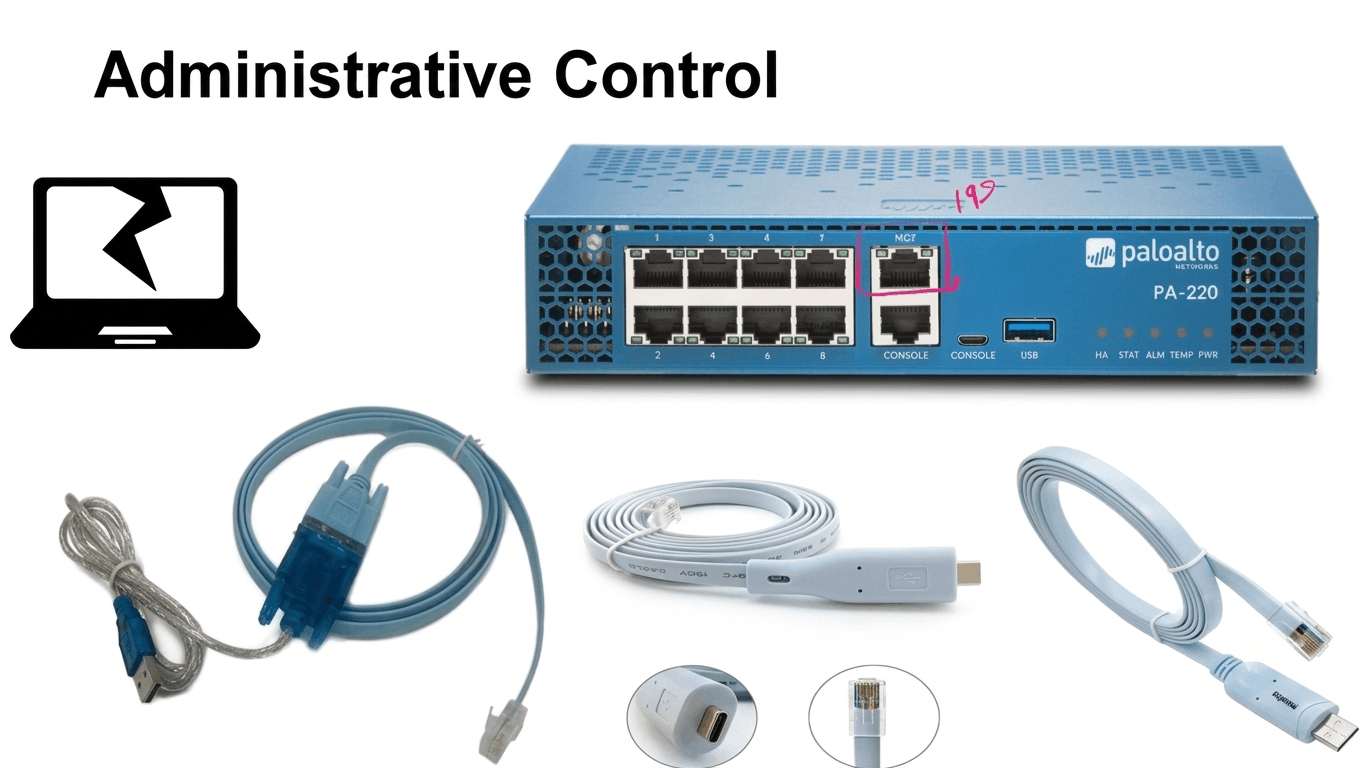
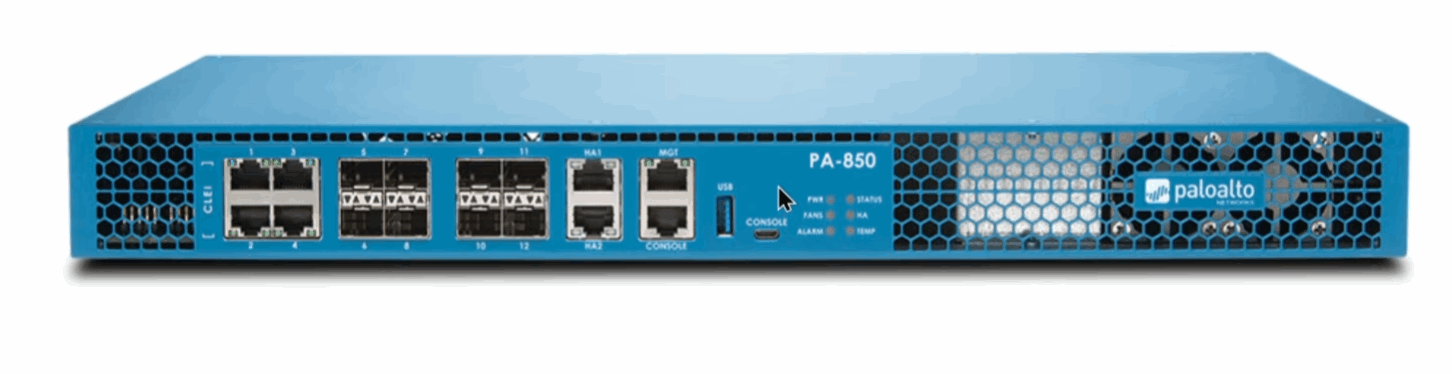
1. Connect to the Palo Alto Firewall
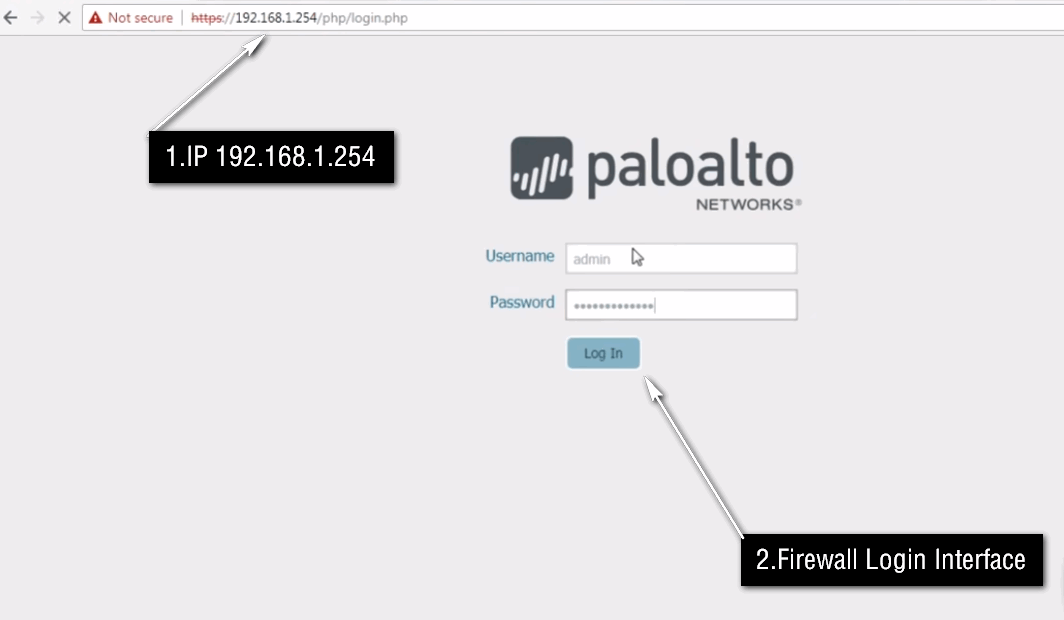
First, connect your laptop or desktop computer to the Management Port of the Palo Alto firewall using an Ethernet cable. Configure a temporary static IP address on your computer so that it can communicate with the firewall’s management interface. Open a web browser and access the firewall’s management IP address. Log in using the administrator account. After successful login, you will see the Palo Alto PAN-OS Web Interface, where most firewall configurations are performed.
- First, connect your laptop directly to the Management Port of the Palo Alto firewall.
- The Management Port is used for administration and is separate from the normal data interfaces.
- For initial access, configure a static IP on your laptop in the same subnet as the firewall’s management interface.
- On commonly deployed Palo Alto appliances, the factory-default management IP is 192.168.1.1.
- Configure your laptop as follows:
					Laptop IP Address:       192.168.1.10
Subnet Mask:             255.255.255.0
Default Gateway:         192.168.1.1
2. Change the Default Administrator Password
The first security step should be changing the administrator password. Go to Device → Administrators and select the administrator account. Set a strong password containing uppercase letters, lowercase letters, numbers, and special characters. A strong administrator password helps protect the firewall from unauthorized administrative access.
3. Configure the Management Interface
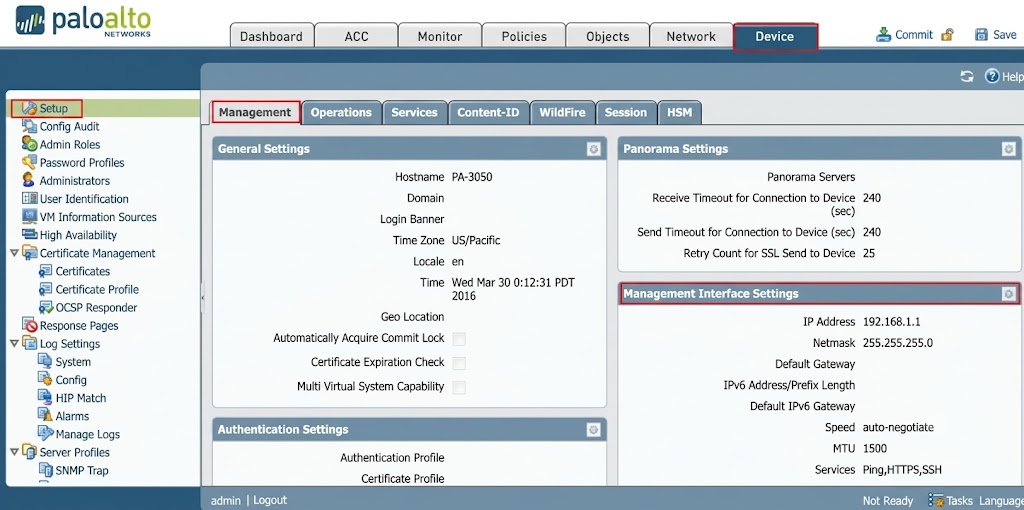
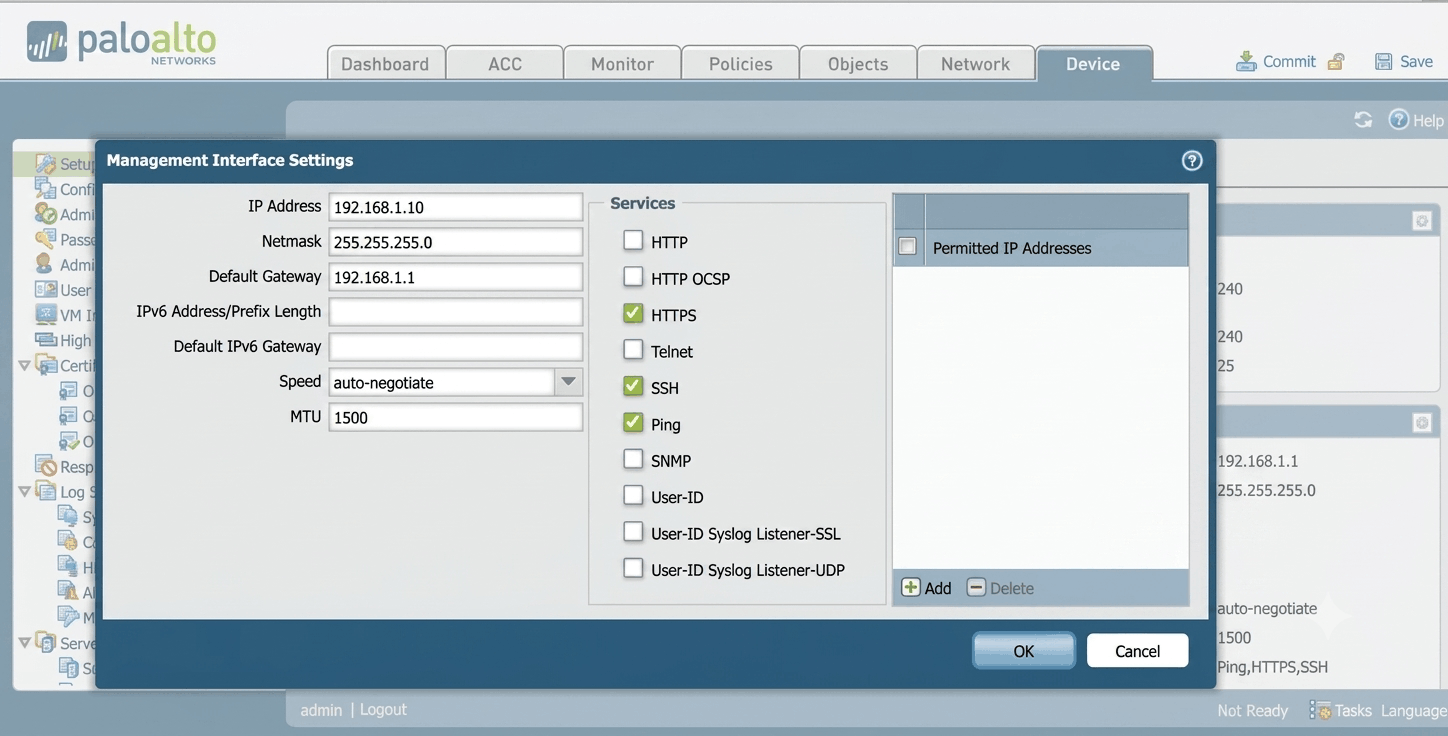
Configure the management interface with a proper IP address for your management network. Go to Device → Setup → Interfaces → Management and configure the IP address, subnet mask, default gateway, and DNS server.
					IP Address:     192.168.10.2
Subnet Mask:    255.255.255.0
Gateway:        192.168.10.1
DNS:            8.8.8.8
The management interface is used for administrative access to the firewall. It is normally kept separate from the normal user traffic.
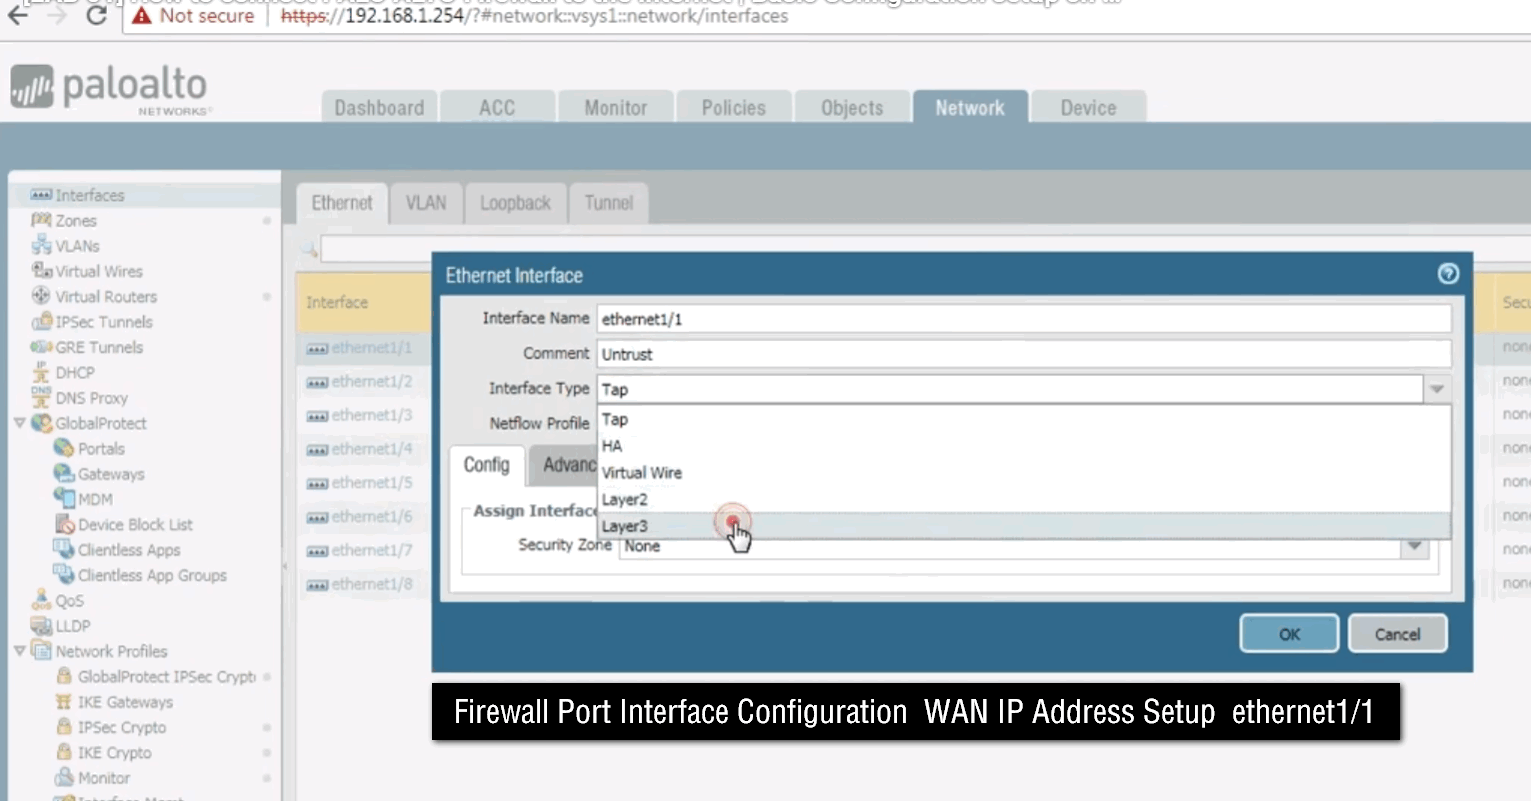
4. Configure the WAN Interface
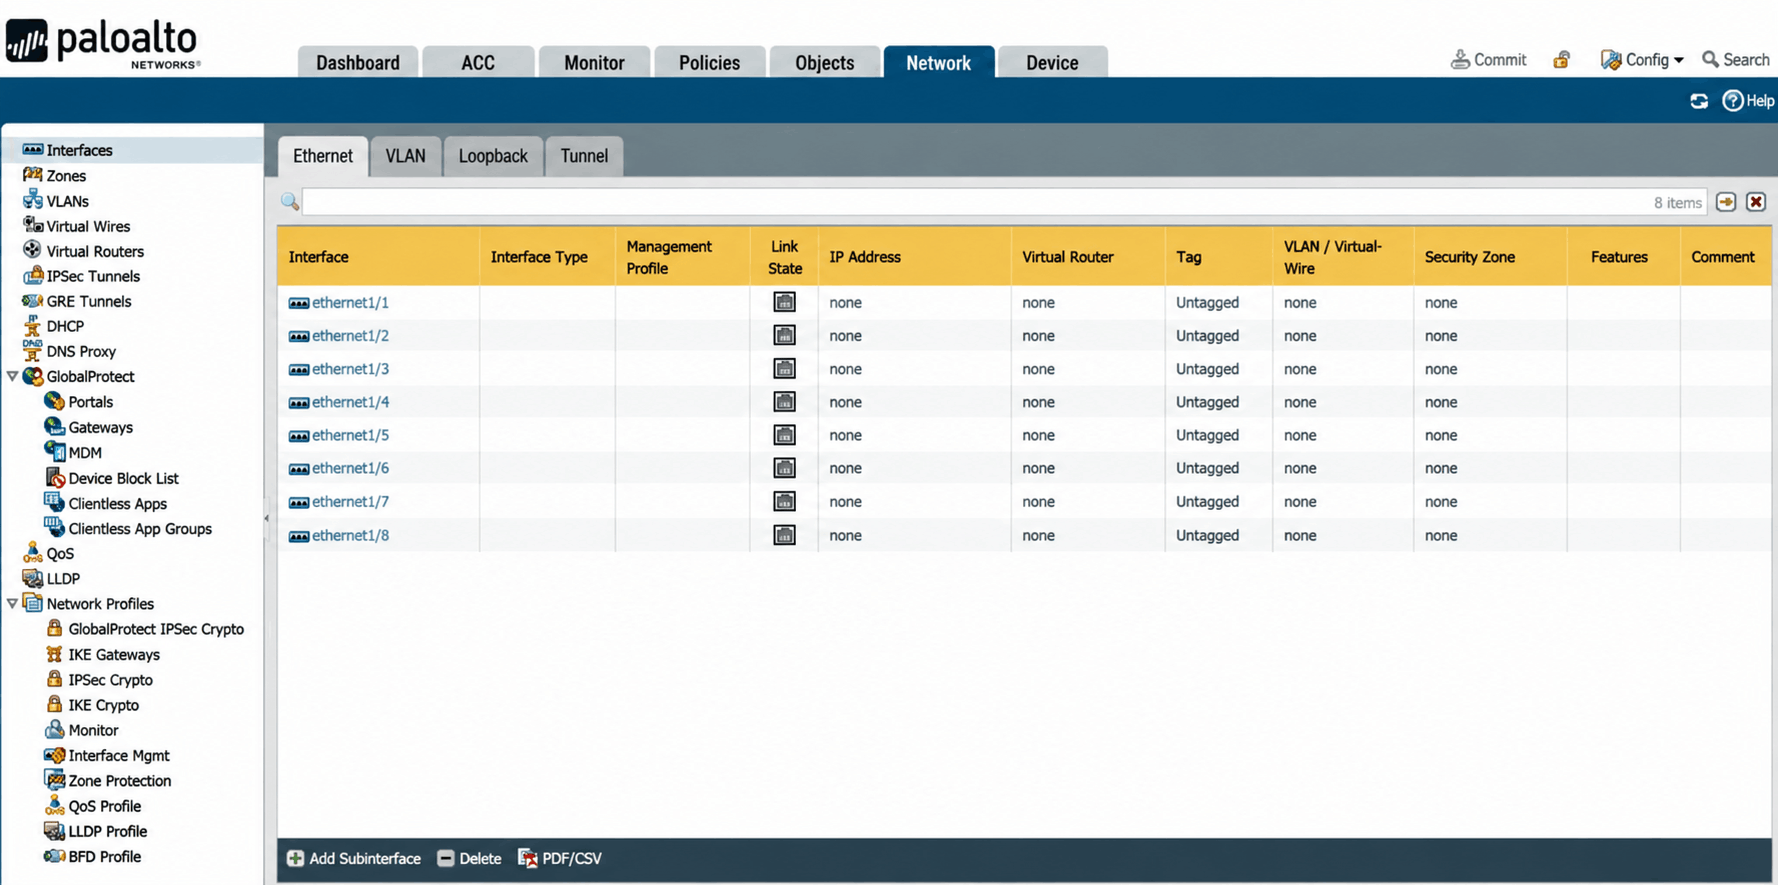
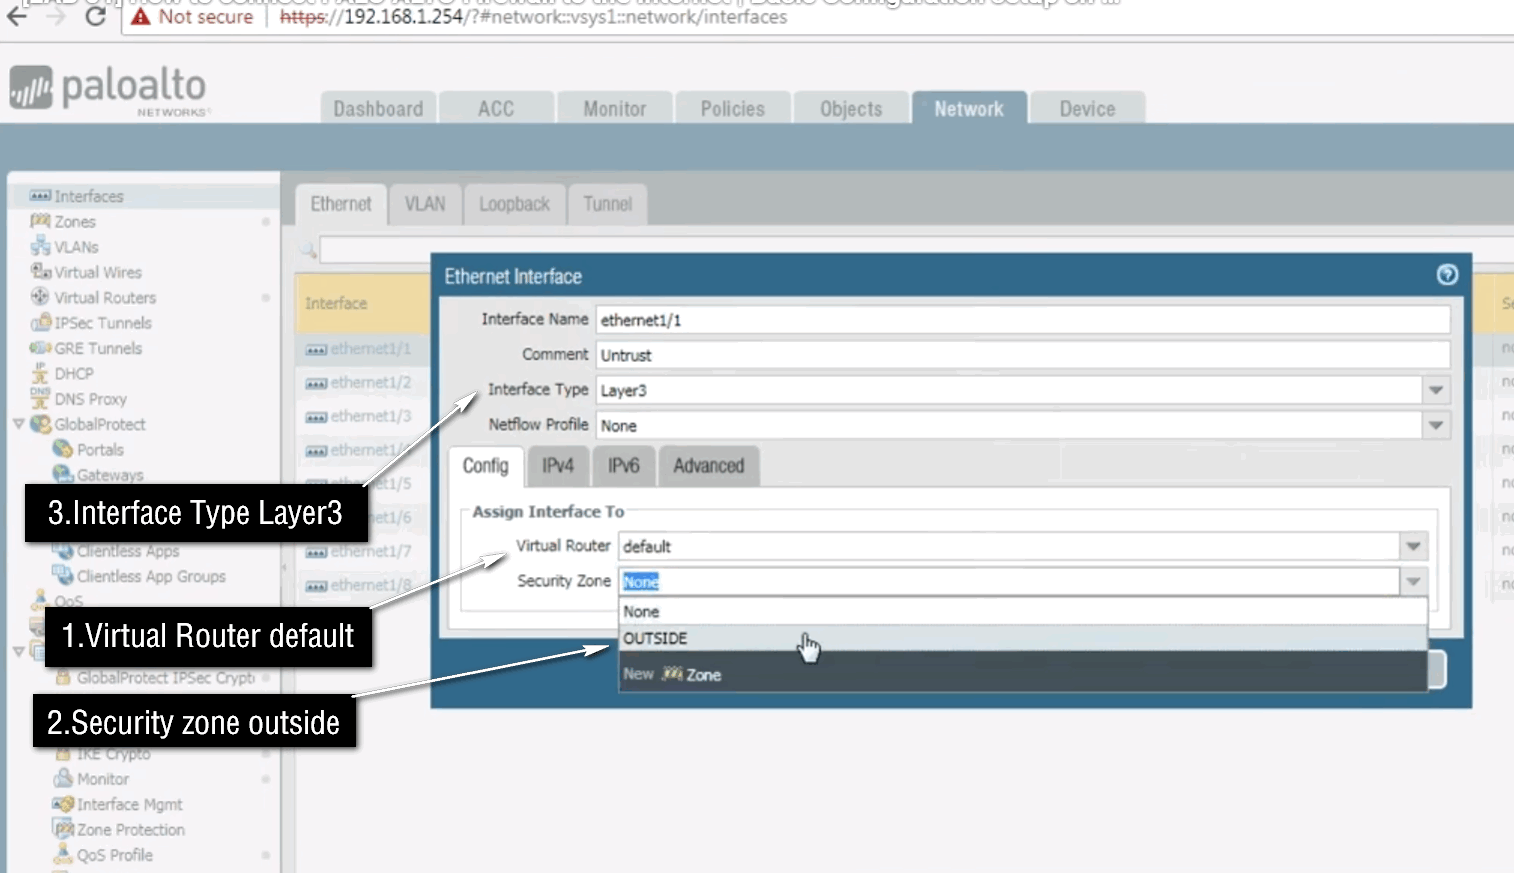
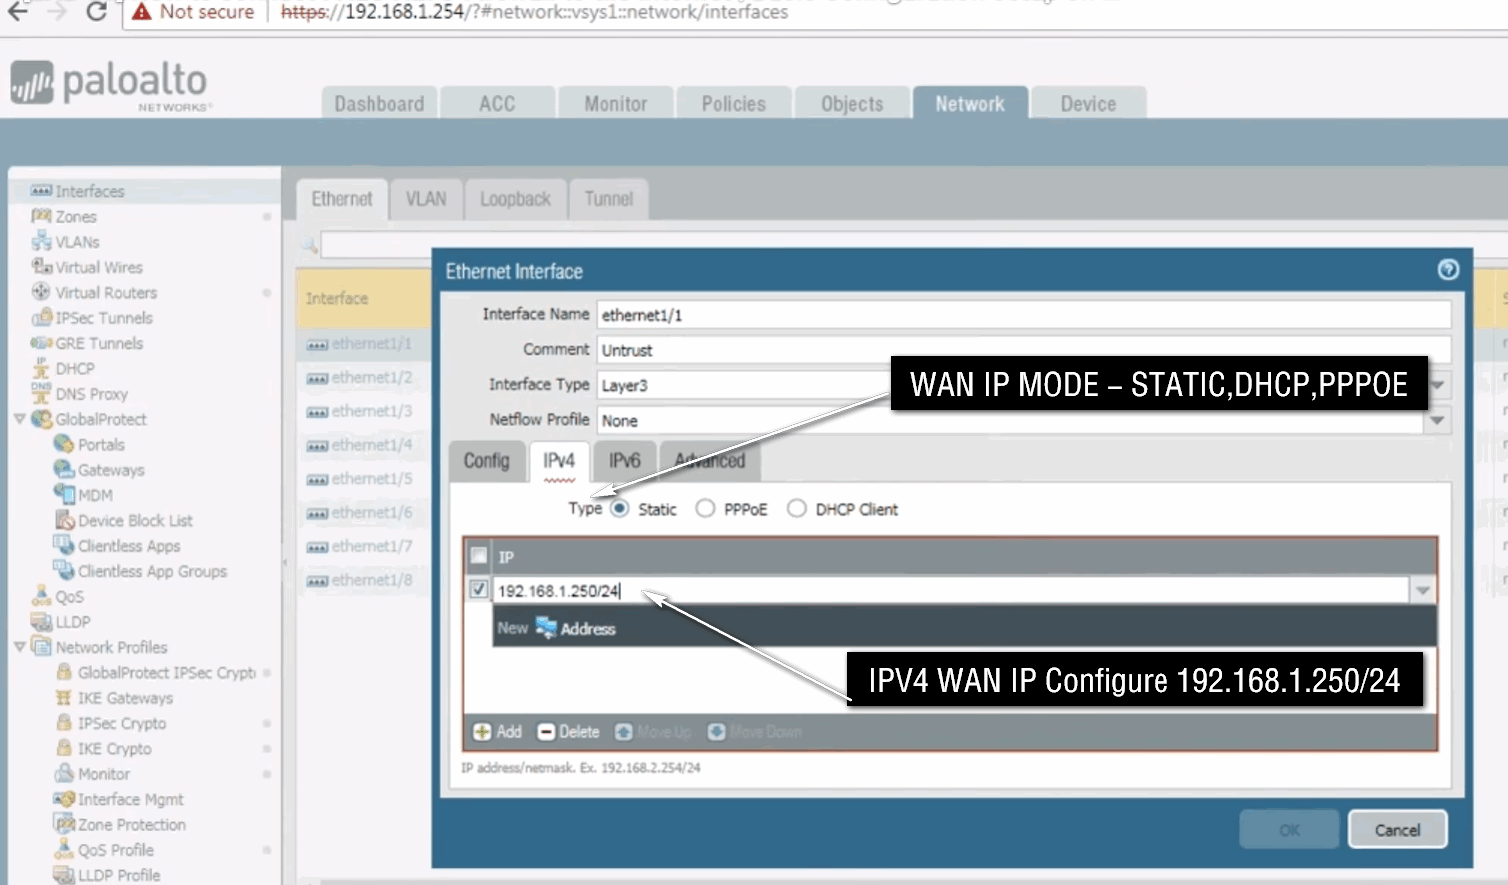
The WAN interface connects the Palo Alto firewall to the ISP router or Internet connection. Go to Network → Interfaces → Ethernet and select the interface connected to the ISP.
For example:
					Interface:       ethernet1/1
IP Address:      100.10.10.2/30
Zone:            WAN
Virtual Router:  default
The actual IP configuration depends on your ISP. The ISP may provide a static IP, DHCP, or PPPoE connection.
5. Configure the LAN Interface
The LAN interface connects the firewall to your internal network or core switch. Configure an IP address that will act as the default gateway for internal users.
Example:
					Interface:       ethernet1/2
IP Address:      192.168.10.1/24
Zone:            LAN
Virtual Router:  default
The user computers can then use 192.168.10.1 as their default gateway.
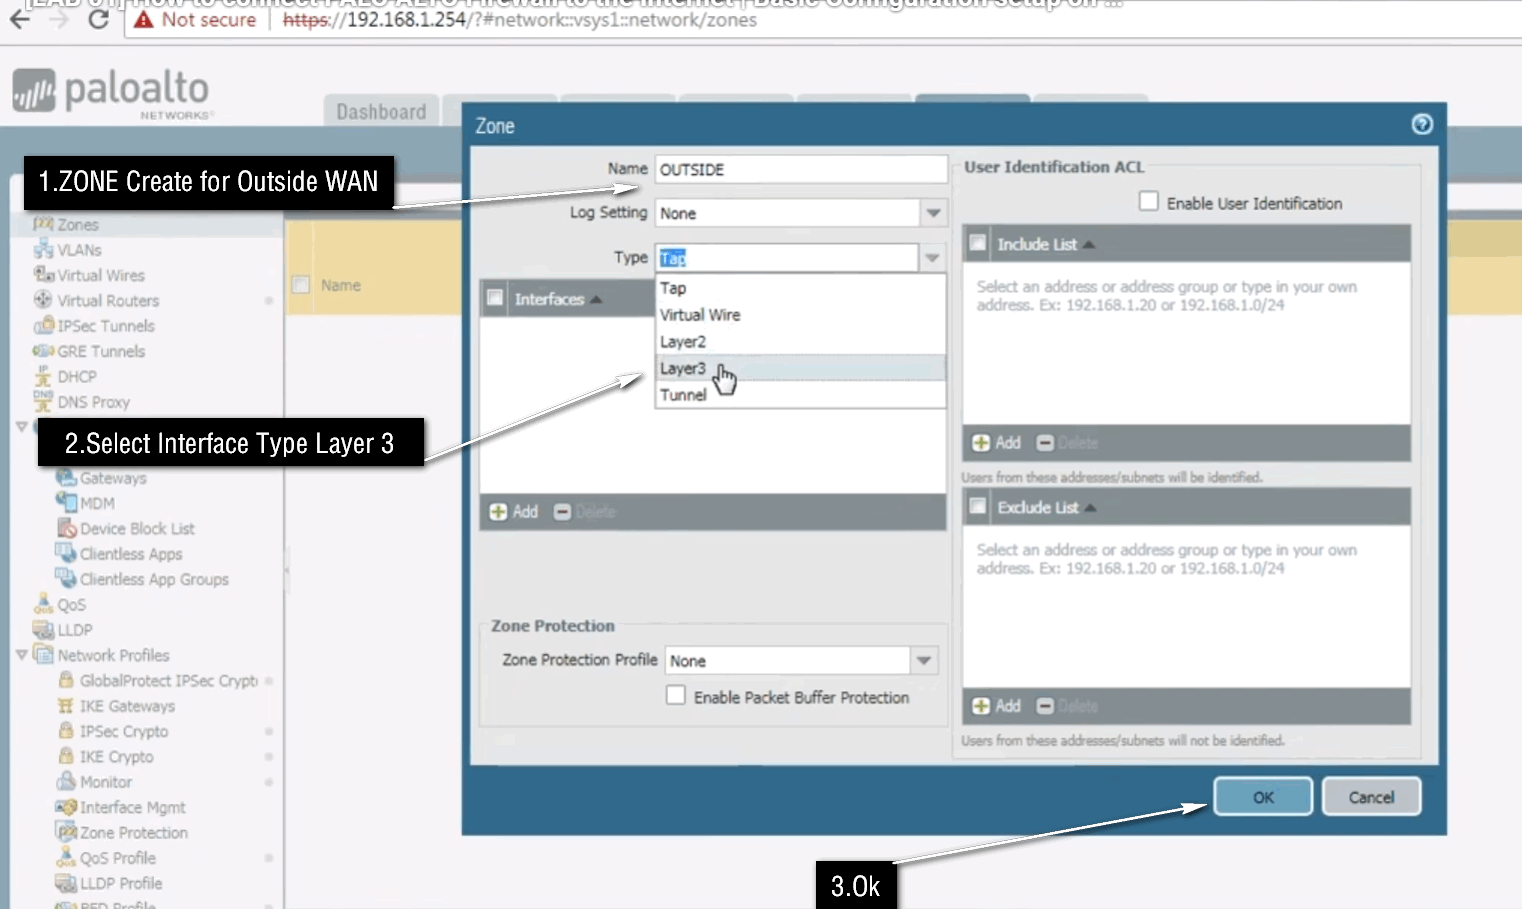
6. Create Security Zones
Security Zones are an important part of Palo Alto firewall configuration. They logically separate different types of network traffic.
Go to:
Network → Zones → Add
Create zones such as:
					WAN Untrust Zone
LAN Trust Zone
DMZ Server Zone
For example:
					ethernet1/1 → WAN
ethernet1/2 → LAN
Security policies are created between these zones.
7. Configure the Virtual Router
The Virtual Router controls Layer-3 routing on the Palo Alto firewall. Go to Network → Virtual Routers and select the appropriate virtual router.
Add the WAN and LAN interfaces to the virtual router.
Example:
					WAN Interface → ethernet1/1
LAN Interface → ethernet1/2
This allows the firewall to route traffic between the internal network and the Internet.
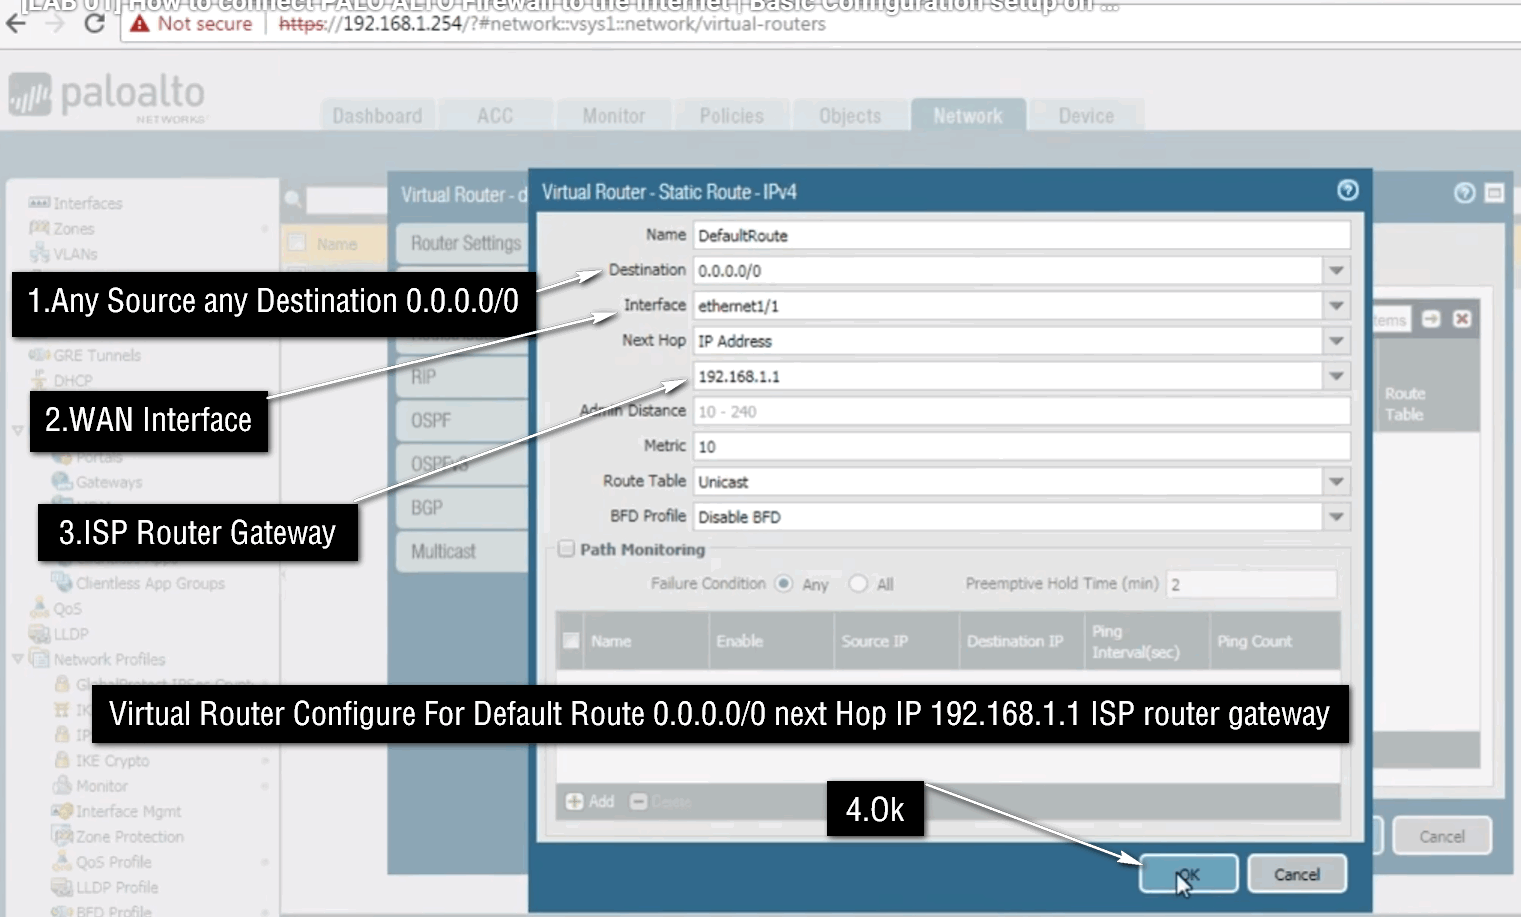
8. Configure the Default Route
The firewall needs a default route to send Internet-bound traffic toward the ISP.
Go to:
Network → Virtual Routers → Static Routes → Add
Example:
					Destination:    0.0.0.0/0
Next Hop:       100.10.10.1
Interface:      ethernet1/1
The 0.0.0.0/0 route means that destinations not known by the firewall should be forwarded to the ISP gateway.
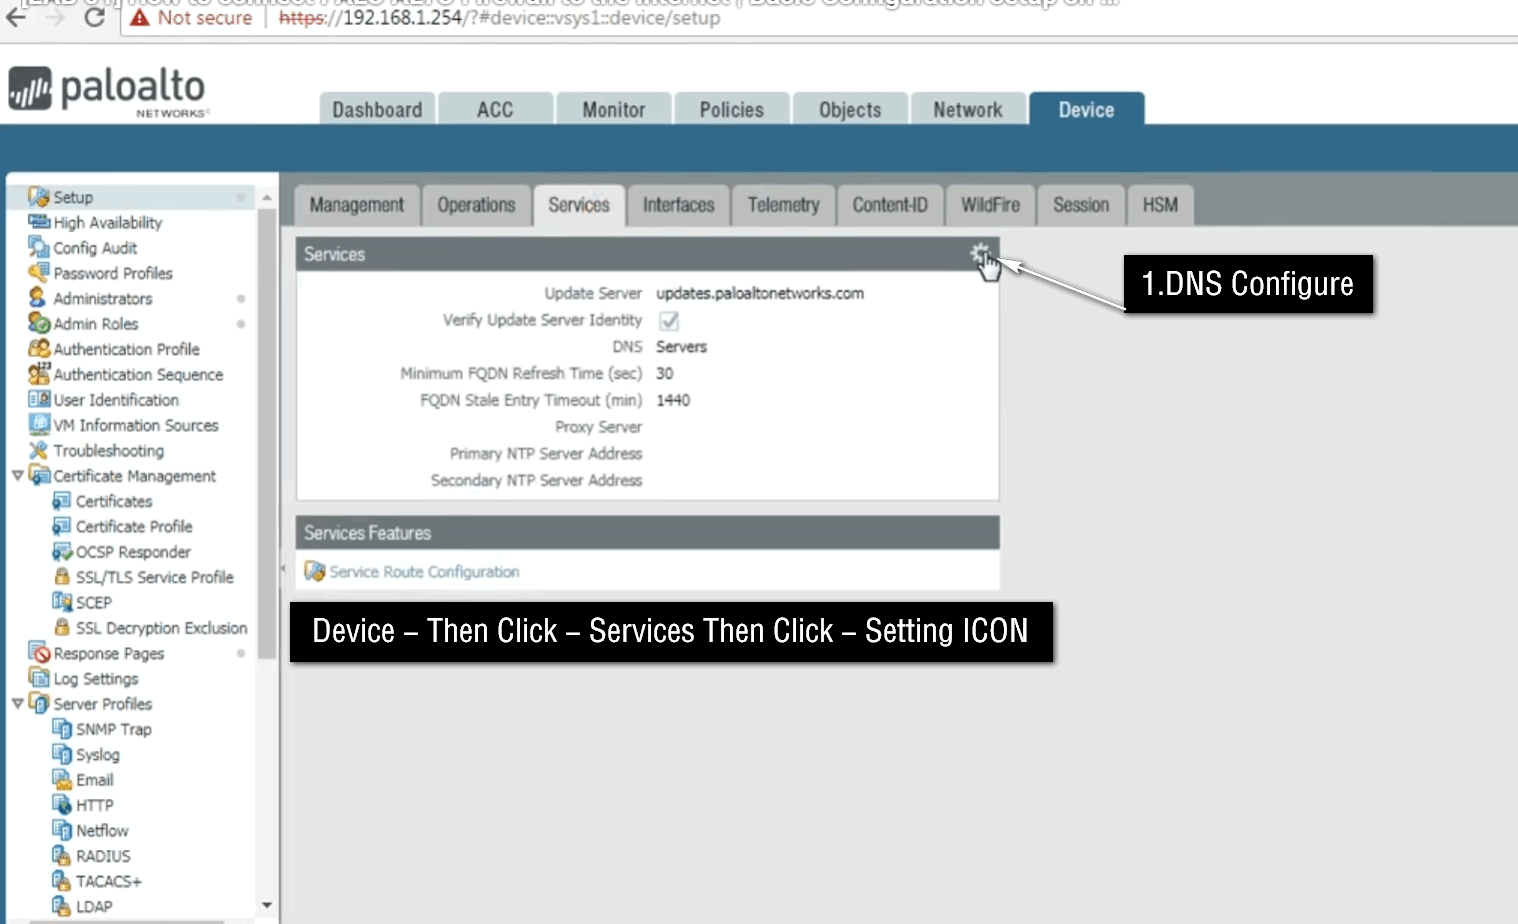
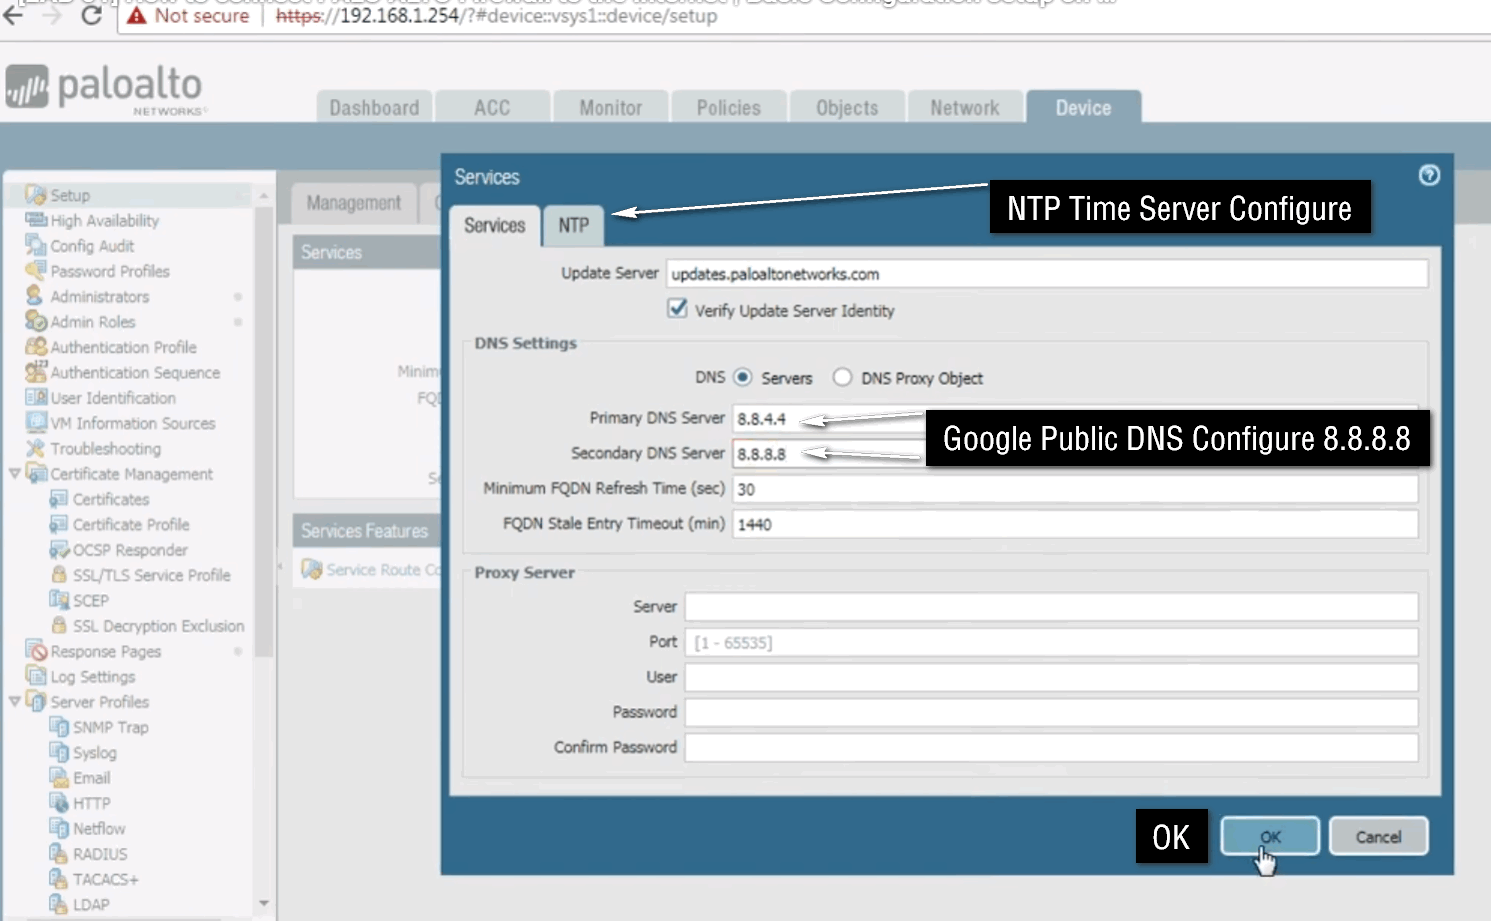
9. Configure DNS
Configure DNS servers so that the firewall can resolve domain names and perform services that require DNS resolution.
Go to:
Device → Setup → Services
Example DNS servers:
					Primary DNS:     8.8.8.8
Secondary DNS:   1.1.1.1
In an enterprise environment, you can also use internal DNS servers.
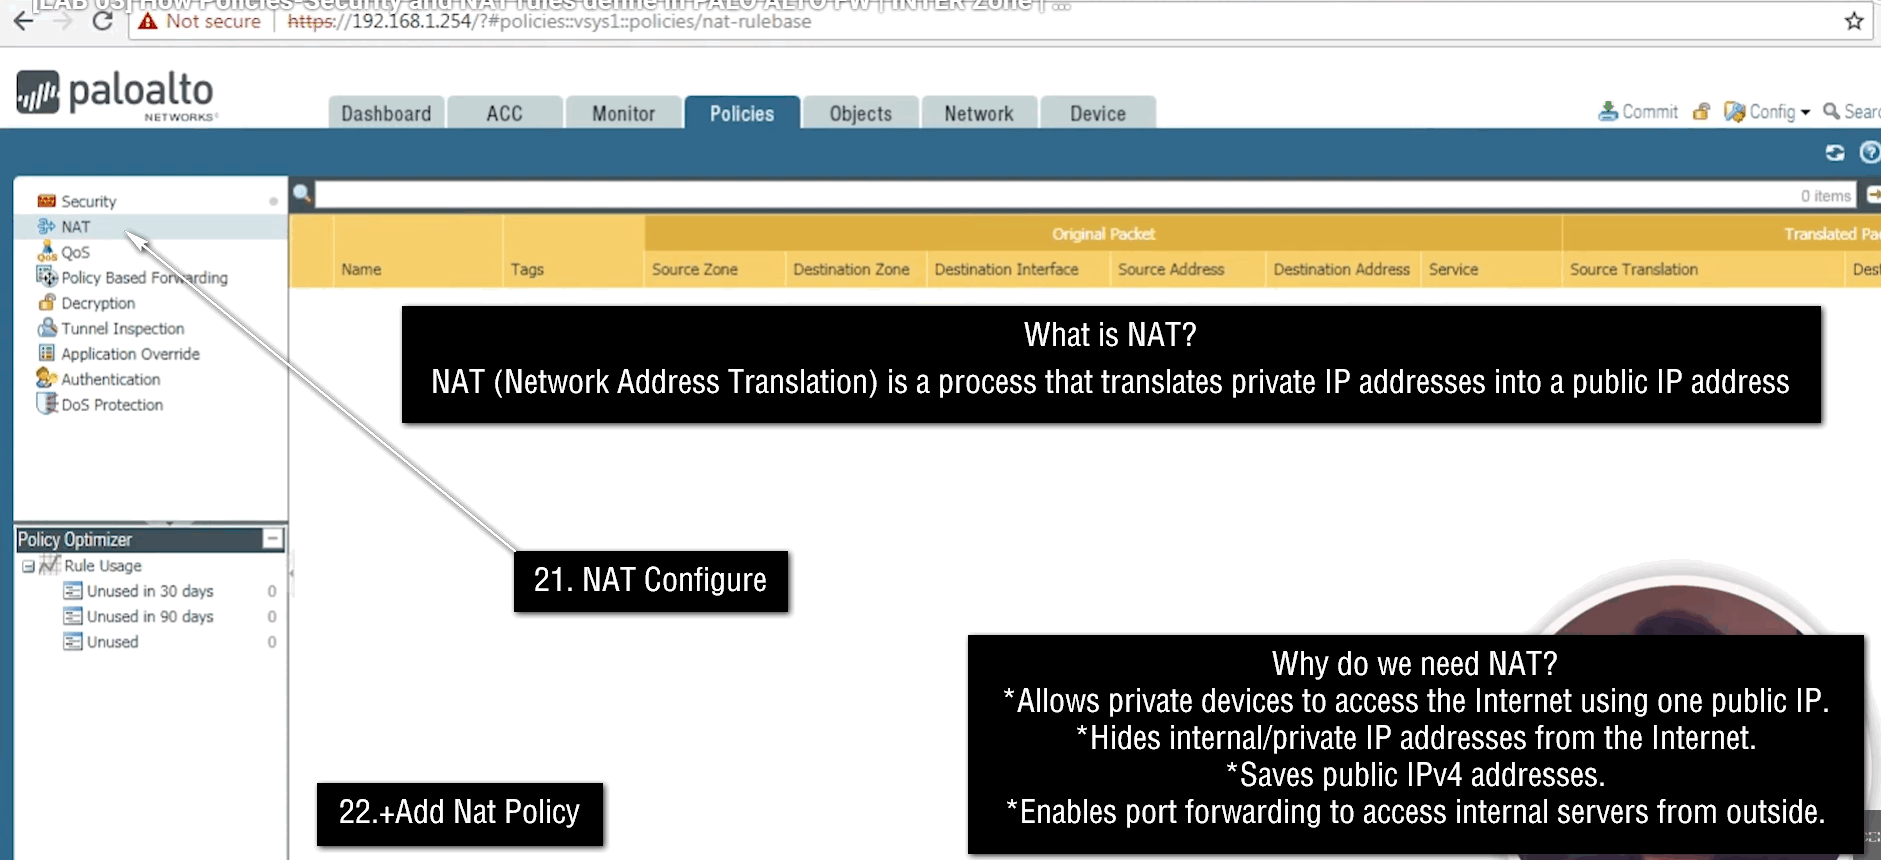
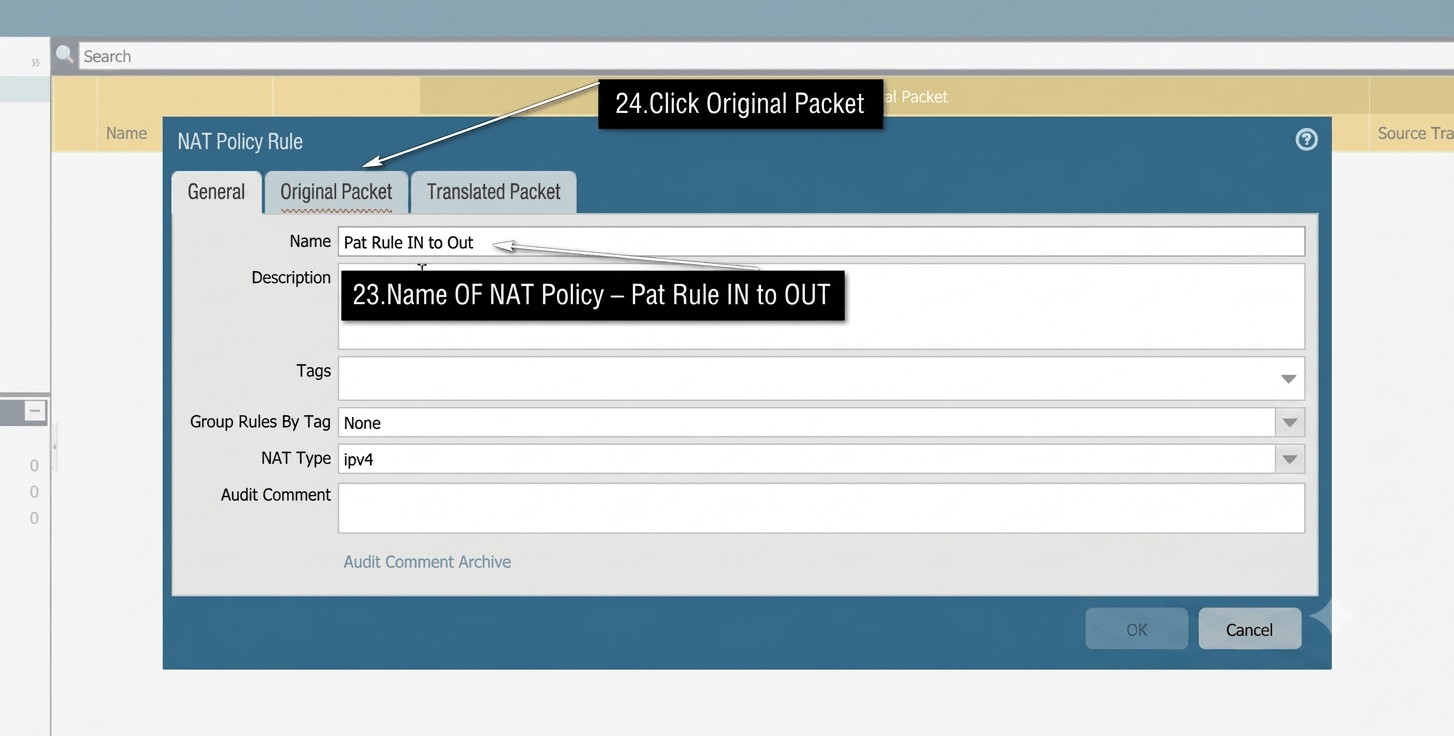
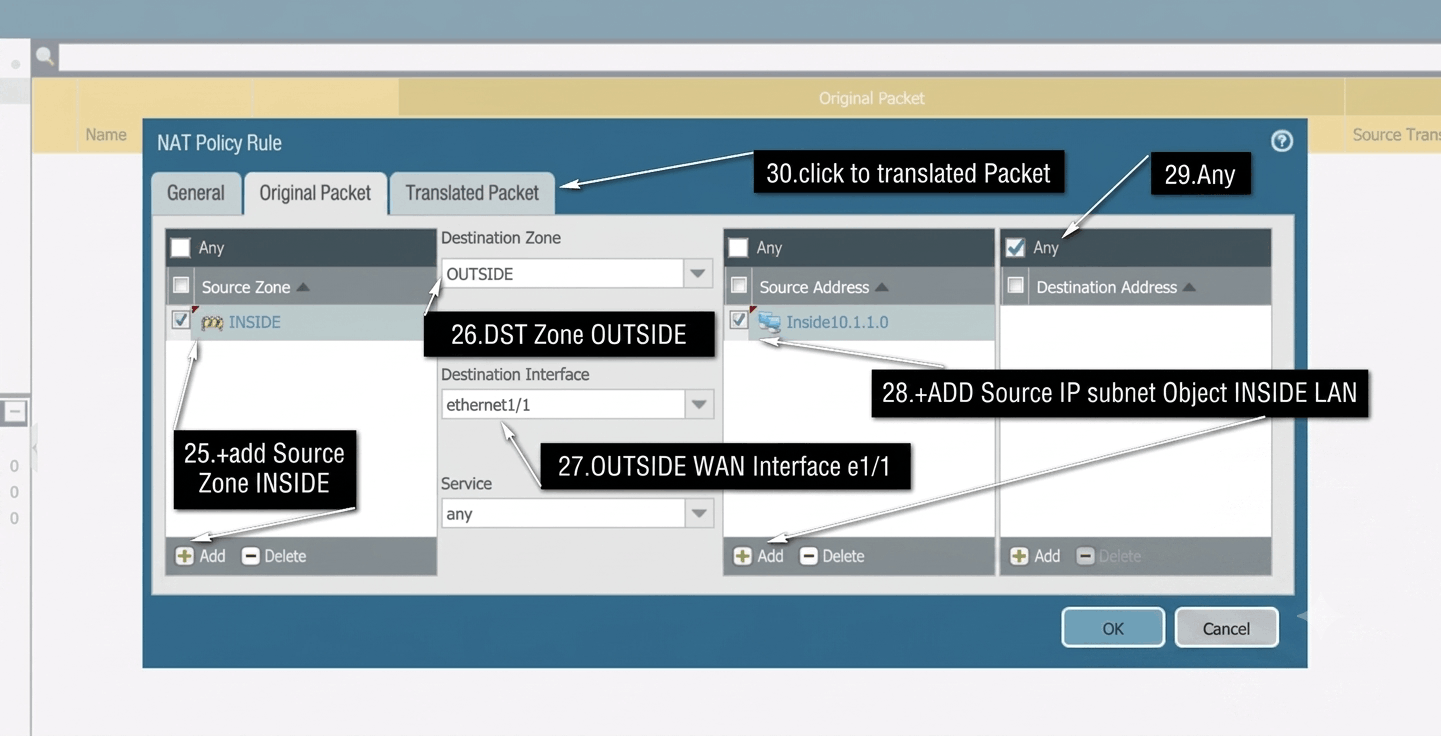
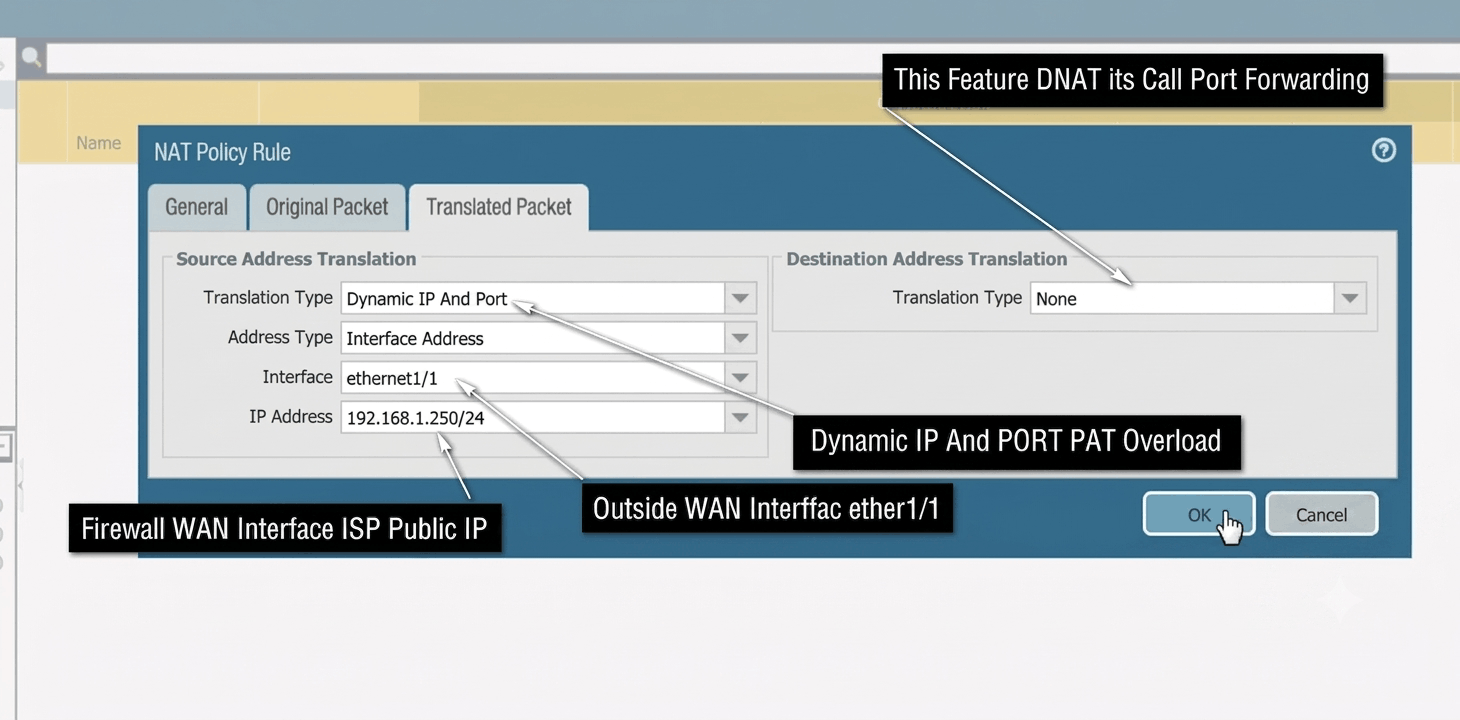
10. Configure Source NAT
Private LAN IP addresses cannot normally be routed directly over the Internet. Therefore, Source NAT is required to translate private IP addresses into the public/WAN IP address.
Go to:
Policies → NAT → Add
Example:
					Source Zone:        LAN
Destination Zone:   WAN
Source Address:     any
Destination Address: any

Source Translation:
Dynamic IP and Port
Interface Address
For example, a PC with:
192.168.10.10
can be translated to the firewall’s public/WAN IP when accessing the Internet.
11. Create a Security Policy
A Security Policy controls whether traffic is allowed or denied.
Go to:
Policies → Security → Add
Create a basic LAN-to-Internet policy.
Example:
					Name:              LAN-to-Internet

Source Zone:       LAN
Source Address:    any

Destination Zone:  WAN
Destination Address: any

Application:       any
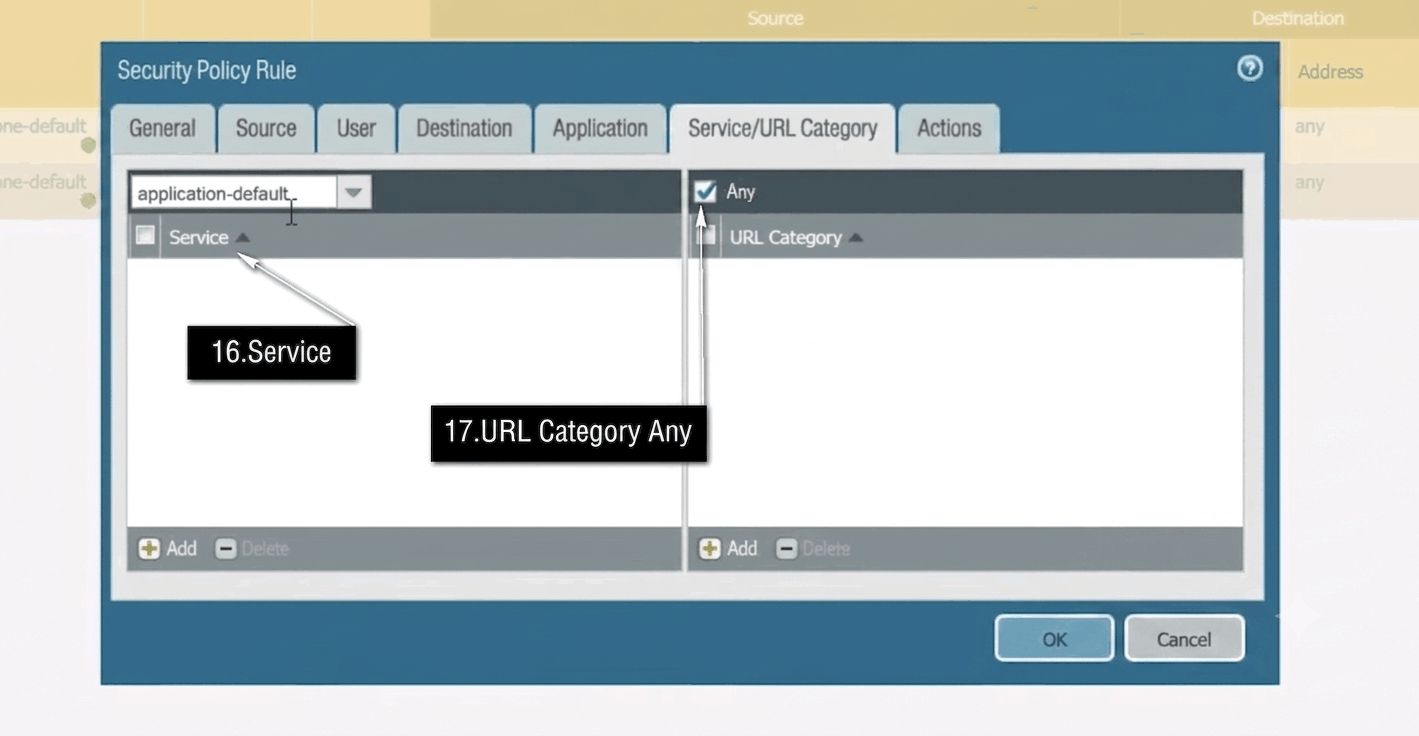
Service:           application-default

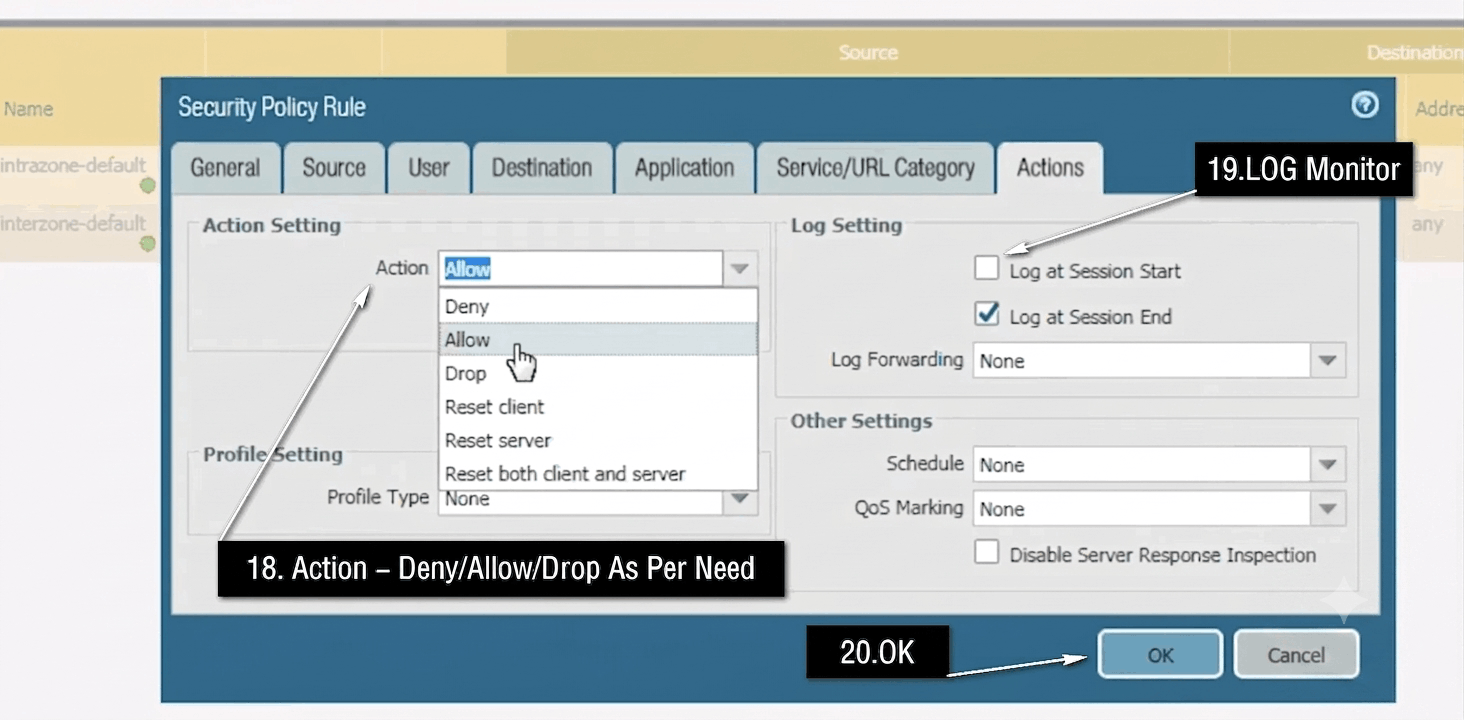
Action:            Allow
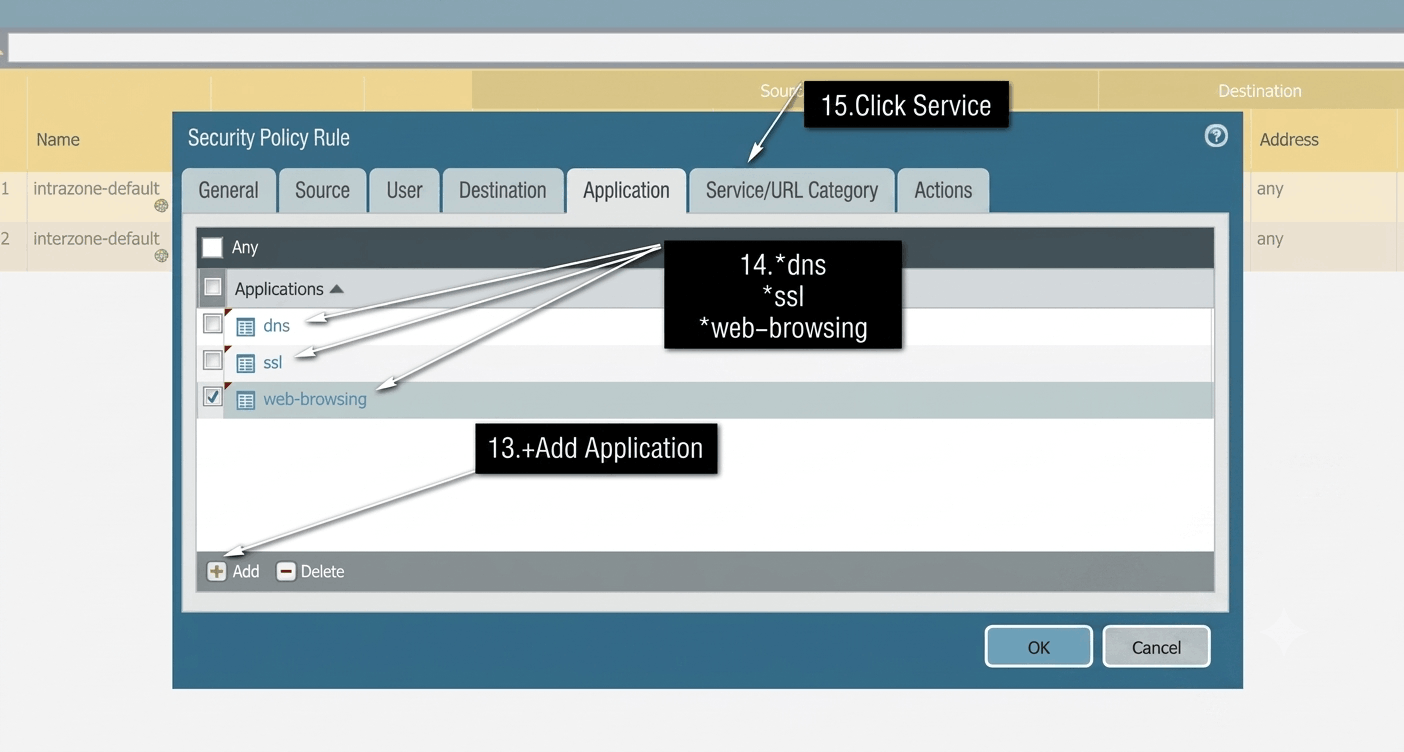
12. Understand Application-Based Security
One of the major advantages of Palo Alto is App-ID. Instead of controlling traffic only by TCP/UDP port numbers, Palo Alto can identify applications.
For example, you can create policies for:
					web-browsing
ssl
dns
ssh
rdp
ms-teams
youtube
facebook
You can therefore create more specific security policies instead of simply allowing all ports.
13. Configure Security Profiles
For better protection, attach security profiles to your security policies.
Common security profiles include:
					Antivirus
Anti-Spyware
Vulnerability Protection
URL Filtering
File Blocking
WildFire
These features help protect users from malware, malicious websites, suspicious files, and network attacks.
14. Configure URL Filtering
URL Filtering allows the administrator to control which websites users can access.
For example, an organization may want to block:
					Malware
Phishing
Gambling
Adult
Proxy Avoidance
Unknown
You can create a URL Filtering profile and attach it to the appropriate Security Policy.
15. Configure Antivirus and Anti-Spyware
Create Antivirus and Anti-Spyware profiles under the security profile configuration. These profiles inspect traffic for known malicious content and suspicious activity.
They should normally be attached to the Internet access security policy so that user traffic receives security inspection.
16. Configure Logging
Logging is important for troubleshooting, monitoring, and security analysis.
You can review:
Monitor → Traffic
Here you can see information such as:
					Source IP
Destination IP
Application
Source Zone
Destination Zone
Action
Bytes
Session
For example, if a user cannot access a website, Traffic Logs can help determine whether the firewall allowed or blocked the connection.
17. Configure NTP
Correct time is important for logs, certificates, authentication, and troubleshooting.
Go to the device’s NTP configuration and configure reliable NTP servers.
Example:
pool.ntp.org
The exact NTP configuration location can vary by PAN-OS version.
18. Update PAN-OS and Security Content
Before deploying the firewall into production, check for available software and security content updates.
Important update areas include:
					PAN-OS
Applications and Threats
Antivirus
WildFire
URL Filtering
Keep the firewall updated according to your organization’s change-management process.
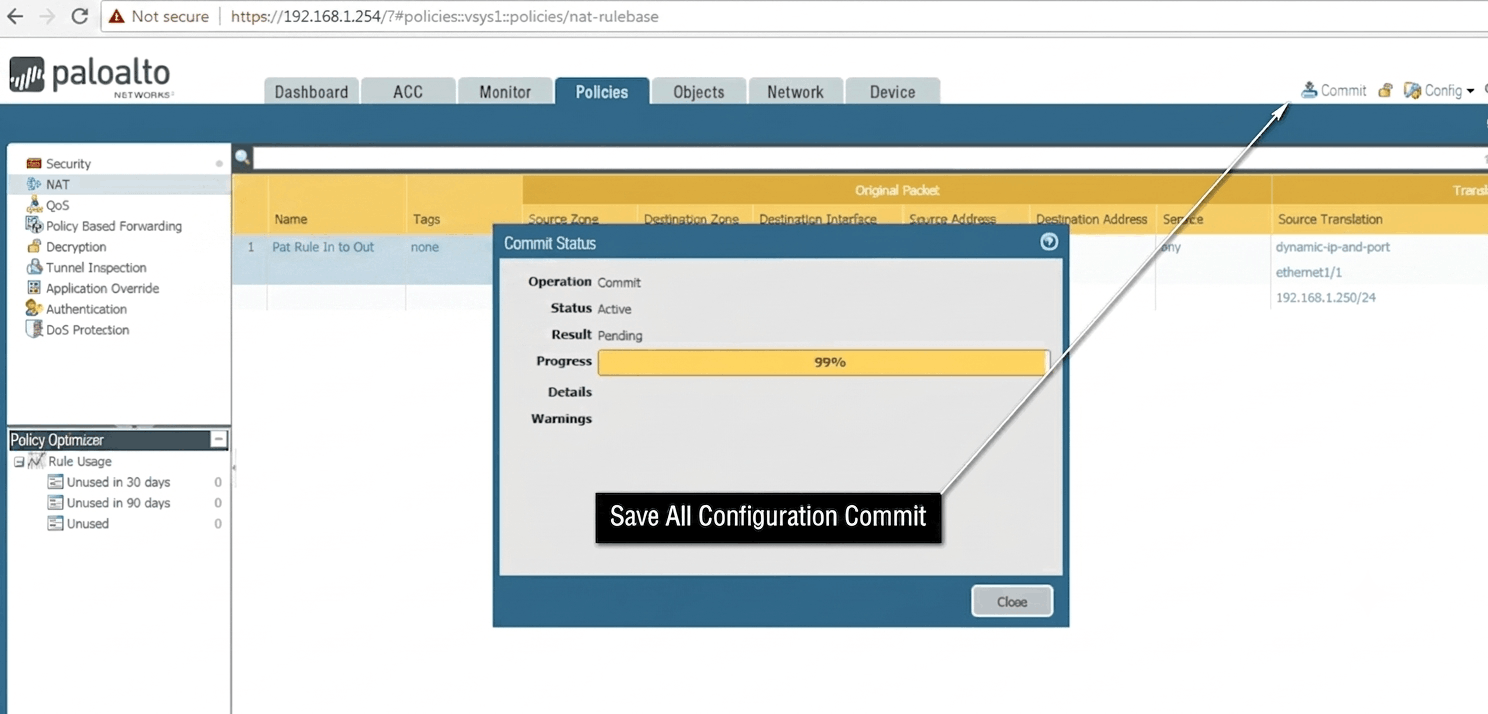
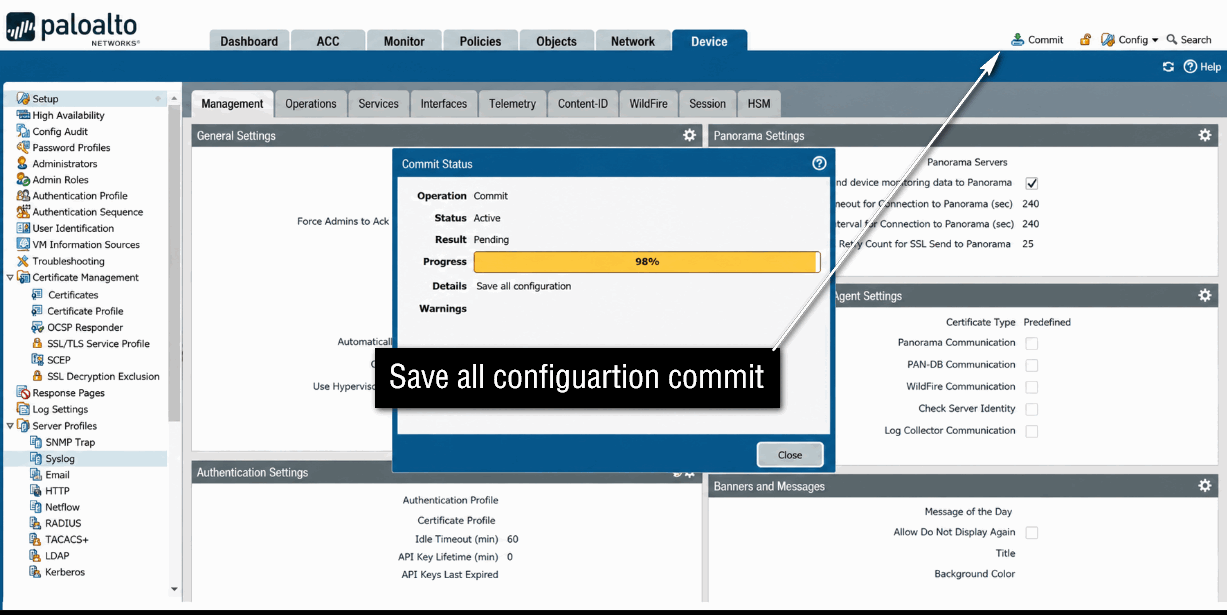
19. Commit the Configuration
Palo Alto uses a candidate configuration system. Configuration changes made in the Web Interface are not immediately active in the running configuration.
After completing the configuration, click:
Commit
Review the changes and commit them.
This is one of the most important differences for people coming from some other firewall platforms: you must commit configuration changes before they become active.
20. Test the Network
After the commit, test connectivity step by step.
From a LAN PC:
					Ping the firewall:
192.168.10.1

Ping the ISP gateway:
100.10.10.1

Ping a public IP:
8.8.8.8
Then test DNS:
nslookup google.com
Finally, open a website from the LAN PC.
21. Verify Traffic Logs
If Internet access does not work, go to:
Monitor → Traffic
Check whether the session is:
					Allow
Deny
Drop
Reset
Also verify:
					Source Zone
Destination Zone
Source IP
Destination IP
Application
Rule
NAT
This is one of the most useful troubleshooting methods for a Palo Alto firewall engineer.
22. Basic Palo Alto Network Flow
					ISP
 │
 │
 ▼
Palo Alto Firewall
 │
 ├── WAN Interface
 │
 ├── Routing
 │
 ├── NAT
 │
 ├── Security Policy
 │
 ├── App-ID
 │
 ├── URL Filtering
 │
 ├── Antivirus
 │
 └── Logging
 │
 ▼
LAN / Core Switch
 │
 ▼
Users / Servers
Palo Alto Firewall Basic Initial Configuration
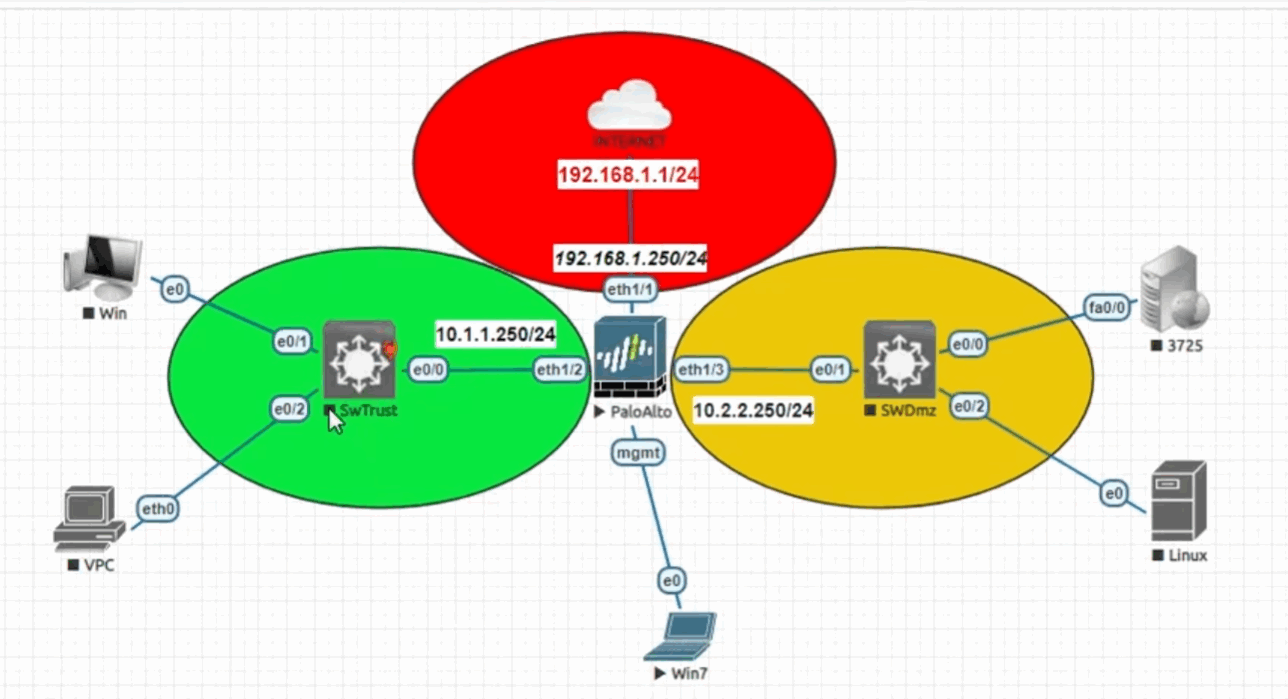
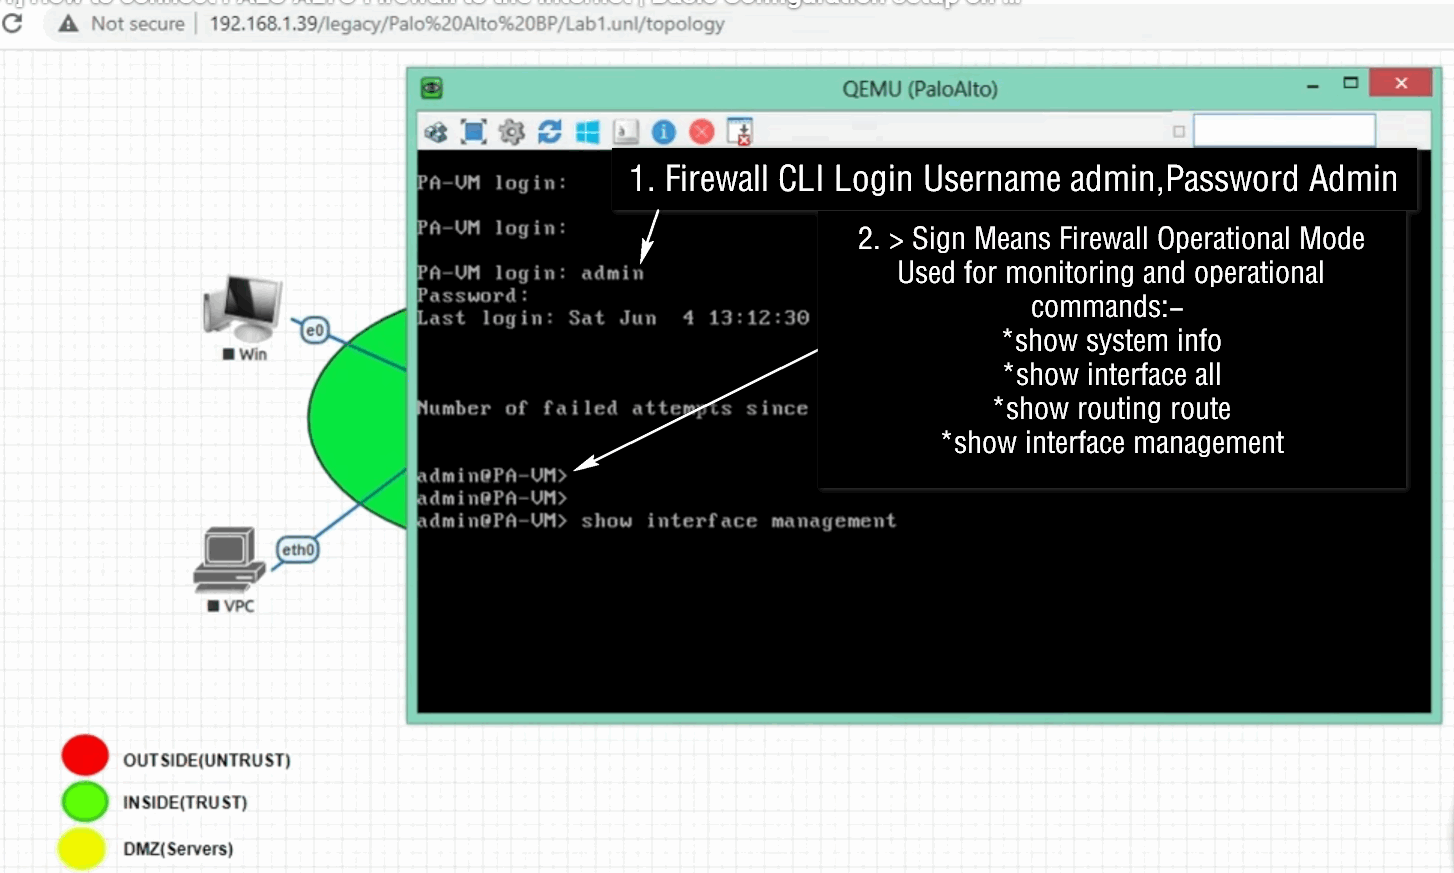
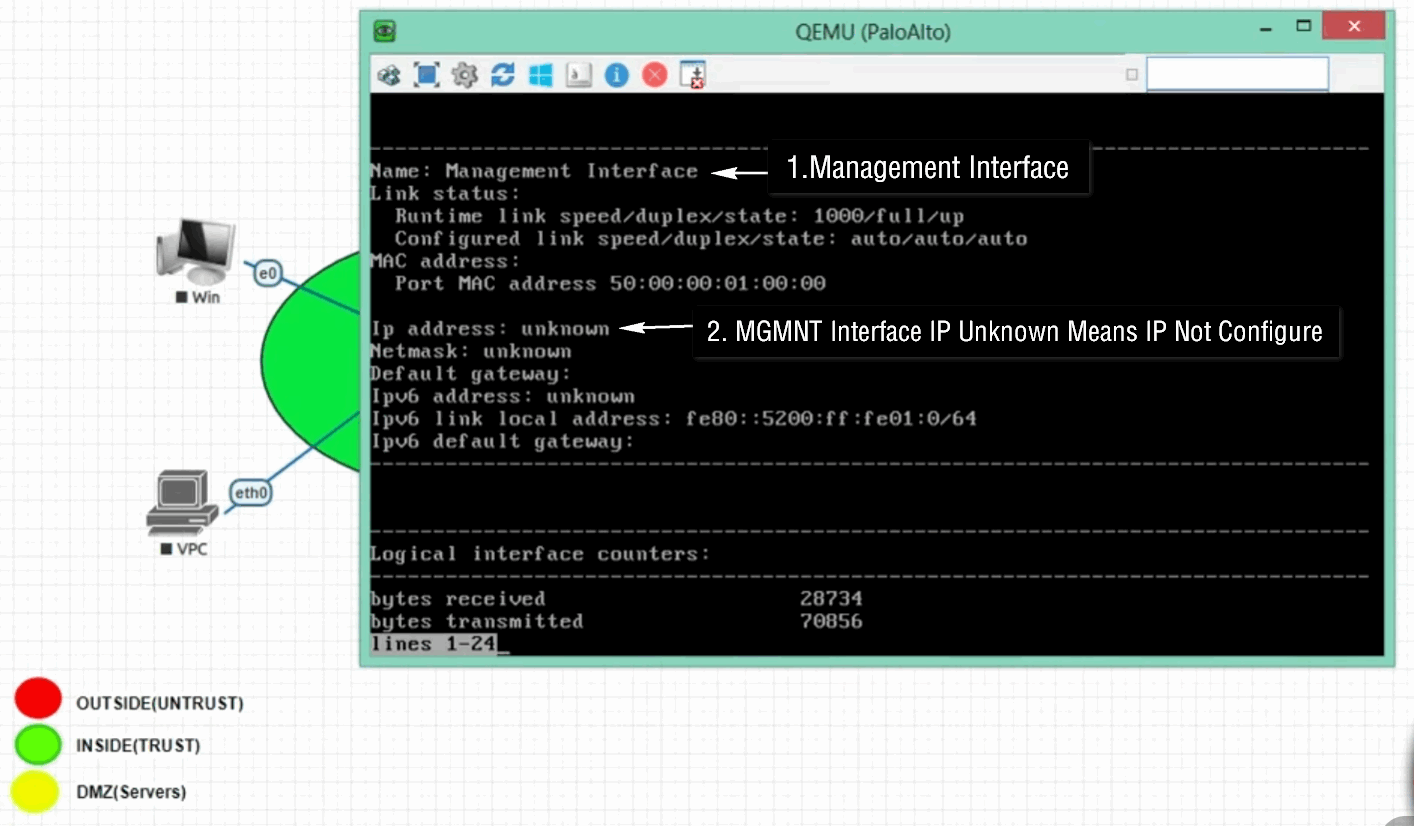
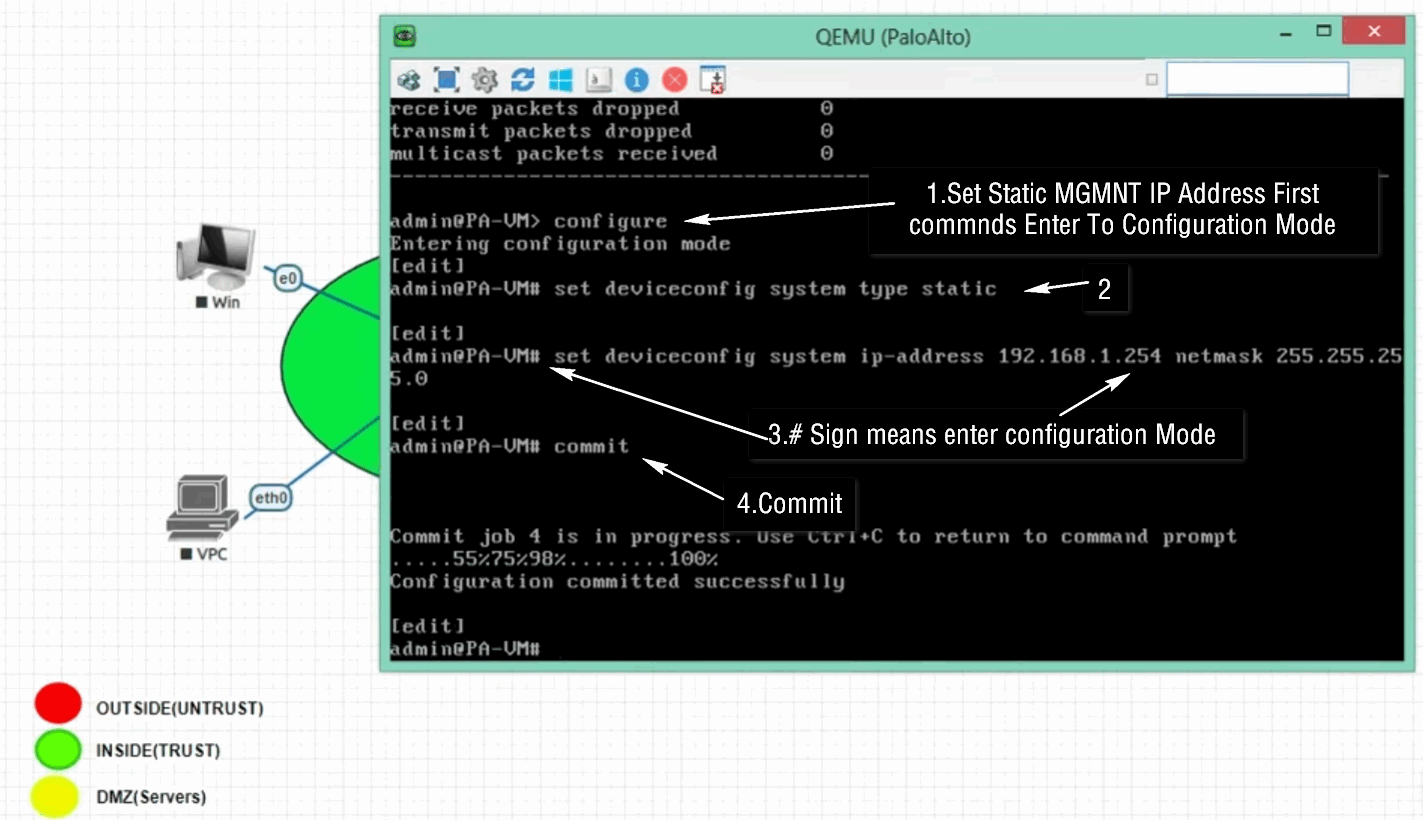
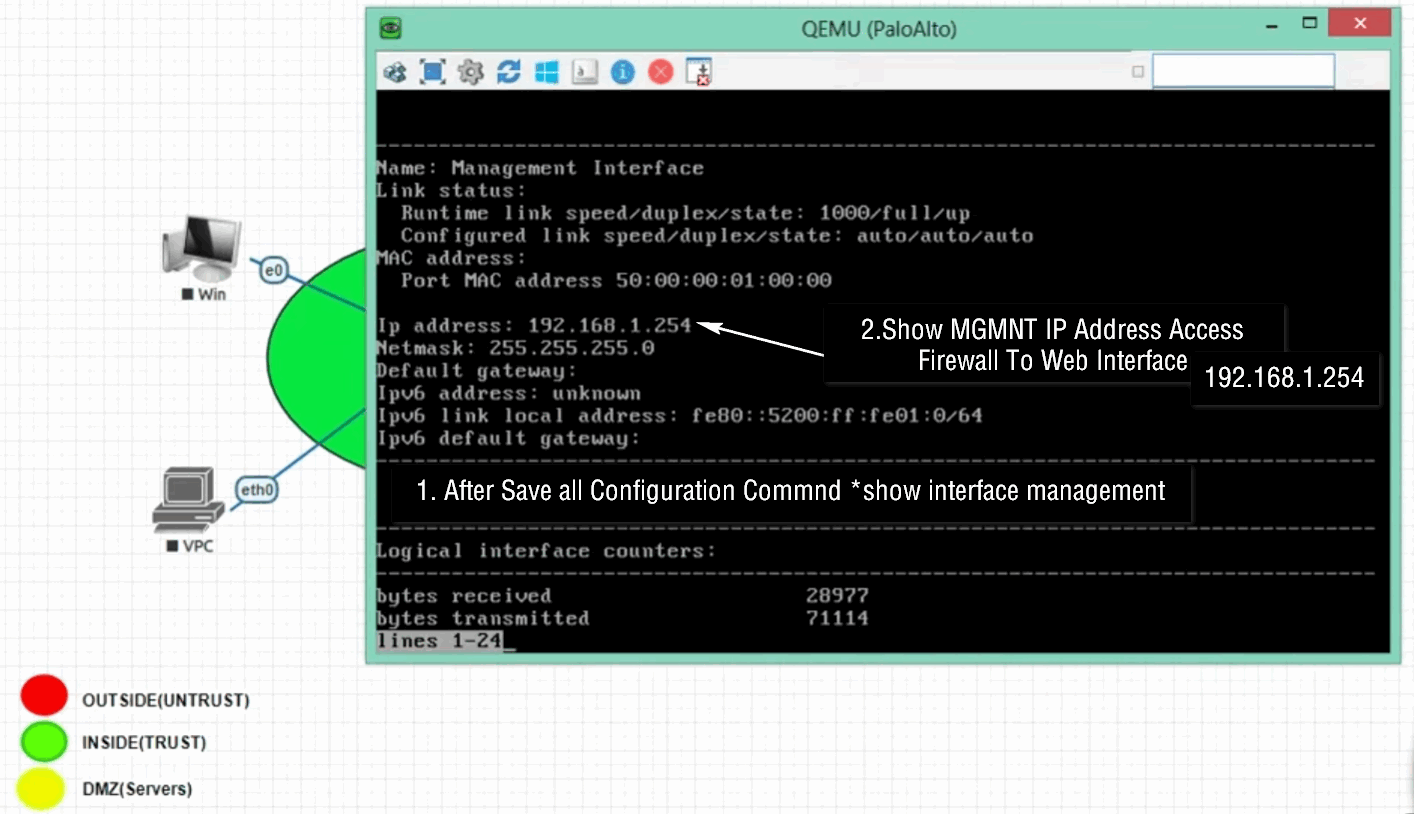
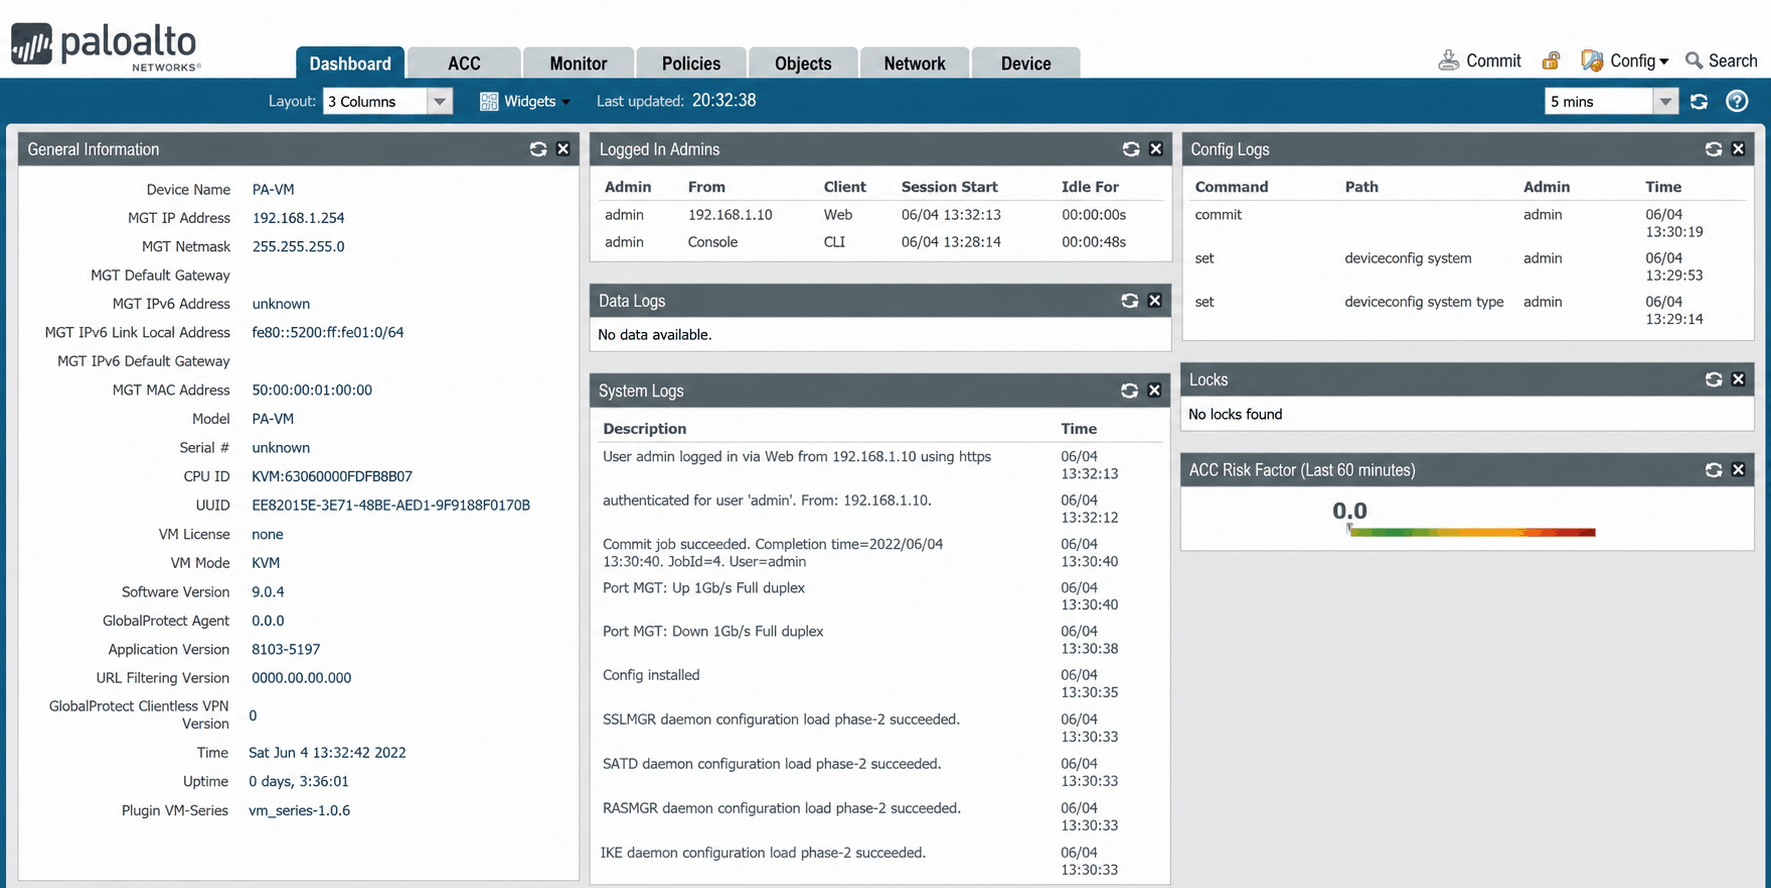
					Palo-Alto Firewall First Managment Port Configration
Step #1 show interfaces all
Step #2 show interfaces management
Step #3 configure mode
Step #4 set deviceconfig system type static
Step #5 set deviceconfig system ip address 192.168.1.254 netmask 255.255.255.0
Step #6 set deviceconfig system default gateway 192.168.1.1
Step #7 comnit
Step #8 show jobs all
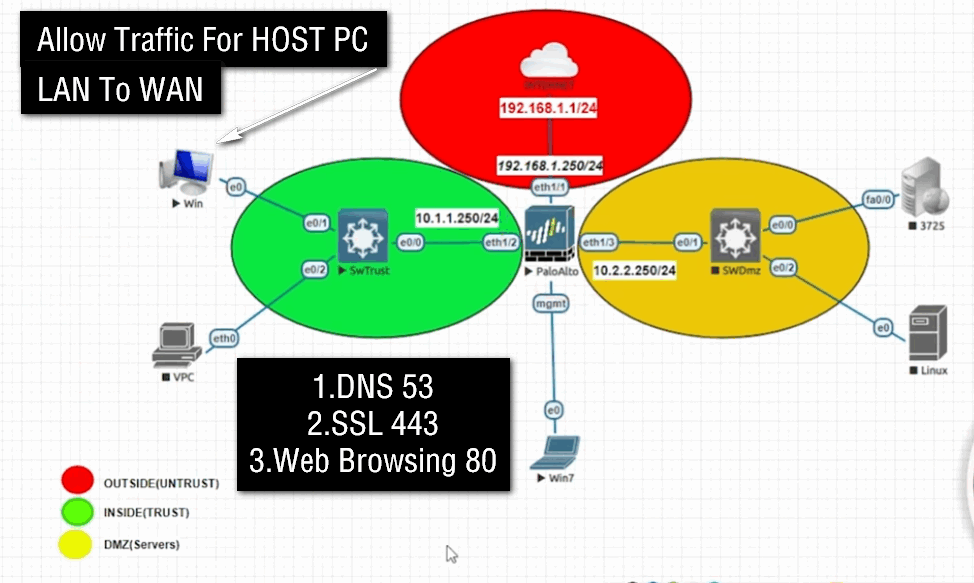
					Palo Alto — Inside LAN → Trust Zone
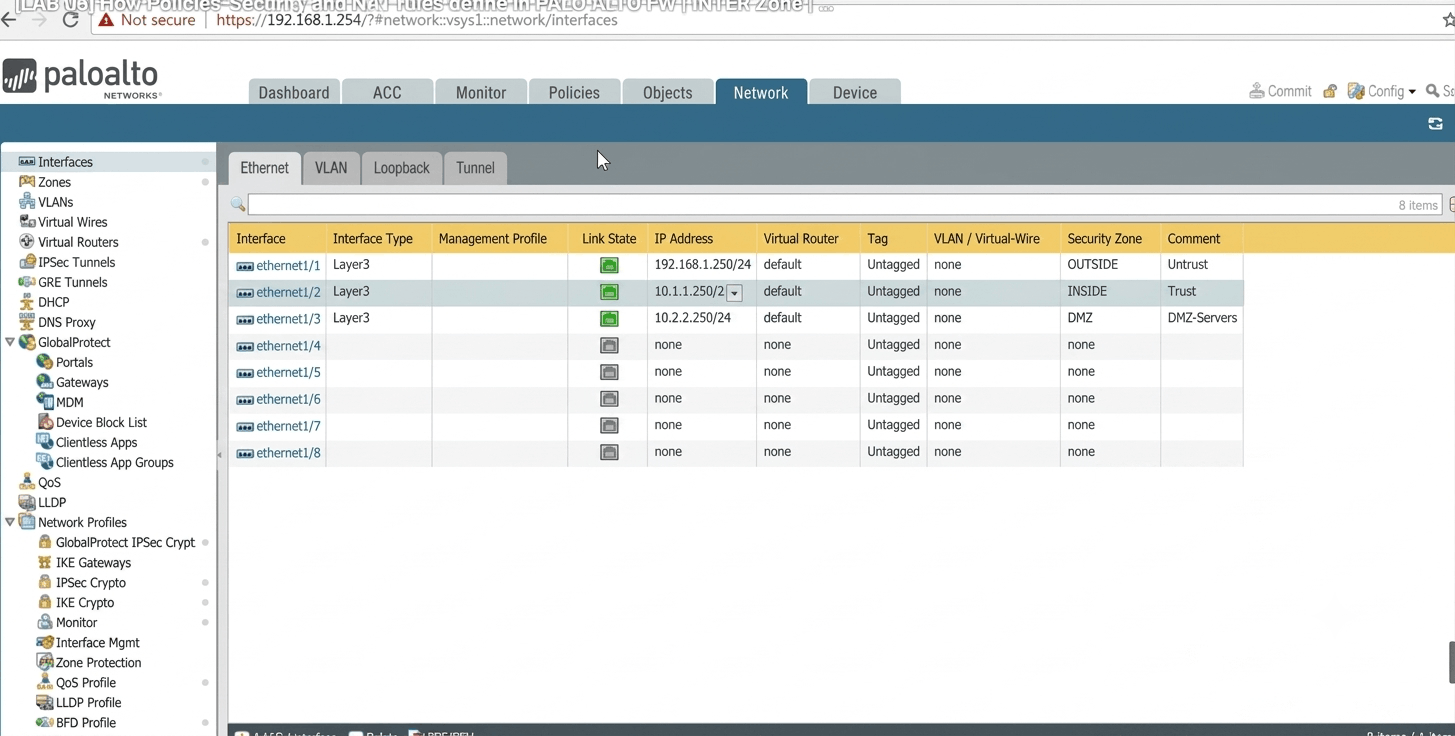
Create Layer 3 Interface
........................
Go to Network → Interfaces → Ethernet
Select your LAN interface, e.g. ethernet1/2
Interface Type: Layer3
Assign IP, for example:
IP: 10.1.1.250/24

Create Trust Zone
.................
Go to Network → Zones
Click Add
Zone Name: Trust
Zone Type: Layer3
Interface: ethernet1/2

Configure DHCP (if required)
............................
Go to Network → DHCP → DHCP Server
Interface: ethernet1/2
IP Pool: 192.168.10.10 – 192.168.10.200
Gateway: 192.168.10.1
DNS: your preferred DNS

Configure WAN/Untrust
.....................
WAN interface → Layer3
Assign ISP IP for example:
IP: 192.168.1.250/24
Put WAN interface in Untrust zone.

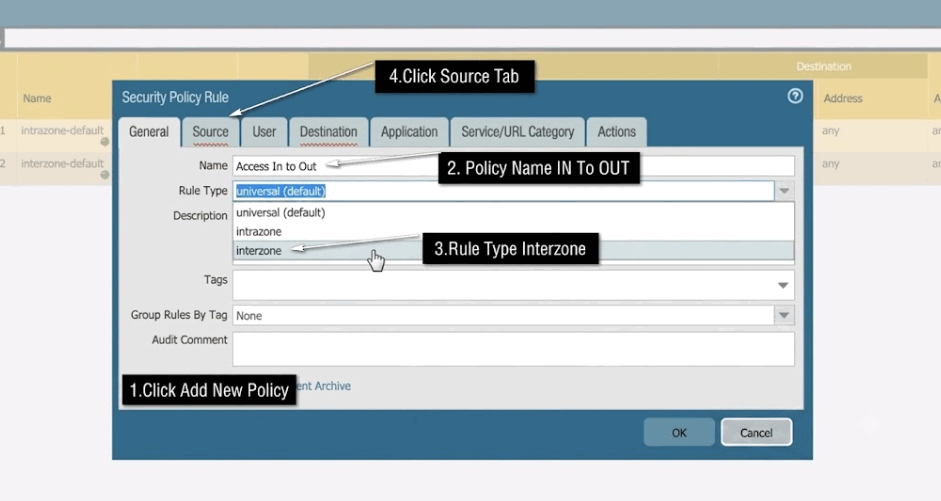
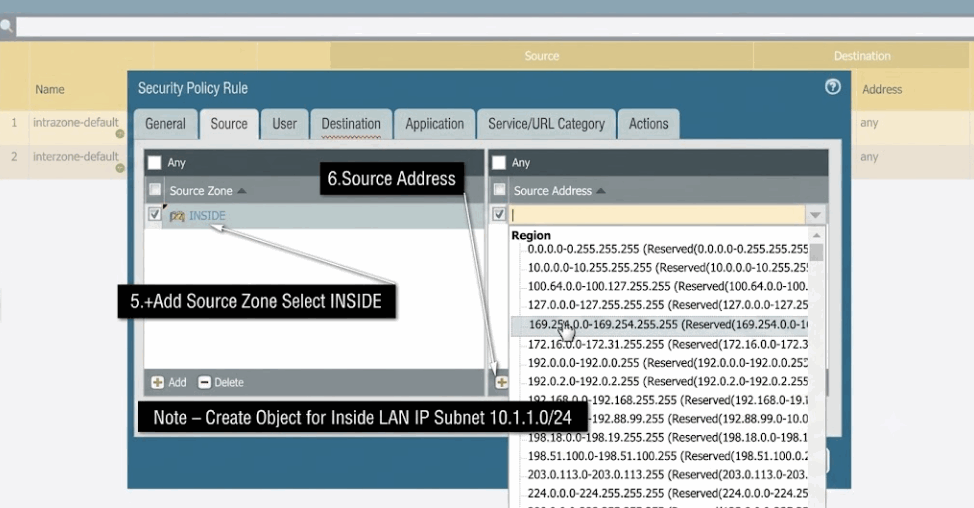
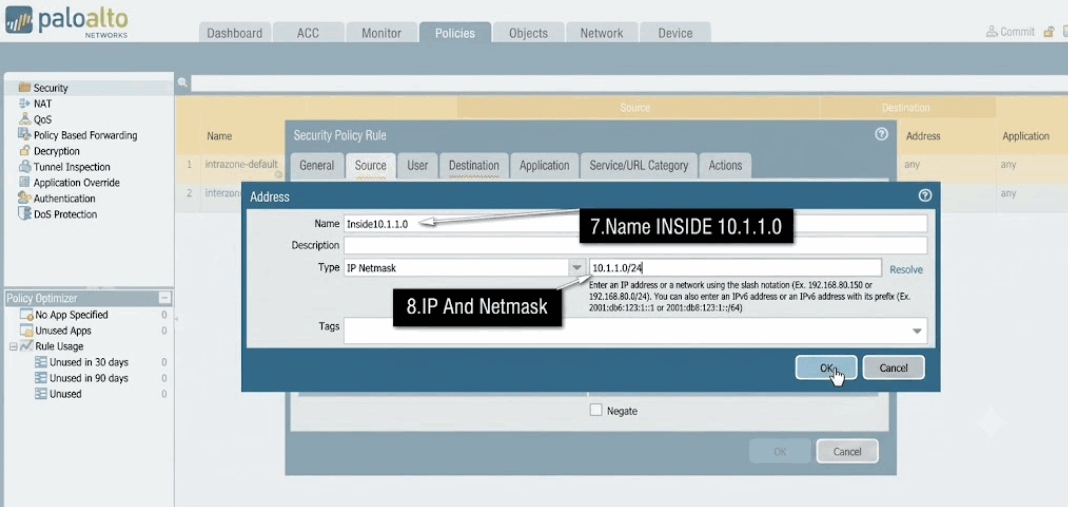
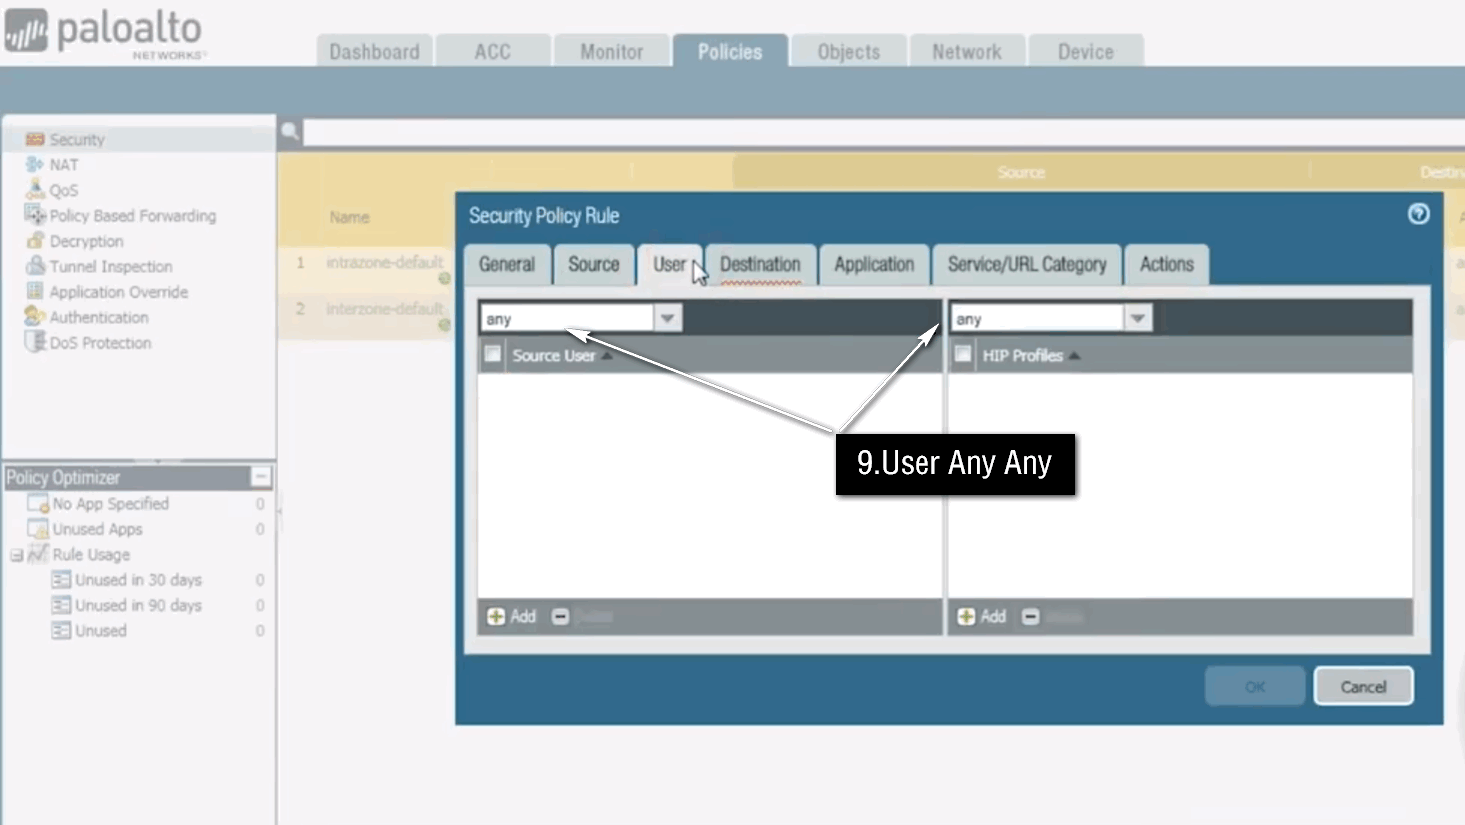
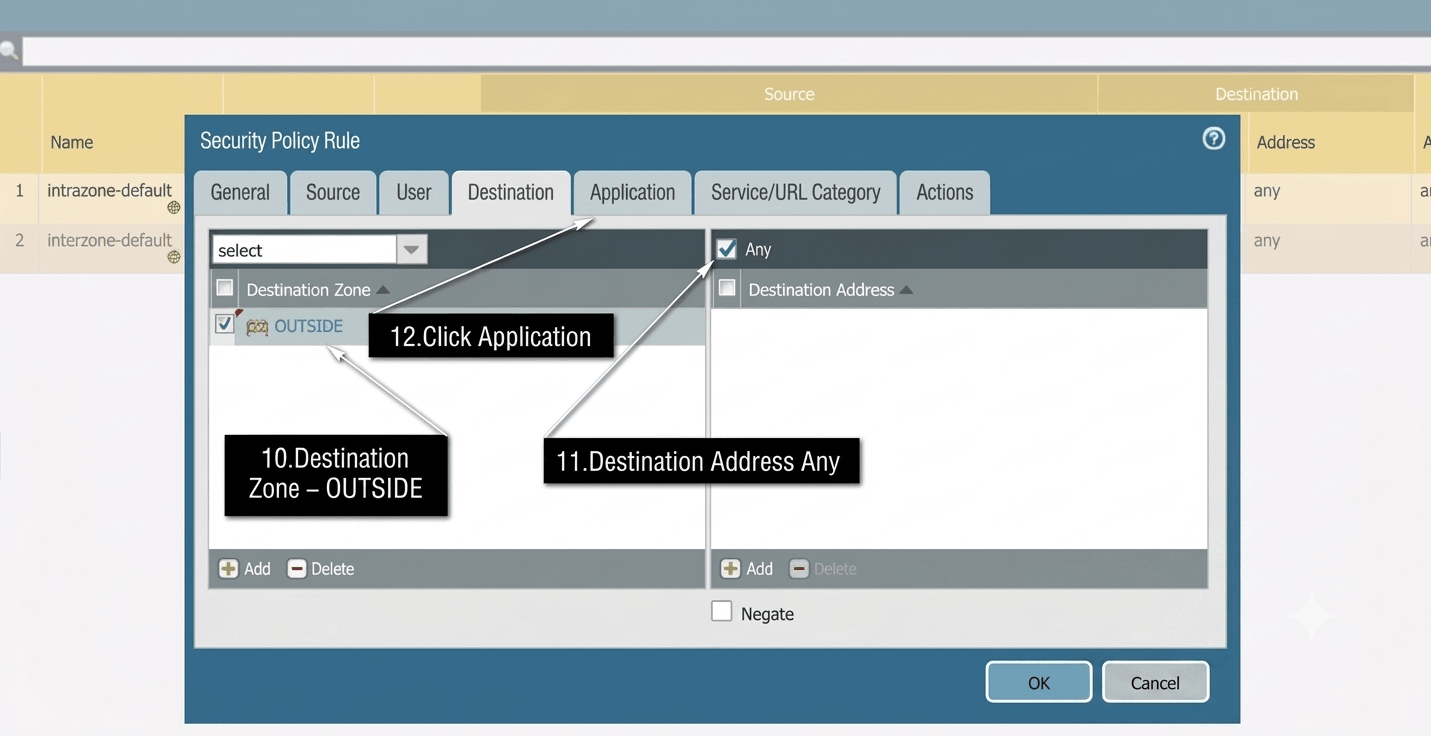
Create Security Policy
......................
Go to Policies → Security
Source Zone: Trust
Destination Zone: Untrust
Source Address: any
Destination Address: any
Application/Service: any initially
Action: Allow

Configure NAT
.............
Go to Policies → NAT
Source Zone: Trust
Destination Zone: Untrust
Source Address: 192.168.10.0/24
Source Translation: Dynamic IP and Port
Translate to your WAN interface/IP.

Virtual Router
..............
Go to Network → Virtual Routers
Add both:
Trust/LAN interface
Untrust/WAN interface
Add the ISP default route:
0.0.0.0/0
Next Hop: ISP Gateway
Commit
Click Commit

After commit, test:
...................
LAN PC → 10.168.10.1
LAN PC → Internet
Check Monitor → Traffic
Security Profile & NAT Policy For Host PC Internet Access