
GRE & DM-VPN
History of DM-VPN
The history of DMVPN (Dynamic Multipoint VPN) is closely tied to the evolution of enterprise networking and the need for scalable, secure, and cost-effective WAN solutions. In the early days of networking, organizations relied heavily on private WAN technologies such as leased lines, Frame Relay, and ATM to connect branch offices. While these technologies were reliable, they were expensive and difficult to scale, especially when the number of branch locations increased.
As the internet became more widely available in the late 1990s and early 2000s, companies began adopting VPN technologies to reduce costs. Traditional VPNs, particularly point-to-point IPsec VPNs, required manual configuration of tunnels between each pair of sites. In a full-mesh network, this meant that the number of tunnels increased significantly as more sites were added, making the network complex and difficult to manage. This challenge led to the need for a more dynamic and scalable solution.
To address these limitations, Cisco Systems introduced DMVPN in the early 2000s. DMVPN was designed to simplify VPN deployment by combining several existing technologies such as Multipoint GRE (mGRE), Next Hop Resolution Protocol (NHRP), and IPsec. This innovation allowed the creation of dynamic, on-demand tunnels between sites, eliminating the need for static configurations and significantly reducing administrative overhead.
DM-VPN


Dynamic Multipoint VPN (DMVPN) is a Cisco-developed networking solution that allows organizations to build scalable, secure, and dynamic Virtual Private Networks over public networks like the internet. It is mainly designed to simplify VPN deployment in large networks where multiple branch offices (spokes) need to communicate with a central office (hub) as well as with each other. Unlike traditional VPNs that require static, point-to-point tunnel configurations between every pair of sites, DMVPN uses dynamic mechanisms to automatically establish tunnels when needed, reducing configuration complexity and improving efficiency.
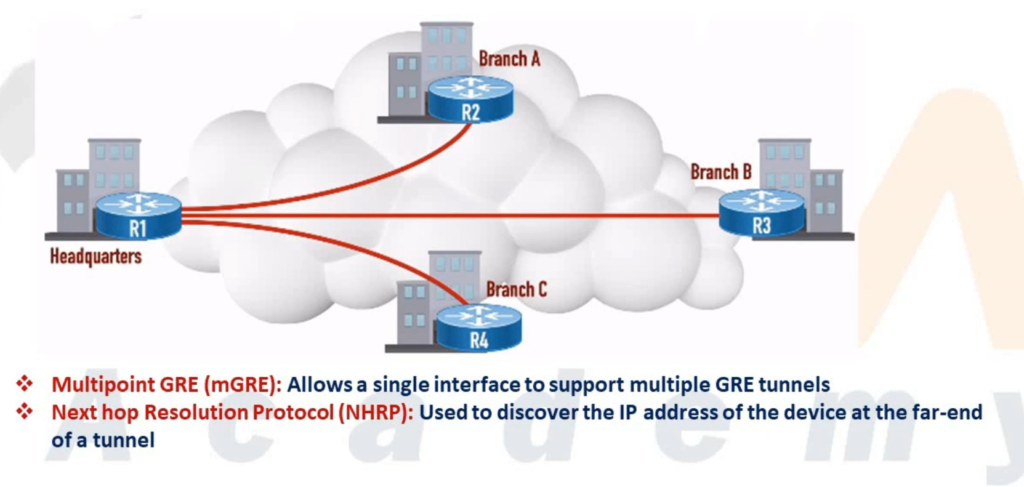
DMVPN works by combining several key technologies, including Multipoint GRE (mGRE), Next Hop Resolution Protocol (NHRP), and IPsec. mGRE allows a single tunnel interface on the hub router to support multiple spoke connections, eliminating the need for multiple tunnel interfaces. NHRP functions like a directory service that maps private IP addresses to public IP addresses, enabling routers to discover each other dynamically. IPsec ensures that all communication over these tunnels is encrypted and secure. Additionally, routing protocols such as OSPF, EIGRP, or BGP are used within the DMVPN network to exchange routing information dynamically.
In a typical DMVPN architecture, there is a hub-and-spoke topology where the hub router acts as a central point of connectivity, and all spoke routers initially establish tunnels with the hub. When a spoke router needs to communicate with another spoke, it first sends traffic through the hub. The hub then helps the source spoke learn the destination spoke’s public IP address using NHRP. After this exchange, a direct tunnel is dynamically created between the two spokes, allowing traffic to flow directly without passing through the hub. This reduces latency and improves network performance.
DMVPN is implemented in three phases, each offering different levels of functionality. In Phase 1, communication is strictly between hub and spokes, and no direct spoke-to-spoke tunnels are formed. In Phase 2, direct spoke-to-spoke communication is enabled, but it requires more careful routing design because route summarization is limited. Phase 3 is the most advanced and widely used, as it introduces NHRP redirect and shortcut features, allowing efficient routing, scalability, and support for route summarization.
The main advantage of DMVPN is its scalability and flexibility, making it ideal for large enterprise networks with many remote sites. It reduces the need for manual configuration, supports dynamic routing, and ensures secure communication through encryption. However, it also has some disadvantages, such as increased complexity during initial setup and troubleshooting, especially for those who are not familiar with NHRP and advanced routing concepts.
In real-world scenarios, DMVPN is widely used in enterprise WAN environments, banking networks, retail chains, and organizations with multiple branch offices that need secure and efficient communication. It allows businesses to connect geographically dispersed locations in a cost-effective and scalable way while maintaining high performance and security.
Best Example of DMVPN (Real-Life)
Imagine a company with:
- Head Office (Hub) → Kolkata
- Branch 1 (Spoke) → Delhi
- Branch 2 (Spoke) → Mumbai
- Branch 3 (Spoke) → Chennai
Without DMVPN:
- Delhi must connect to Mumbai, Chennai separately
- Many tunnels required (full mesh)
- Complex configuration
With DMVPN:
- All branches connect only to Kolkata (Hub)
- When Delhi wants to communicate with Mumbai:
- Delhi sends traffic to Hub
- Hub shares Mumbai’s public IP
- Direct tunnel forms between Delhi ↔ Mumbai
- Communication becomes fast and direct
👉 So:
- Initial path: Delhi → Kolkata → Mumbai
- Optimized path: Delhi → Mumbai (direct)
Simple Practical Example (Study Perspective)
Think of DMVPN like a phone contact system:
- Hub = Contact server
- Spokes = Users
- First time you call someone → you ask server for number
- Next time → you call directly
Key Benefits in This Example
No need to configure many tunnels
Direct communication between branches
Saves bandwidth and cost
Easy to expand network

DM-VPN Phase
Phase 1
In phase 1, the DMVPN spokes are registered with the hub. In this early phase, there is no direct communication between the spokes, so all traffic goes through the hub. Each spoke uses regular point-to-point GRE tunnel interfaces and requires only a summary or default route to the hub to reach other spokes. As a result, the routing configuration in this phase is simple.
Phase 2
This phase allows spoke-to-spoke tunnel deployment with all spoke routers using multipoint GRE tunnels. These spoke-to-spoke tunnels are on demand, i.e., triggered based on the spoke traffic. This means the data does not have to travel to a central hub first. While the hub is used for the control plane, it is not necessarily in the data plane. This key fact differentiates Phase 2 from Phase 1.
Phase 3
In phase 3, the spoke-to-spoke tunnels are deployed without using specific pre-made routes. To secure those routes on the fly, this phase uses NHRP traffic indication messages (redirect and shortcuts) from the hub. This phase improves the scalability of phase 2.
DM-VPN Short Explain
1. What is DMVPN?
DMVPN is a combination of multiple technologies that allows routers to dynamically build secure IPsec tunnels over the internet.
👉 It is mainly used in hub-and-spoke networks where:
- One router = Hub
- Multiple routers = Spokes
2. Why DMVPN is Needed?
Before DMVPN:
- Static VPN tunnels were required between every site
- Configuration was complex (full mesh = too many tunnels)
With DMVPN:
- No need to configure tunnels manually between all sites
- Spokes can dynamically connect to each other
✅ Benefits:
- Scalability (100+ sites easily)
- Reduced configuration
- Dynamic tunnel creation
- Better performance (direct spoke-to-spoke traffic)
3. Technologies Used in DMVPN
DMVPN is built using these core technologies:
1. mGRE (Multipoint GRE)
- Allows one tunnel interface to support multiple destinations
- Hub can connect to many spokes using a single interface
2. NHRP (Next Hop Resolution Protocol)
- Works like “ARP for VPN”
- Maps private IP to public IP
- Helps spokes discover each other
3. IPsec
- Provides encryption and security
- Protects data over the internet
4. Routing Protocol (OSPF/EIGRP/BGP)
- Used to exchange routes dynamically
4. DMVPN Architecture
Hub-and-Spoke Model
- Hub = Central router
- Spokes = Branch routers
Traffic flow:
- Initially: Spoke → Hub → Spoke
- Later (optimized): Spoke → Spoke (direct tunnel)
5. How DMVPN Works (Step-by-Step)
- Spoke router connects to Hub
- Spoke registers its public IP with Hub using NHRP
- Hub stores mapping (private ↔ public IP)
- When one spoke wants to talk to another:
- It asks Hub for destination info
- Hub replies with destination public IP
- Direct tunnel is created between spokes
- Traffic flows directly (secure IPsec tunnel)
6. DMVPN Phases
Phase 1
- Only Hub-and-Spoke communication
- No direct spoke-to-spoke
- Simple but inefficient
Phase 2
- Direct spoke-to-spoke communication
- Routing protocols must support it (no summarization at hub)
Phase 3 (Most Used)
- Best and most scalable
- Uses NHRP Redirect & Shortcut
- Supports route summarization
7. Advantages of DMVPN
✔ Scalable network design
✔ Dynamic tunnel creation
✔ Reduced configuration effort
✔ Secure communication (IPsec)
✔ Direct communication improves performance
8. Disadvantages of DMVPN
❌ Complex initial setup
❌ Requires good understanding of NHRP & routing
❌ Troubleshooting can be difficult
9. Real-Life Example
Imagine:
- Head Office (Hub) in Kolkata
- Branch Offices (Spokes) in Delhi, Mumbai, Chennai
Without DMVPN:
- Each branch needs tunnels to all others
With DMVPN:
- Each branch connects only to Hub
- When needed, branches talk directly
10. Use Cases
- Enterprise WAN networks
- Banking networks
- Retail chains
- Remote office connectivity
History of GRE
The history of GRE (Generic Routing Encapsulation) is closely linked to the early development of the internet and the need to transport different types of network traffic across IP-based networks. In the early 1990s, networks often used multiple protocols such as IP, IPX, and AppleTalk, but many wide-area networks (WANs) and the growing internet primarily supported only IP. This created a challenge: how to carry non-IP protocols or private network traffic across an IP-based infrastructure without changing the underlying network.
To solve this problem, Cisco Systems developed GRE as a simple and flexible tunneling protocol. GRE was later standardized by the Internet Engineering Task Force (IETF) in 1994 with RFC 1701 and RFC 1702, and later updated by RFC 2784. The main goal of GRE was to provide a generic method for encapsulating different types of network layer protocols inside IP packets, allowing them to travel across IP networks transparently.
During its early use, GRE became popular because it allowed organizations to create virtual point-to-point links over the internet or other IP networks. This was especially useful for connecting remote offices and transporting routing protocols that required multicast or broadcast traffic, something that traditional IPsec VPNs could not handle at the time. GRE enabled the use of dynamic routing protocols like OSPF and EIGRP over tunnels, making network design more flexible and scalable.
As networking evolved in the late 1990s and early 2000s, GRE became a foundational technology for many advanced solutions. It was widely used in enterprise networks for site-to-site connectivity and later became a key component in more advanced architectures such as DMVPN (Dynamic Multipoint VPN). However, since GRE itself does not provide encryption or security, it began to be commonly combined with IPsec to ensure secure data transmission over public networks.
Over time, even with the introduction of newer technologies like MPLS and SD-WAN, GRE has remained relevant due to its simplicity and versatility. It continues to be used in various networking scenarios, including tunneling, overlay networks, and VPN solutions. In summary, GRE was developed to overcome protocol limitations in early networks and has since become a fundamental building block in modern networking technologies.
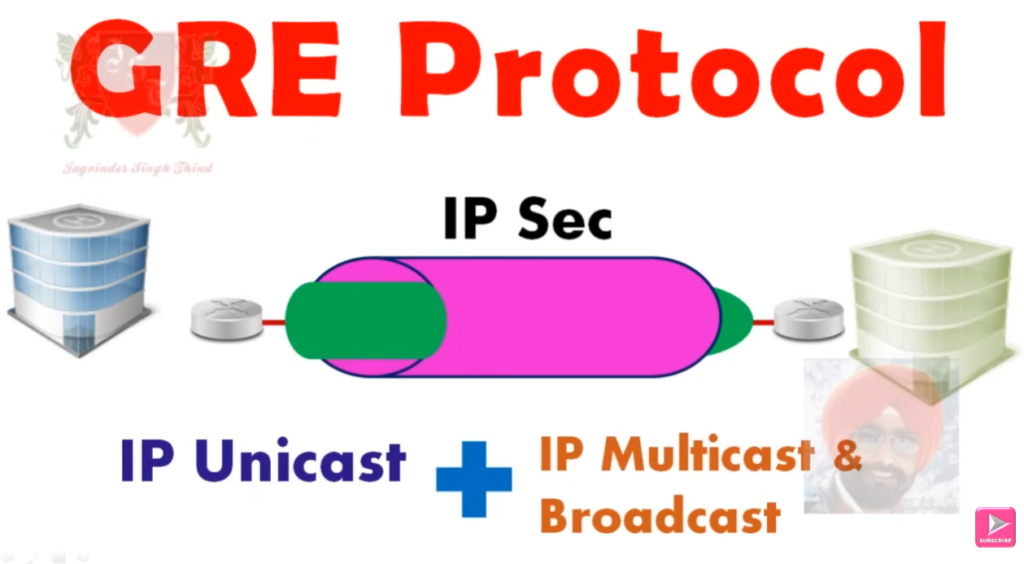
What is GRE


GRE (Generic Routing Encapsulation) is a tunneling protocol developed by Cisco Systems that allows one type of network traffic to be encapsulated inside another, typically inside IP packets. It creates a virtual point-to-point tunnel between two routers over a public or private network like the internet. GRE works by taking the original packet from a private network, adding a GRE header and a new IP header, and sending it across the network. When the packet reaches the destination, the outer headers are removed, and the original packet is delivered. This makes different networks appear as if they are directly connected, even if they are geographically far apart.
One of the main advantages of GRE is its flexibility. It supports multiple protocols, including multicast and broadcast traffic, which allows routing protocols like OSPF and EIGRP to run over the tunnel. This is something standard IPsec VPNs cannot do alone. GRE is also simple to configure and is widely supported in networking devices, making it a popular choice for creating site-to-site connections and overlay networks. Additionally, GRE is a key component in advanced technologies like DMVPN, where dynamic tunnels are required for scalable network design.
However, GRE also has some disadvantages. The biggest limitation is that it does not provide any security features such as encryption or authentication. This means that data sent through a GRE tunnel can be intercepted or modified if it is not protected by additional security mechanisms. Another drawback is the extra overhead caused by encapsulation, which increases packet size and may reduce network performance slightly. Because of these limitations, GRE is often combined with IPsec to provide secure communication over untrusted networks like the internet.
A simple real-world example of GRE is a company with two offices in different cities, such as Kolkata and Delhi. The company can create a GRE tunnel between the routers in both locations so that their internal networks can communicate as if they are on the same local network. For instance, a computer in the Kolkata office can send data to a server in the Delhi office through the GRE tunnel. However, since GRE alone is not secure, if this data travels over the internet, it can be exposed. Therefore, in practical scenarios, GRE is usually used along with IPsec to ensure that the data is encrypted and secure during transmission.
GRE (Generic Routing Encapsulation) is a tunneling protocol developed by Cisco Systems that allows you to carry one network’s traffic inside another by creating a virtual tunnel between two routers.
👉 In short:
GRE wraps (encapsulates) original data into a new IP packet and sends it across networks like the internet.
Is GRE Secure?
❌ No, GRE is NOT secure by itself
- No encryption
- No authentication
- Data can be seen or modified
👉 To make it secure:
✔ Use GRE + IPsec (adds encryption and security)
Final One-Line Answer
GRE = Tunneling protocol (not secure), needs IPsec for security.
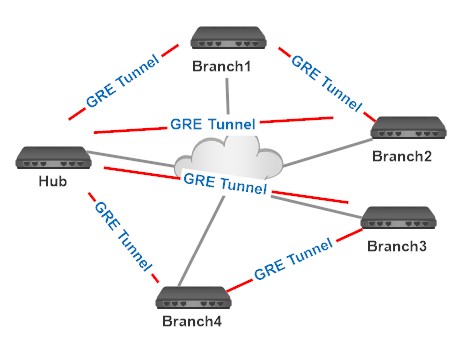
After DMVPN – MGRE

DMVpn = Dynamic Multipoint VPN | MGRE
- Introduced by cisco 2000.
- Automatically created VPN tunnels.
- DMVPN supports point to multipoint tunnels.
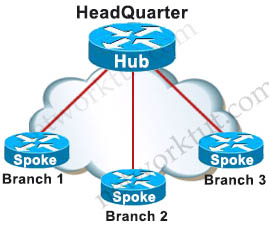
Hub is central location like HQ of any office and Spokes are branch offices of any network.
- Keep the low cost, less configurations and increasing flexibilty & scalibilty.
- DMVPN a popular choice for connecting different sites using regular Internet connections.
- It’s a great backup or alternative to private networks like MPLS VPN.
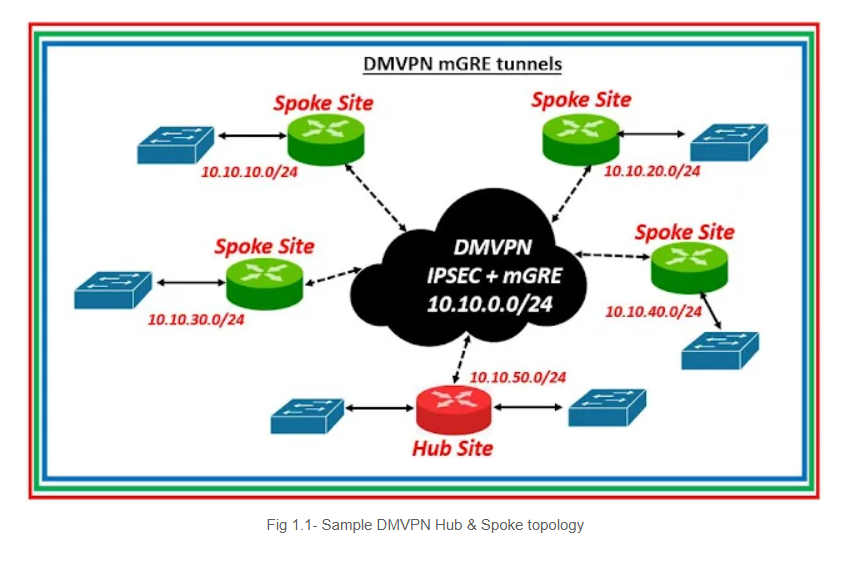
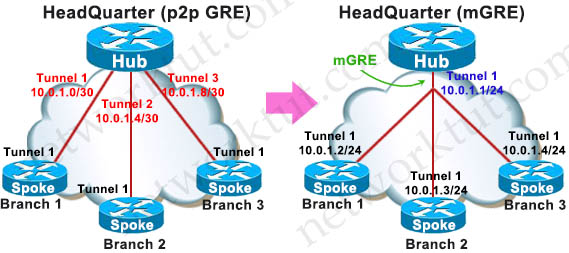
- Multipoint GRE (mGRE)
- NHRP (Next Hop Resolution Protocol)
- Routing (RIP, EIGRP, OSPF, BGP, etc.)
- IPsec (not required but recommended)
GRE Multipoint, there will be only one tunnel interface on each router.
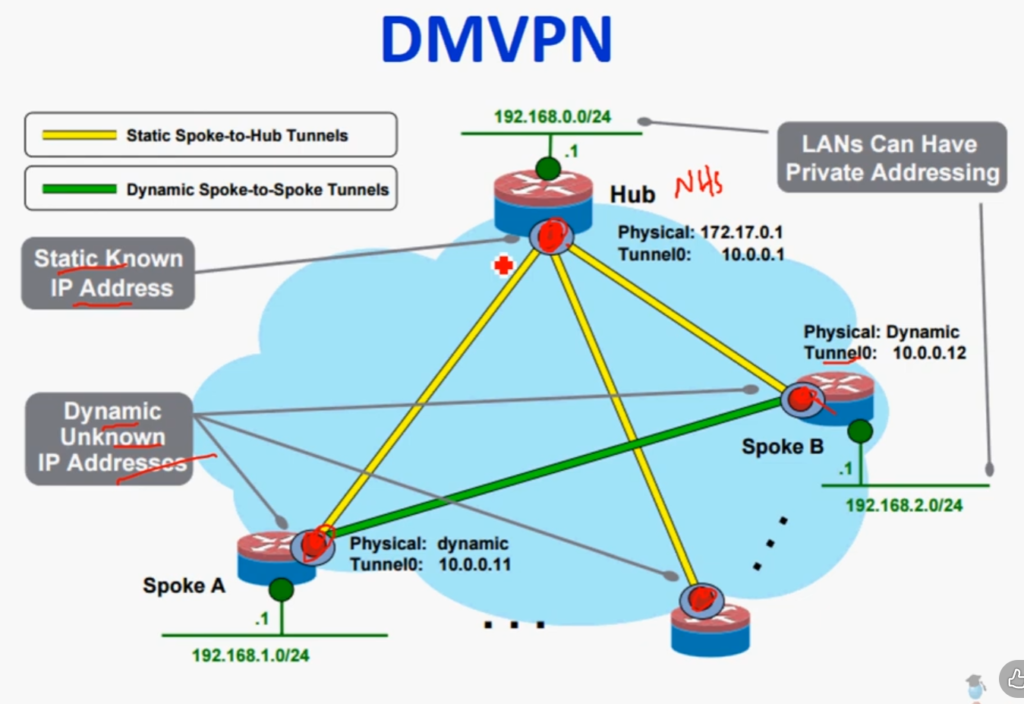
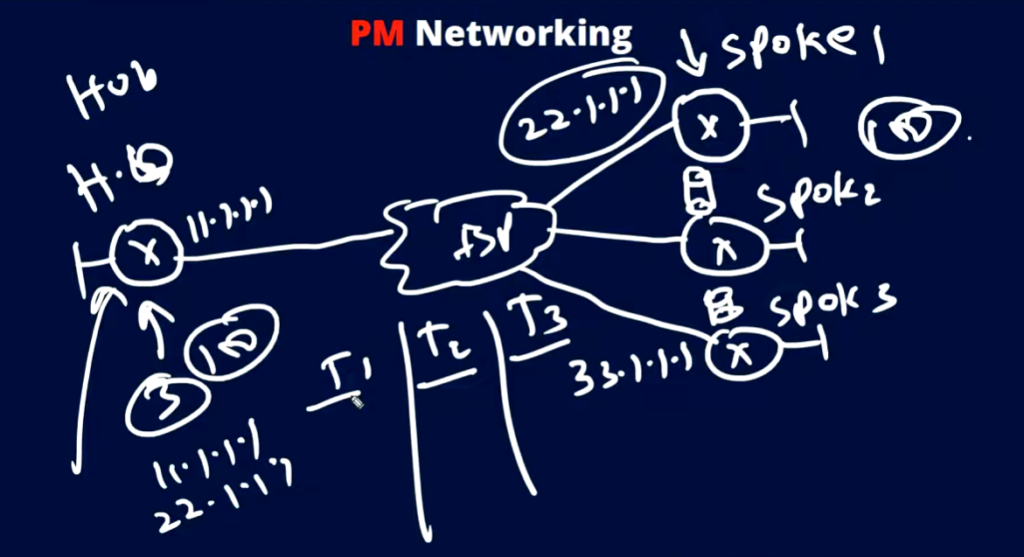
NHRP (Next Hop Resolution Protocol)
- One router will be the NHRP server.
- All other routers will be NHRP clients.
The NHRP server keeps track of all public IP addresses in its cache. When one router wants to tunnel something to another router,
it will request the NHRP server for the public IP address of the other router.

After Recieving the NHRP Registeration Requests, NHRP


DMVPN Phases Explained
DMVPN has three main phases — each offering progressively more efficient and flexible communication between network sites (spokes).
Phase 1 – Hub-and-Spoke
Key Points:
- All traffic flows through the hub router.
- GRE tunnels are built between spokes and hub only.
- No direct spoke-to-spoke tunnels.
- NHRP is used by spokes to register with the hub.
Traffic Flow:
Spoke ➡️ Hub ➡️ Spoke
Pros:
- Simple to configure.
- Good for small networks.
Cons:
- Inefficient: All data between spokes must go through the hub.
- Bottleneck risk at hub.
Phase 2 – Spoke-to-Spoke with Static Routing
Key Points:
- Direct spoke-to-spoke tunnels are allowed.
- Spokes dynamically discover each other using NHRP.
- Hub helps resolve the next-hop IP address for spoke-to-spoke connections.
- Still uses GRE tunnels and optionally IPsec.
- Routing protocol still sees hub as next-hop (static or with “next-hop-self”).
Traffic Flow:
Spoke ➡️ Spoke (via dynamic GRE tunnel, but routing goes through hub)
Pros:
- More efficient traffic flow.
- Reduces load on hub.
Cons:
- More complex configuration.
- Some routing limitations due to next-hop handling.
Phase 3 – Full Dynamic Spoke-to-Spoke with Dynamic Routing
Key Points:
- Most scalable and flexible phase.
- True spoke-to-spoke communication with dynamic GRE tunnels.
- Hub initially routes traffic, then redirects spokes to each other using NHRP Redirect/Shortcut messages.
- Works with dynamic routing protocols like EIGRP, OSPF, BGP using Next-Hop unchanged (real next hop, not hub).
Traffic Flow:
Spoke ➡️ Hub (initially) ➡️ Redirect ➡️ Spoke (direct)
Pros:
- Fully dynamic, scalable for large networks.
- Best performance with dynamic routing.
Cons:
- Most complex to configure.
- Requires router support for NHRP redirection.
Phase Comparison Table
| Feature | Phase 1 | Phase 2 | Phase 3 |
|---|---|---|---|
| Spoke-to-Spoke Tunnels | ❌ No | ✅ Yes | ✅ Yes |
| NHRP Used | ✅ Yes | ✅ Yes | ✅ Yes |
| Routing Type | Static/Dynamic | Static/Dynamic (Next-hop-self) | Dynamic (real next-hop) |
| NHRP Redirect/Shortcut | ❌ No | ❌ No | ✅ Yes |
| Hub Traffic Load | 🔺 High | 🔽 Reduced | 🔽 Lowest |
| Complexity | ⭐ Easy | ⭐⭐ Moderate | ⭐⭐⭐ Complex |
Real-World Use Case Mapping
- Phase 1: Small branch networks with low inter-branch traffic.
- Phase 2: Medium networks needing direct branch-to-branch communication.
- Phase 3: Large enterprises with high scalability and dynamic routing needs.

Differences (GRE vs mGRE)
GRE (Generic Routing Encapsulation) and mGRE (Multipoint GRE) are both tunneling technologies developed by Cisco Systems, but they differ mainly in how they form tunnels and how many endpoints they support.
GRE (Point-to-Point GRE)
GRE creates a point-to-point tunnel between exactly two routers. In this setup, you must manually configure the source and destination IP addresses for each tunnel. This means if you have multiple branch sites, you need to create separate tunnels for each connection. For example, if a company has offices in Kolkata, Delhi, and Mumbai, and all need to communicate directly, multiple GRE tunnels must be configured between each pair of routers. This increases configuration complexity and does not scale well for large networks.
mGRE (Multipoint GRE)
mGRE is an advanced version of GRE that allows a single tunnel interface to support multiple destinations (multipoint). Instead of defining a fixed destination, the tunnel can dynamically connect to many endpoints. This is mainly used in DMVPN, where one hub router connects to multiple spoke routers using a single tunnel interface. It reduces configuration effort and allows dynamic communication between multiple sites without creating separate tunnels for each pair.
Key Differences (GRE vs mGRE)
| Feature | GRE | mGRE |
|---|---|---|
| Tunnel Type | Point-to-Point | Multipoint |
| Number of Peers | One-to-One | One-to-Many |
| Configuration | Manual for each tunnel | Single interface for many |
| Scalability | Low | High |
| Use Case | Small networks | Large networks (DMVPN) |
| Dynamic Tunnels | No | Yes |
Simple Example
👉 GRE Example:
- Kolkata ↔ Delhi → 1 tunnel
- Kolkata ↔ Mumbai → 1 tunnel
- Delhi ↔ Mumbai → 1 tunnel
➡️ Total many tunnels needed
👉 mGRE Example (DMVPN):
- Kolkata (Hub) connects to all branches using one tunnel interface
- Delhi, Mumbai, Chennai connect dynamically
➡️ Fewer configs, scalable
Final One-Line
GRE = One-to-One tunnel (static)
mGRE = One-to-Many tunnel (dynamic, used in DMVPN)
GRE Cisco LAB
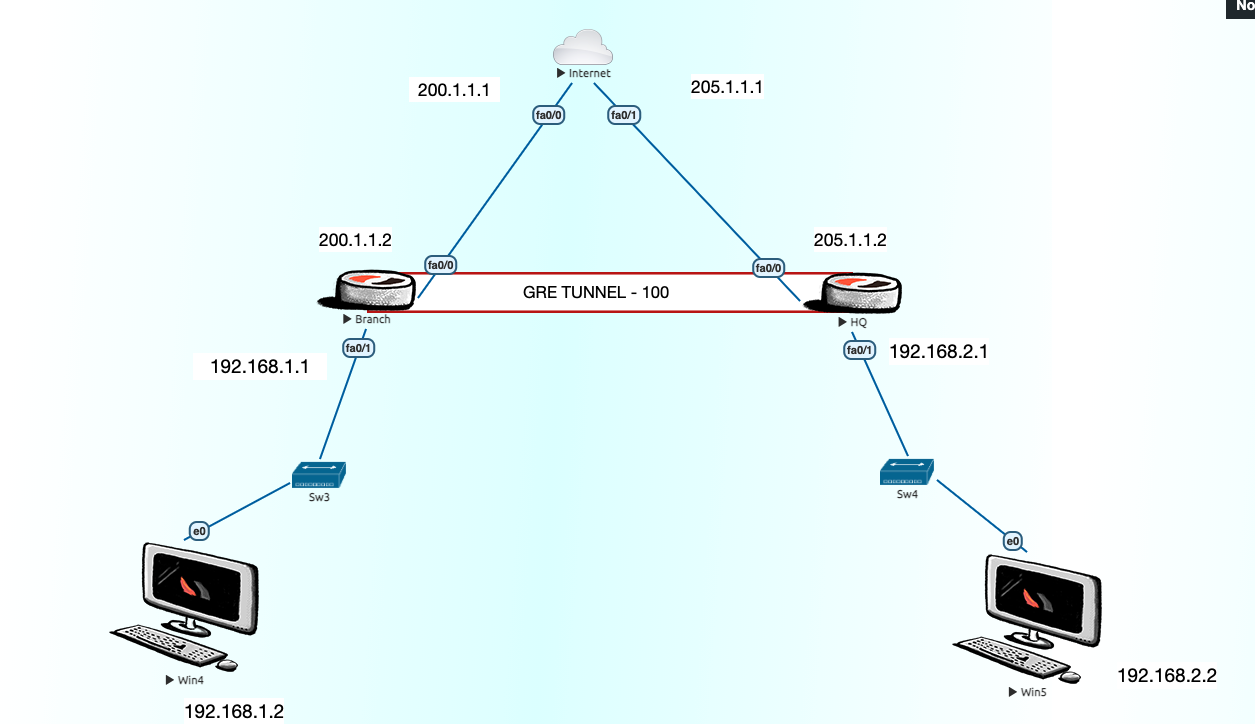
Internet-ISP
int fa0/0
ip add 200.1.1.1 255.255.255.0
no sh
int fa0/1
ip add 205.1.1.1 255.255.255.0
no sh
int lo 0
ip add 8.8.8.8 255.255.255.0
BR---
conf t
hostname BR
int fa0/0
ip add 200.1.1.2 255.255.255.0
no sh
int fa0/1
ip add 192.168.1.1 255.255.255.0
no sh
ip route 0.0.0.0 0.0.0.0 200.1.1.1
access-list 1 permit 192.168.1.0 0.0.0.255
ip nat inside source list 1 interface fa0/0 overload
int fa0/1
ip nat inside
int fa0/0
ip nat outside
ip dhcp pool NWKINGS
default-router 192.168.1.1
HQ---
conf t
hostname HQ
int fa0/0
ip add 205.1.1.2 255.255.255.0
no sh
int fa0/1
ip add 192.168.2.1 255.255.255.0
no sh
ip route 0.0.0.0 0.0.0.0 205.1.1.1
access-list 1 permit 192.168.2.0 0.0.0.255
ip nat inside source list 1 interface fa0/0 overload
int fa0/1
ip nat inside
int fa0/0
ip nat outside
ip dhcp pool NWKINGS
default-router 192.168.2.1
network 192.168.2.0 255.255.255.0
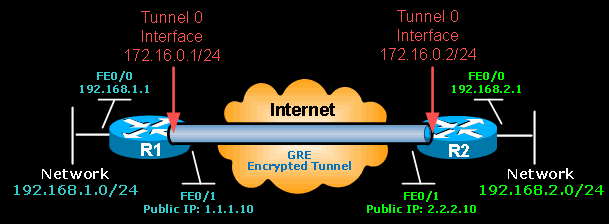
GRE TUNNEL
-----------
Branch
interface tunnel 100
ip add 192.168.3.1 255.255.255.0
tunnel source fa0/0
tunnel destination 205.1.1.2
HQ
interface tunnel 100
ip add 192.168.3.2 255.255.255.0
tunnel source fa0/0
tunnel destination 200.1.1.2
					BR
conf t
ip route 192.168.2.0 255.255.255.0 192.168.3.2

or
router eigrp 1
network 192.168.1.0
network 192.168.3.0
no auto-summary

HQ
conf t
ip route 192.168.1.0 255.255.255.0 192.168.3.1

or
router eigrp 1
network 192.168.2.0
network 192.168.3.0
no auto-summary
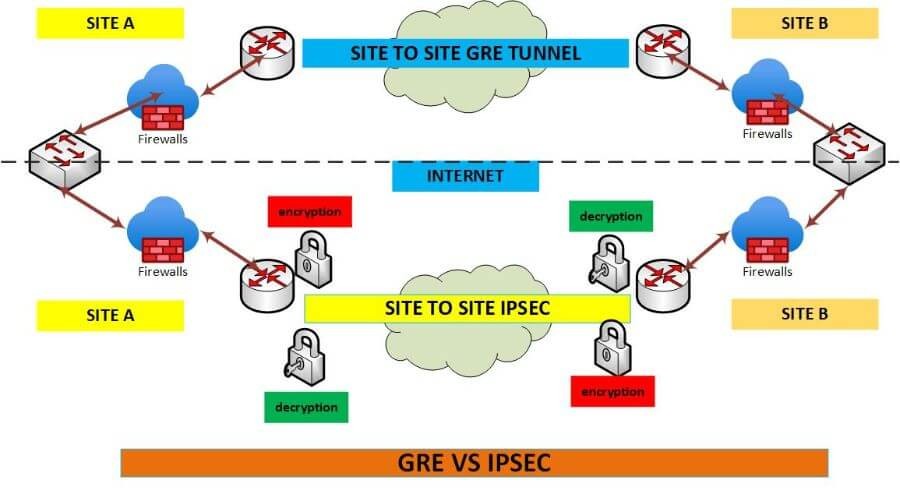
GRE OVER IPSEC

What is GRE over IPsec?
GRE over IPsec =
👉 GRE tunnel (for flexibility) + IPsec (for security)
How it works:
- Data enters GRE tunnel → encapsulated
- GRE packet is then encrypted by IPsec
- Sent securely over the Internet
- At destination → decrypted → decapsulated
					LAN ---- Router1 ===(GRE Tunnel)=== Router2 ---- LAN
                 \___ IPsec Encryption ___/
Why use GRE over IPsec
Because it solves limitations of both:
| Feature | GRE | IPsec | GRE over IPsec |
|---|---|---|---|
| Encryption | ❌ No | ✅ Yes | ✅ Yes |
| Multicast support | ✅ Yes | ❌ No | ✅ Yes |
| Dynamic routing (OSPF/EIGRP) | ✅ Yes | ❌ Limited | ✅ Yes |
| Security | ❌ No | ✅ Yes | ✅ Yes |
6Advantages
- Supports routing protocols (OSPF, EIGRP, BGP)
- Supports multicast traffic
- Provides strong encryption
- Ideal for site-to-site VPN
Disadvantages
- Extra overhead (GRE + IPsec headers)
- More CPU usage
- Slightly lower performance
Real-world Example
Suppose:
- Office A and Office B are connected via Internet
- You want to run OSPF routing between them securely
👉 Solution:
- Create GRE tunnel (for OSPF)
- Protect it using IPsec (for security)
					How To Configration GRE-VPN Tunnel ?
....................................

-------R1-Router-HQ-Branch------------
Step #1 interface tunnel 1
Step #2 ip address 40.40.40.1 255.255.255.0
Step #3 tunnel source fa0/0
Step #4 tunnel destination 203.202.2.2 <R2-Public-IP>


----------R2-Router-Branch-Office----------
Step #1 interface tunnel 1
Step #2 ip address 40.40.40.2 255.255.255.0
Step #3 tunnel source fa0/0
Step #4 tunnel destination 203.202.100.100 <R1-Public-IP>


-------Optional-------
Step #5 int tunnel 0
Step #6 ip mtu 1400
Step #7 ip tcp adjust-mss 1360


How To Configration GRE-VPN IP-Sec Policy
.........................................
---------R1-Router-HQ-Office-------------
Step #1 crypto isakmp policy 10
Step #2 authentication pre-share
Step #3 encryption 3des
Step #4 hash md5
Step #5 group 2
Step #6 exit
Step #7 crypto isakmp key saikat address 203.202.100.100
<Remote Public IP -R2-Router-Branch-Office>
Step #8 crypto ipsec transform-set saikat123 esp-sha-hmac esp-3des
Step #9 mode transparent
Step #10 exit
Step #11 crypto ipsec profile CCNP
Step #12 set transform-set saikat123

-----R2-Router-Branch-Office--------
Step #1 crypto isakmp policy 10
Step #2 authentication pre-share
Step #3 encryption 3des
Step #4 hash md5
Step #5 group 2
Step #6 exit
Step #7 crypto isakmp key saikat address 203.202.100.100 <Remote Public IP -R1-Router-HQ-Office>
Step #8 crypto ipsec transform-set saikat123 esp-sha-hmac esp-3des
Step #9 mode transparent
Step #10 exit
Step #11 crypto ipsec profile CCNP
Step #12 set transform-set saikat123


IP-SEC Policy Apply GRE-VPN Tunnel Interface 1 ?
................................................
Step #5 int tunnel 1
Step #6 tunnel protection ipsec profile CCNP
DM-VPN Configuration
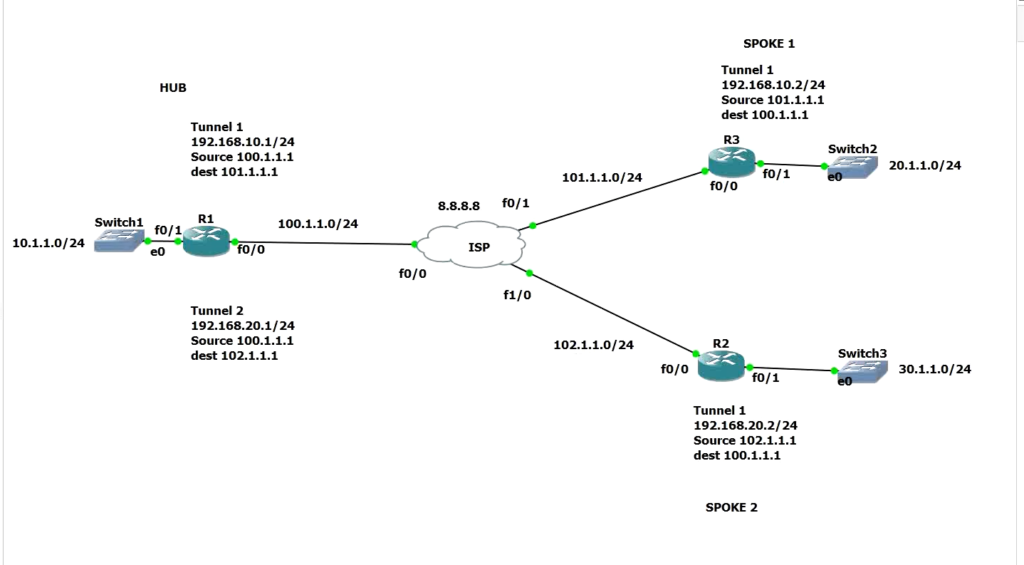
					How To Configration DM-VPN Hub Phase - 1 - Branch Router ?

------R1-Router-Hub-HQ-Office---------
Step #1 interface tunnel 1
Step #2 ip address 40.40.40.1 255.255.255.0 <Hub-Tunnel-Private-IP-Gateway>
Step #3 tunnel source fa0/0
Step #4 tunnel mode gre multipoint
Step #5 ip nhrp network id 123
Step #6 ip nhrp map multicast dynamic
Step #7 no ip split-horizon eigrp 10


How To Configration DM-VPN Hub Phase - 2 - Branch Router ?
........................................................
-R1-Router-Hub-HQ-Office-------
Step #1 interface tunnel 1
Step #2 ip address 40.40.40.1 255.255.255.0 <Hub-Tunnel-Private-IP-Gateway>
Step #3 tunnel source fa0/0
Step #4 tunnel mode gre multipoint
Step #5 ip nhrp network id 123
Step #6 ip nhrp map multicast dynamic
Step #7 no ip split-horizon eigrp 10
Step #8 no ip next hop self eigrp 10 <Spoke To Spoke Reach With Out Hub >


How To Configration DM-VPN Spoke Phase - 1 - Branch Router ?
..........................................................
-R2-Router-Spoke-2----------
Step #1 interface tunnel 1
Step #2 ip address 40.40.40.2 255.255.255.0
Step #3 tunnel source fa0/0
Step #4 tunnel destination 203.202.2.2 <R1-Hub-Public-IP>
Step #5 ip nhrp network id 123
Step #6 ip nhrp nhs 40.40.40.1 <Hub-Tunnel-Private-IP-Gateway>
Step #7 Exit


How To Configration DM-VPN Spoke Phase - 2 - Branch Router ?
............................................................
-------------R2-Router-Spoke-2----------------------
Step #1 interface tunnel 1
Step #2 ip address 40.40.40.2 255.255.255.0
Step #3 tunnel source fa0/0
Step #4 tunnel mode gre multipoint
Step #5 ip nhrp network id 123
Step #6 ip nhrp map multicast 203.202.2.2 <Hub-Public-IP>
Step #7 ip nhrp nhs 40.40.40.1 <Hub-Tunnel-Private-IP-Gateway>
Step #8 ip nhrp map 40.40.40.1 203.202.2.2 <Hub-Public-IP>


How To Configration DM-VPN Duel Hub Phase - 2 - Branch Router ?
...............................................................
Step #01 Same Configration DM-VPN Hub <Changes From Spoke Router For Duel Hub NHS Server>


How To Configration DM-VPN Spoke Phase - 2 Duel Hub 2 Nhs Server - Branch Router ?
................................................................................
-------R1-Router-Spoke-1---------
Step #1 interface tunnel 1
Step #2 ip address 40.40.40.2 255.255.255.0
Step #3 tunnel source fa0/0
Step #4 tunnel mode gre multipoint
Step #5 ip nhrp network id 123
Step #6 ip nhrp map multicast 203.202.2.2 <Hub-Static-Public-IP-1>
Step #7 ip nhrp map multicast 203.202.2.3 <Hub-Static-Public-IP-2>
Step #8 ip nhrp nhs 40.40.40.1 <Hub-Tunnel-Private-IP-Gateway-Server-1>
Step #9 ip nhrp nhs 40.40.40.5 <Hub-Tunnel-Private-IP-Gateway-Server -2>
Step #10 ip nhrp map 40.40.40.1 203.202.2.2 <Hub-Public-IP>
Step #11 ip nhrp registration timeout 5
Step #12 ip nhrp holdtime 20


------Showing--Commnd----DM---VPN--------
Step #1 show ip nhrp nhs
Step #2 clear ip nhrp
Step #2 show ip nhrp
Step #3 show run int tunnel 0
Step #4 show dmvpn
Step #5 clear dmvpn session


How To Configration DM-VPN Hub Phase - 2-3 - Branch Router ?
...........................................................

-R1-Router-Hub-HQ-Office------
Step #1 interface tunnel 1
Step #2 ip address 172.168.1.1 255.255.255.0 <Hub-Tunnel-Private-IP-Gateway>
Step #3 tunnel source fa0/0
Step #4 tunnel mode gre multipoint
Step #5 ip nhrp network id 123
Step #5 ip nhrp authentication saikat
Step #5 ip nhrp holdtime 300
Step #6 ip nhrp map multicast dynamic
Step #7 no ip split-horizon eigrp 100
Step #8 no ip next hop self eigrp 100 <Spoke To Spoke Reach With Out Hub >
router eigrp 100
network 172.168.0.0
network 10.0.0.0

Phase 3
interface Tunnel0
ip nhrp redirect


How To Configration DM-VPN Spoke Phase - 2-3 ?
Step #1 interface tunnel 1
Step #2 ip address 172.168.1.2 255.255.255.0
Step #3 tunnel source fa0/0
Step #4 tunnel mode gre multipoint
Step #5 ip nhrp network id 123
Step #6 ip nhrp authentication saikat <Password Protect Hub Router>
Step #7 ip nhrp holdtime 300
Step #8 ip nhrp map 172.168.1.1 203.202.2.2 <Tunnel Gateway> <Hub-Public-IP>
Step #9 ip nhrp nhs 172.168.1.1 <Hub-Tunnel-Private-IP-Gateway>
Step #10 ip nhrp map multicast 203.202.2.2 <Hub-Public-IP-This Commnd For Eigrp Routing Hello Exchange

Go to Hub Router Then Commnd <show ip nhrp>
Output- Spoke Registration Details NBMA address
router eigrp 100 <Spoke Router Configure Eigrp>
network 172.168.0.0
network 20.0.0.0
interface Tunnel0
ip nhrp shortcut


Ipsec With DMVPN Commmnd
------------------------
HUB
crypto isakmp policy 10
hash md5
authentication pre-share
group 2
encryption 3des
exit
crypto isakmp key cisco address 0.0.0.0 0.0.0.0
crypto ipsec transform-set TSET esp-des esp-md5-hmac
mode transport
crypto ipsec profile TST
set transform-set TSET
interface tunnel 1
tunnel protection ipsec profile TST

Spoke-1
same Commnd For Spoke Router <HUB Config Commnd>

Spoke-2
same Commnd For Spoke Router <HUB Config Commnd>

Checking Commnd
show crypto ipsec sa