Disk Management in Linux
One of the most important parts of keeping a stable and optimized Linux system is effectively managing storage. As a system administrator, developer, or casual Linux user, effective disk management helps keep your system up and running without suffering from performance bottlenecks, data corruption, or surprise failures.
Linux provides a plethora of command-line utilities and GUI-based tools for disk management, making it one of the most versatile operating systems for storage handling. With these tools, disk partitioning, formatting, resizing, mounting, and monitoring are done in a single click. Whereas Windows is dependent on GUI, Linux offers strong command-line based disk management commands that allow more control and automated tools.
By the end of the article, you will know exactly how to handle disks and storage devices on Linux like a PRO! Let’s begin.
Disk Management in Linux Operating System
Disk Management for Linux
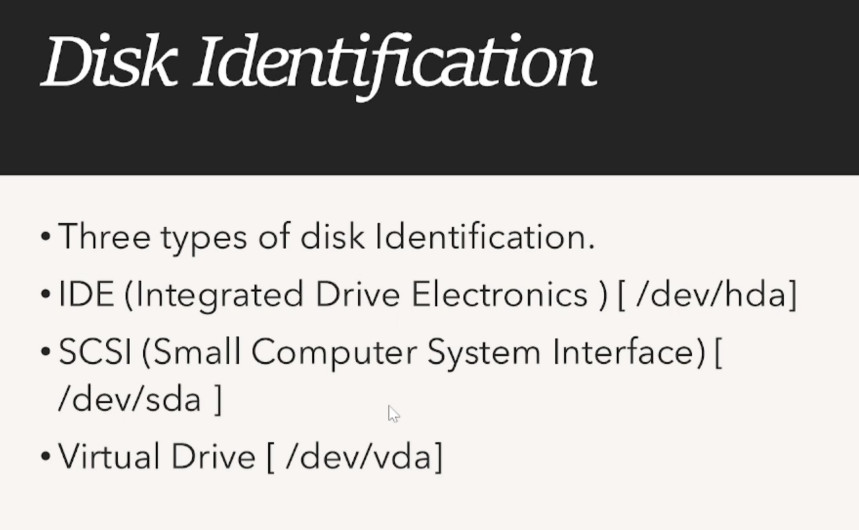
In Linux, everything is a file (of disks and partitions validators). Does it have a file folder in it? Well, everything has a file in the dev folder in your device. For example:
- /dev/sda – First hard drive
- /dev/sdb – Second hard drive
- /dev/sdc1 – First partition on the second hard drive
Add to these the fact that Linux attaches its partitions to the filesystem using a system of mount points versus Windows, which assigns drive letters (C:, D:, E:, etc.).
What We Need to Know About Partitions and Filesystems
A partition is a logical division of a hard drive. Each partition is formatted with a particular file system, such as:
- ext4 – Extensible Fourth Extended Filesystem; default for most Linux distributions
- XFS- Ideal for high-performance computing
- Btrfs — Advanced filesystem with snapshot features built in
Depending on how partitions are created, they may be primary, extended, or logical.
How To Mount And Unmount Disks In Linux
On Windows, drives are automatically mounted; whereas in Linux, you need to manually mount a partition so you can access it. We do that using the mount command. Unmounting a device (using umount) is not only a good idea, it is necessary when you are done with it to avoid data loss.
Basic Disk Management Commands in Linux
That said, Linux has several command-line tools to help manage disks. These include:
Checking Disk Space and Usage
Available disk space is shown using the df command:
df -h
To see disk usage at the directory level
du -sh /home
Viewing Disk and Partition Details
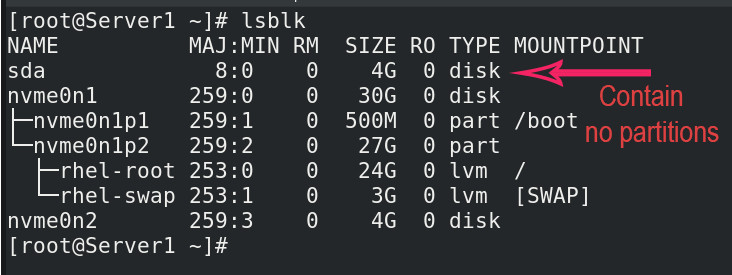
To list all attached storage devices
lsblk
To show partition tables for all the drives:
fdisk -l
Partition Creation and Formatting
To create a new partition:
sudo fdisk /dev/sda
To create the ext4 file system on the partition:
mkfs.ext4 /dev/sda3
Disk Manager for Linux with GUI
Not comfortable with command line usage? There are graphical Linux disk manager tools that all you need to do is search for it.
GNOME Partition Editor (GParted)
GParted is one of the most widely used GUI tools for handling partitions on Linux. It allows users to:
- Add, remove, resize, and move partitions
- Manage partitions with different file systems
- Check health of disk and fix file system errors
To install GParted:
sudo apt install gparted -y
GNOME Disks
Overall, it is a simple, user-friendly tool to manage partitions and disks. Various Linux distributions come with this package pre-installed. It allows users to:
- Partitions to mount and unmount
- Benchmark disk performance
- Make and restore drive images
Browsing these folders, you can keep any data now. You can see usage of disk with the following command.
Browsing these folders, you can keep any data now. You can see usage of disk with the following command.
df –HT
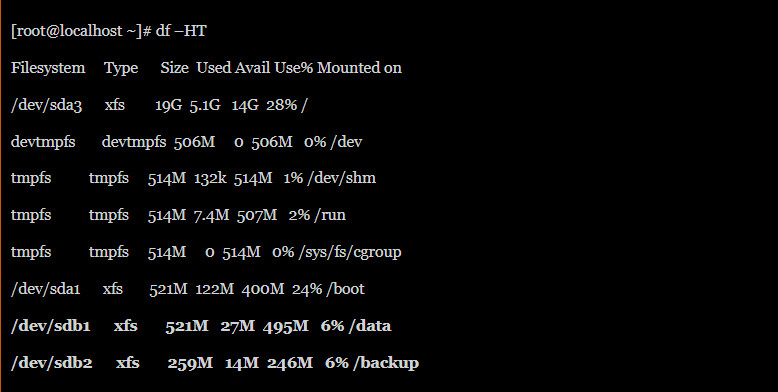
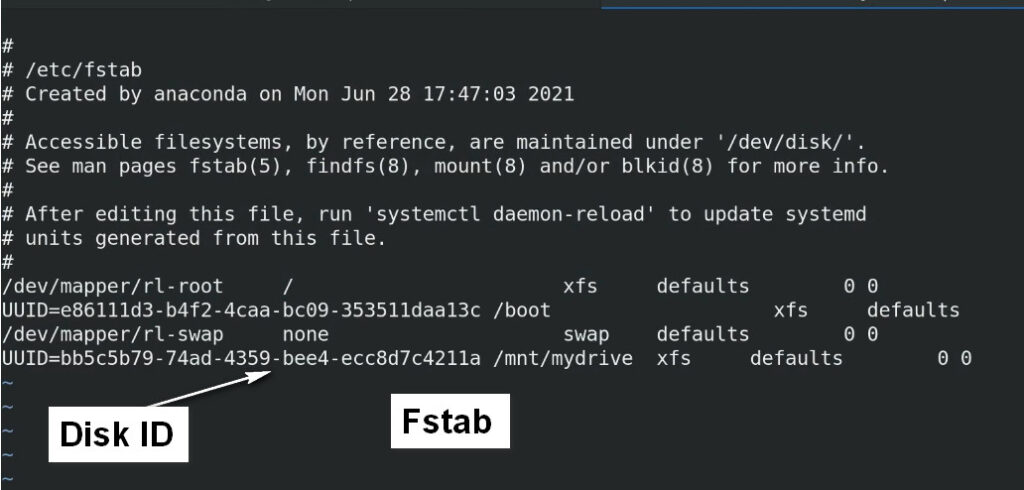
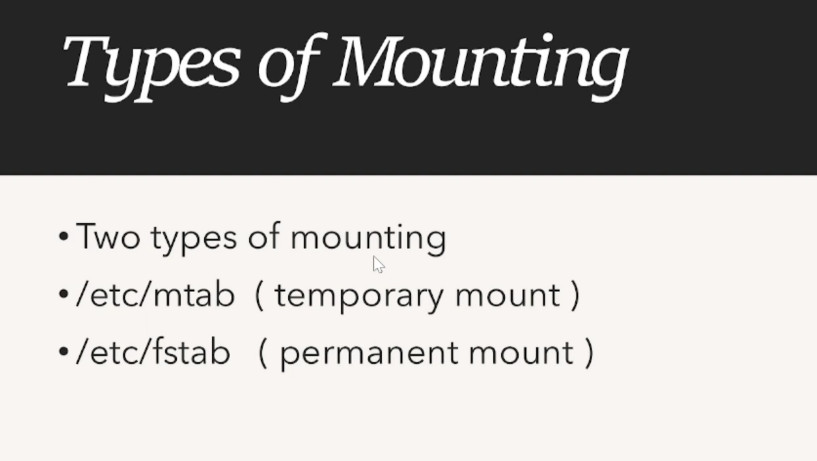
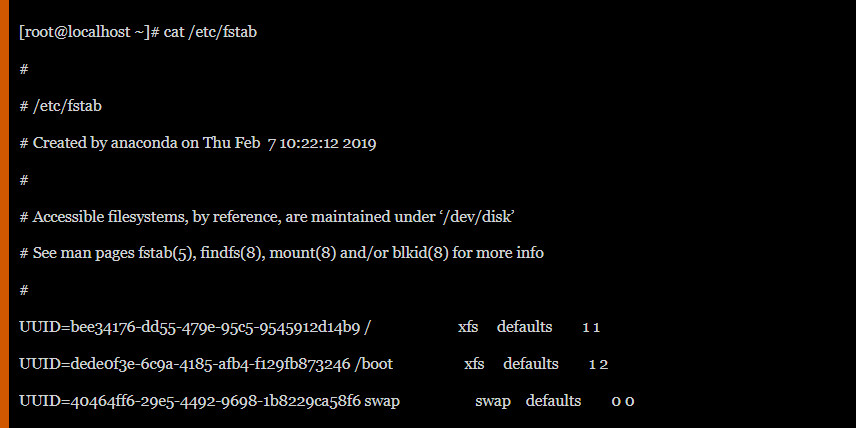
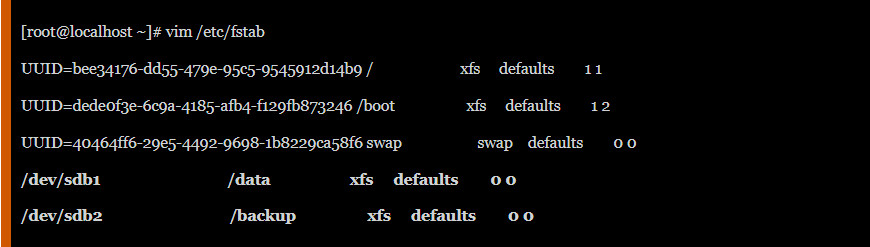
At this stage, our mounted partitions are temporary. If our Operating System gets restarted, these mounted directory will be lost. So, we need to do permanent mount. To do permanent mount, we have to put entry in fstab file. You can see current fstab entry with the following command.
Disk Partitioning is the process of dividing a disk into one or more logical areas, often known as partitions, on which the user can work separately. It is one step of disk formatting. If a partition is created, the disk will store the information about the location and size of partitions in the partition table. With the partition table, each partition can appear to the operating system as a logical disk, and users can read and write data on those disks. The main advantage of disk partitioning is that each partition can be managed separately.
Why do we need it?
- To upgrade Hard Disk (to incorporate a new Hard Disk into the system)
- Dual Booting (Multiple Operating Systems on the same system)
- Efficient disk management
- Ensure backup and security.
- Work with different File Systems using the same system.
How to Partition Disks in Linux?
(For the purpose of demonstration Cent OS 7 and VMware are used in the screenshots of the article.)
In order to successfully partition a disk and to make it useful, we need to ensure that we have completed the below four steps, regardless of the Operating system and Hardware of the system.
- Attach the disk to the proper port.
- Create partitions in the disk.
- Create a file system on the partition.
- Mounting the file systems
Attaching Disk:
This step points to physically connecting the disk to the system. The below screenshot specifies the system configuration of my CentOS 7.
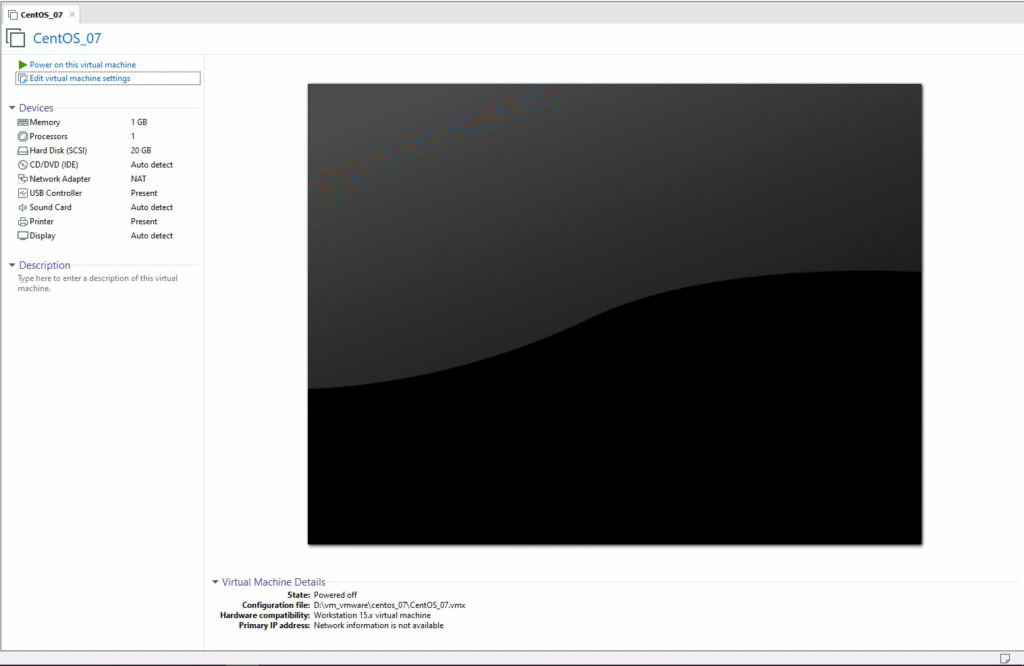
It is clearly specified that the system has only 20 GB of Hard Disk. After installing the necessary software and downloading some movies, I found that the system Hard Disk is almost completely used up. Now I will have two options in front of me, either buy a new system with a higher Hard Disk capacity or upgrade the existing one. Most of you will go for the second option, just like me, unless the system is very old. Let us upgrade the system with an additional 20 GB of Hard Disk.
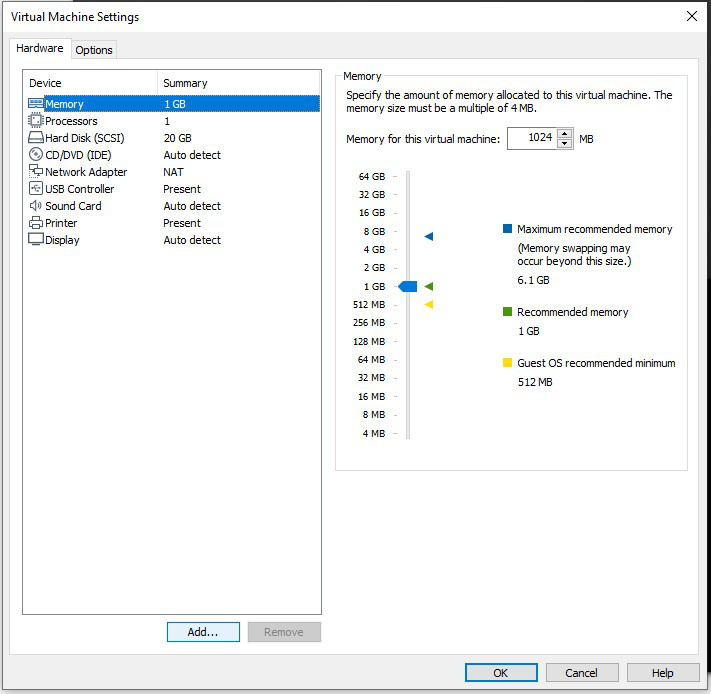
In order to attach the new virtual Hard Disk in VMware, click on the “Edit virtual machine settings” link and choose the Add option on the next window.
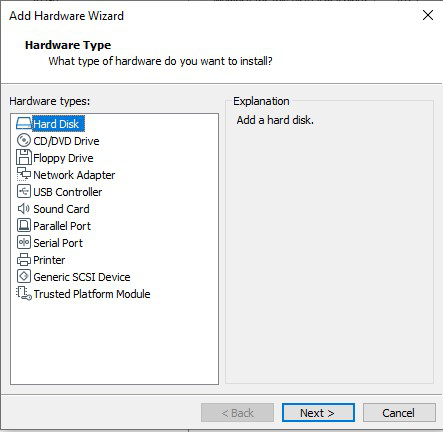
Choose the Hard Disk option and move forward.
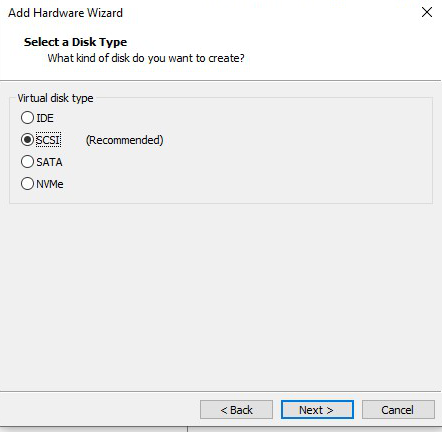
Choose the recommended disk type. (SCSI is recommended here since the Operating System that I am using is CentOS)
Complete the attachment of the disk by specifying the required size of Hard Disk needed and choosing the recommended selections.
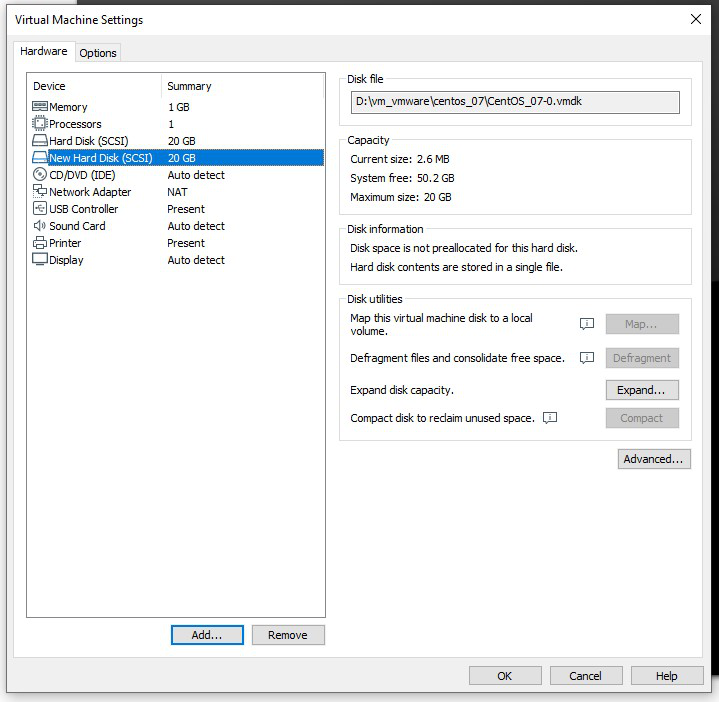
The final configuration shows that our system has a new Hard Disk of 20 GB size. The newly added Hard disk is of no use to our system unless we complete the remaining steps.
Create Partitions in the Disk
Power on the system and log in to the system. Ensure that you are logged in as root (or any user of the sudo group). Once the system UI comes up, open the Terminal. To view the available Hard Disks in our system, use the command lsblk or cat /proc/partitions. Both commands will display the same results, but in different ways.
lsblk
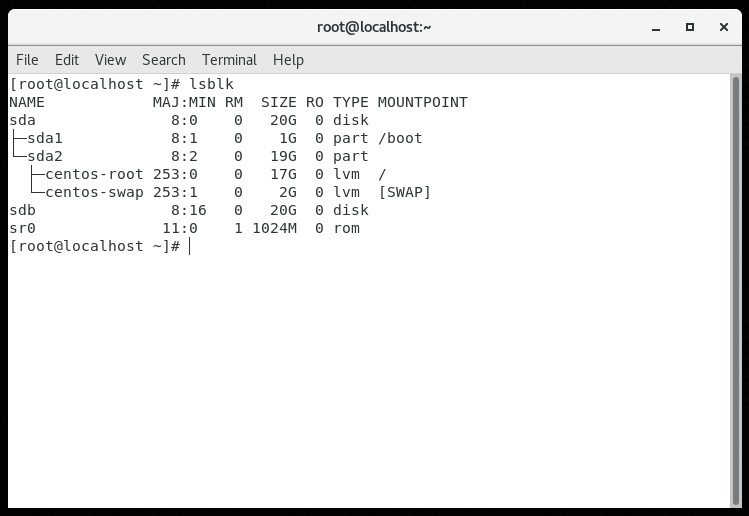
We can find that the system has two disks -> sda and sdb. sda is our older Hard Disk. We can say so, as that disk is already partitioned as sda1 and sda2. We can partition the disk using CLI as well as GUI. We will demonstrate CLI based partitioning in this article.
fdisk -l

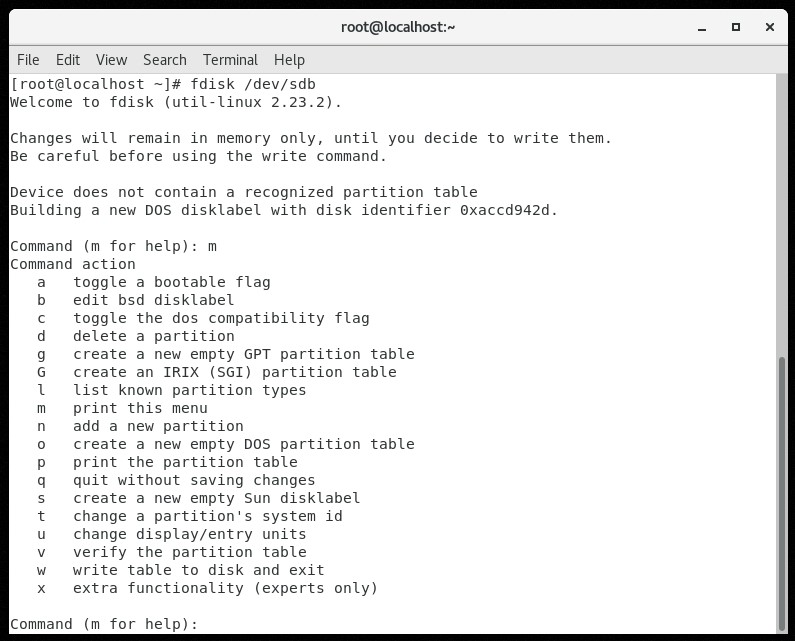
We found that the Hard Disk that we are going to partition can be found at /dev/sdb. Use the command.
fdisk /dev/sdb
It will take us to a different console where we can use the partitioning specific commands. We will be concentrating more on the following commands (or flags).
					m  -> help
p  -> print partition table
n  -> create new partition
d  -> delete partition
q  -> quit without writing
w  -> write to disk
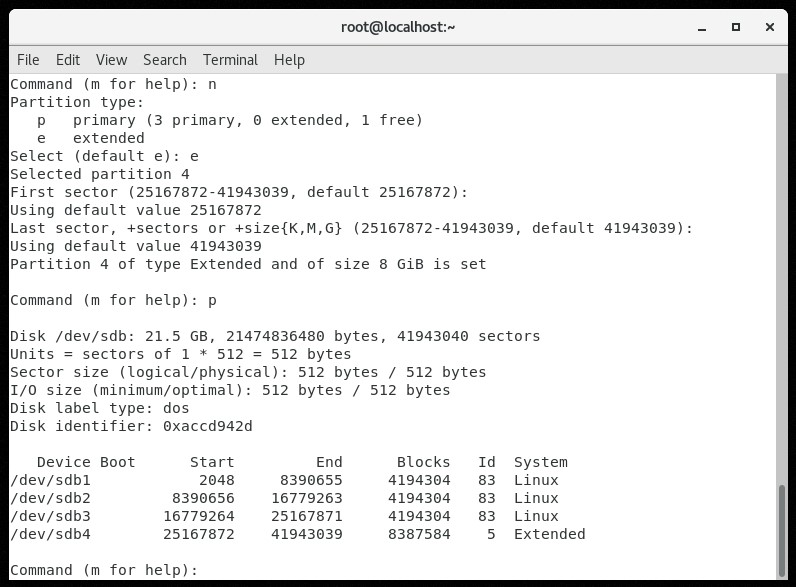
While partitioning, we should be aware of certain factors.
- On a disk, we can have a maximum of four partitions.
- The partitions are of two types.
- Primary
- Extended
- Extended partitions can have logical partitions inside it.
- Among the four possible partitions, the possible combinations are.
- All 4 primary partitions
- 3 primary partitions and 1 extended partition
n
This will create a new partition. Specify the type of partition using the p for primary and e for extended.
p
This will create a primary partition. The console will prompt for the number to be given to the partition. We can give any number from 1 to 4. Let me give 1. Then choose the starting position (cylinder) of partition 1. Press enters to start partitioning from the beginning of the disk.
You can specify the size of the partition in two ways, either as the last cylinder number or by specifying the size directly. If we need partition1 to be of 4 GB size (as a whole number), use.
+4G
Pressing enter will create our 1st partition successfully. Follow the same steps, until we create 4 partitions on our newly attached disk.

We have created 3 primary partitions and an extended partition in the disk. The extended partition, as the name suggests, can be further divided into multiple logical partitions. Once 4 partitions are created, no more partitions can be created on the same disk. We can check whether we have done the partitioning in the right way by printing the partition table using the p command. If everything is as per the expectation, then write the changes to the disk using the w command, else use the q command to quit without writing.
Create a File System on the Partition
Computers use particular kinds of file systems to store and organize data on media, like Hard Disk, CD, DVD, etc. The commonly used Linux file systems are ext2, ext3, ext4, JFS, ReiserFS, XFS, FAT (usually in Windows OS) and B-treeFS. Inorder to specify the file system to be used in each partition, we can use the mkfs (make file system) command.
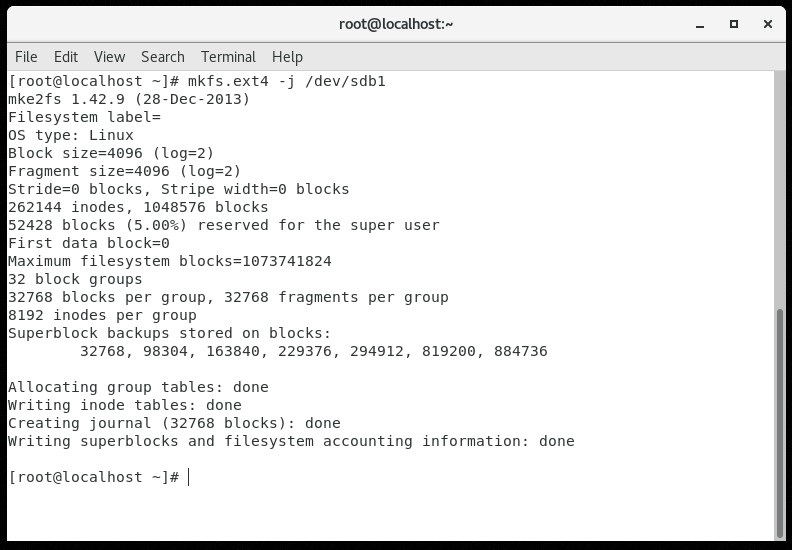
mkfs.ext4 -j /dev/sdb1
What this command does is that it will make the first partition’s file system to be ext4 (format the partition to ext4). -j flag is used to allow/support journaling. It helps in throwing errors into the journal, in case of system failure.
mkfs.fat /dev/sdb2
This command is used to format the 2nd partition available in /dev/sdb2 to the FAT file system. Even though we formatted the disks, it is of no use to us, unless we mount it on a directory.
Mounting the file systems
Let us make three directories, for mounting the first, second, and third partition using the mkdir (make directory) command
					mkdir /mount1
mkdir /mount2
mkdir /mount3
Mounting the formatted partitions can be achieved using the mount command.
					mount /dev/sdb1 /mount1
mount /dev/sdb2 /mount2
mount /dev/sdb3 /mount3
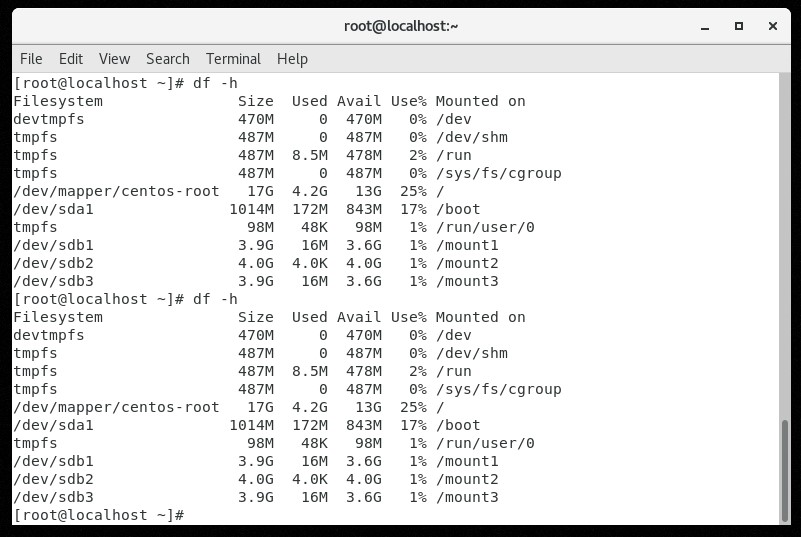
The first part of the command is the keyword mount, followed by the partition and the directory to which the mounting is to be done. To view the disk details, we can use the df command. h flag helps to display the output in a human-readable format.
df -h
Unmounting a disk can be achieved by unmount command.
unmount /dev/sdb2
All these mountains are temporary in nature. Once we reboot the system, mounting will be reverted. To make it permanent, we must edit the File System Table of the Operating System. We should be highly careful whirling with this file. A small error in this file can cause the system to be unbootable and can make the entire system to be useless. Let us open the file in any editor (I will be using the nano editor).
nano /etc/fstab
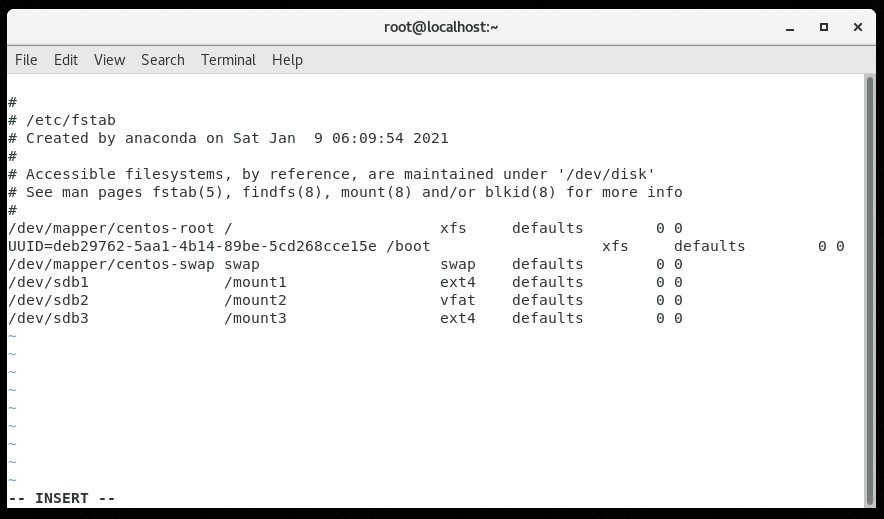
Add our mounted file systems’ details in the file, in the order.
mounted partition [ space ] directory [ space ] file system type [ space ] defaults [ space ] 0 [ space ] 0
Save the file and come back to the terminal. Mount the partitions permanently using the mount -a command
mount -a
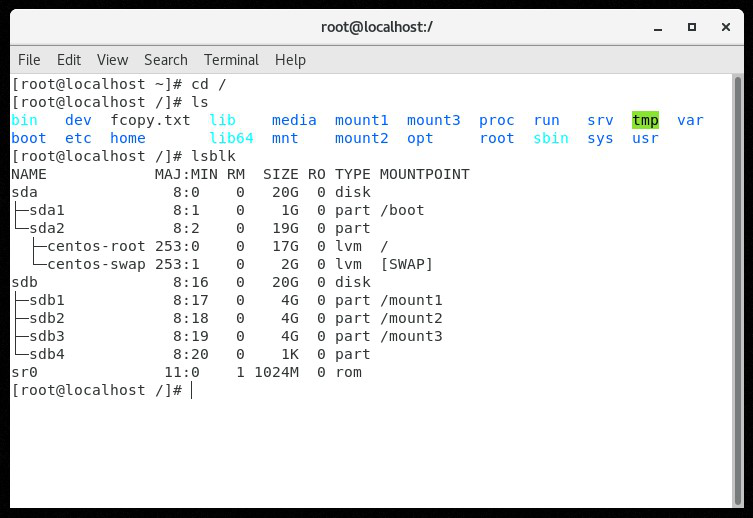
We can verify whether our partitions are available for our purposes by visiting the root folder of the Operating System (since we have mounted the partitions on the mount1, mount2, mount3 directories in the root folder). We can also verify the existence of our newly created partitions using the lsblk command.
lsblk
We can find our partitions in the table, each of 4 GB size.
Disk Management Commnd
How to check hdd?
sudo fdisk -l
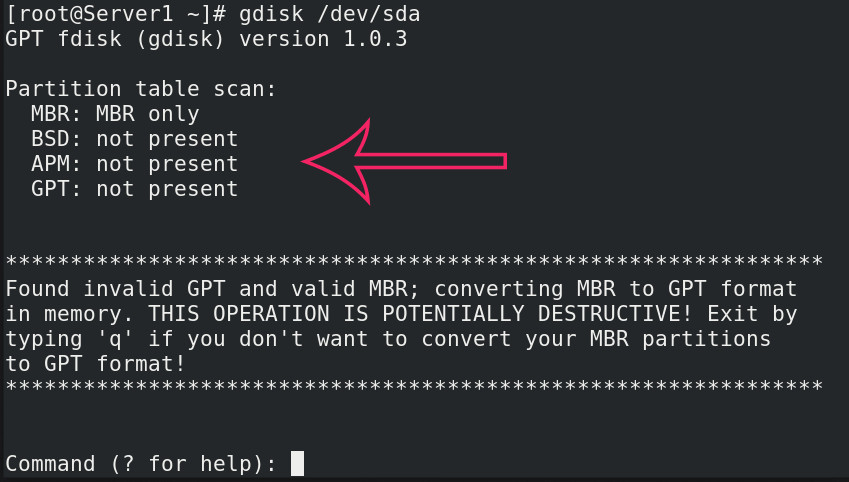
How to check partition MBR/GPT?
gdisk /dev/sda
lsblk
How to create partition ?
sudo fdisk /dev/sda
help- m
n
enter
enter
+20G
p- print
w-save
fdisk -l
How to format partition ?
mkfs.ext4 /dev/sda
lsblk -f -chcek format or not partition
How to mount partiton?
sudo mount /dev/sda /<mount folder>
check - sudo mount
lsblk
How To Cheking Linux Ubantu Disk Status?
.........................................
lsblk
fdisk -l
df -hT
lsblk -f <Cheking Formating Partition >
mount -av <cheking Mounting>
How To Check Partition Style MBR or GPT
					fdisk -l /dev/sda

parted /dev/sda print <Checking HDD Information>
parted /dev/sda mklavel msdos <MBR>
parted /dev/sda mklavel gpt <gpt>